30.2 Troubleshooting Access Gateway
-
Section 30.2.5, Useful Troubleshooting Tools for Access Gateway Service
-
Section 30.2.7, Understanding the Authentication Process of Access Gateway Service
-
Section 30.2.8, Issue While Accelerating the Ajax Applications
-
Section 30.2.9, Accessing Lotus-iNotes through Access Gateway Asks for Authentication
-
Section 30.2.13, Issues while Changing Management IP Address in Access Gateway Appliance
-
Section 30.2.14, Issue While Adding Access Gateway in a Cluster
30.2.1 Useful Troubleshooting Files
Access Gateway Service consists of two main modules, a Gateway Manager module that runs on top of Tomcat and a Proxy Service module that runs on top of Apache. Figure 30-1 illustrates these modules and the communication paths that Access Gateway Service has with other devices.
Figure 30-1 Access Gateway Service Modules
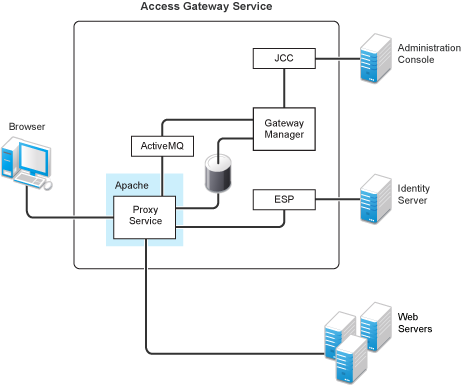
Proxy Service: This component runs as an instance of Apache and is responsible for controlling access to the configured protected resources on web servers. Low-level errors are reported in the Apache logs. Some higher-level errors are also reported to the files in the amlogging/logs directory.
ESP: The Embedded Service Provider is responsible for handling all communications with Identity Server and is responsible for the communication that verifies the authentication credentials of users. Log entries for this communication process, including errors, are logged in the catalina.out file and the stdout.log file.
ActiveMQ: This module is used for real-time communication between Administration Console and the Proxy Service. Errors generated from the Gateway Manager to the ActiveMQ module are logged to the Tomcat logs. Errors generated from the Proxy Service to the ActiveMQ module are logged to the Apache error logs.
JCC: The Java Communication Controller is the interface to Administration Console. It handles health, statistics, configuration updates, and purge cache requests from Administration Console. It is also responsible for certificate management. Errors generated between the JCC module and the Gateway Manager are logged to the ags_error.log file. Errors generated between Administration Console and the JCC module are logged to the jcc-0.log.x file
Gateway Manager: This module is responsible for handling communication from JCC to the Proxy Service. It also writes the configuration commands to the Apache configuration files and the Proxy Service configuration file on disk. Errors generated while performing these tasks are logged to the ags_error.log file.
For more information about these various log files, see the following:
Apache Logging Options for Gateway Service
The Proxy Service module of Access Gateway Service is built on top of Apache as an Apache application. This module handles the browser requests for access to resources and is responsible for sending authorized requests to the Web servers. Entries for these events are logged to the Apache log files.
/var/log/novell-apache2/
For more information, see sections Ignoring Some Standard Messages and Section 21.4.1, Managing Access Gateway Logs.
Ignoring Some Standard Messages
Apache cannot detect the proper use of domain-based multi-homing with wildcard certificates, which allows multiple proxy services to share the same SSL port. If you create reverse proxy services that are configured for domain-based multi-homing with SSL, Apache considers this a possible port conflict and logs it as a warning in the error.log file.
The error messages look similar to the following:
[<time and date stamp>] [warn] Init: SSL server IP/port conflict:
dbmhnsnetid.dsm.cit.novell.com:443 (C:/Program
Files/Novell/apache/conf/vhosts.d/dbmhNS-NetID.conf:18) vs.
magwin1430external.dsm.cit.novell.com:443 (C:/Program
Files/Novell/apache/conf/vhosts.d/magMaster.conf:18)

[<time and date stamp>] [warn] Init: SSL server IP/port conflict:
magdbmheguide.dsm.cit.novell.com:443 (C:/Program
Files/Novell/apache/conf/vhosts.d/dbmhMagEguide.conf:18) vs.
magwin1430external.dsm.cit.novell.com:443 (C:/Program
Files/Novell/apache/conf/vhosts.d/magMaster.conf:18)
You can ignore these errors because Access Gateway Service knows how to handle the traffic and send the packets to the correct proxy service.
For more information about Apache log files, see “Log Files”.
Modifying the Logging Level for the Apache Logs
If the Apache error log file does not contain enough information, you can modify the log level and the types of messages written to the file.
WARNING:If you set the log level to debug, the size of the file can grow quickly, consume all available disk space, and crash the system. If you change the log level, you need to carefully monitor available disk space and the size of the error log file.
To modify what is written to the Apache error log file:
-
Change to the Apache configuration directory.
/etc/opt/novell/apache2/conf
-
Open the httpd.conf file.
-
Find the LogLevel directive and set it to one of the following:
debug, info, notice, warn, error, crit, alert, emerg
-
Save the file.
-
Restart Apache:
/etc/init.d/novell-apache2 restart OR rcnovell-apache2 restart
-
(Optional) If you set the level to debug and the log file still does not supply enough information, see Section 30.2.4, Enabling Debug Mode and Core Dumps.
Access Gateway Service Log Files
See Section 21.5.3, Access Gateway Appliance and Access Gateway Service Logs. You can gather these log files into a single zip file:
30.2.6 Solving Apache Restart Issues
When you make configuration changes and update Access Gateway, Administration Console uses the JCC channel to send the configuration changes to Access Gateway. Figure 30-2 illustrates this flow.
Figure 30-2 Sending Configuration Updates to Access Gateway
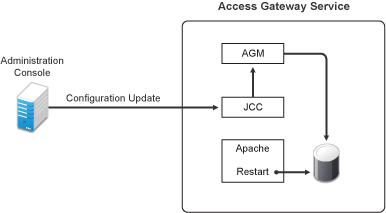
JCC sends the configuration changes to Access Gateway Manager (AGM), which writes the Apache configuration to disk. Apache is sent a restart command, which causes Apache to read the new configuration, then Apache validates the configuration.
-
If the configuration is valid, Apache starts.
-
If the configuration is invalid, Apache fails to start.
If Apache fails to start after a configuration change, roll back to the previous configuration. Restore a backup if you have one, or use Administration Console to manually remove the modifications that have caused the problem. If this does not solve the problem, try the following:
Removing An Advanced Configuration Settings
Apache fails to start when it discovers a syntax error in any of the advanced options.
-
Click .
-
To reset all options to their default values, delete all options from the text box.
-
Click .
When you return to the Advanced Options page, all options are set to their default values.
-
Click.
-
To reset all options to their default value, delete all options from the text box.
-
Click .
When you return to the Advanced Options page, all options are set to their default values.
-
Repeat these steps for each proxy service that has advanced options configured.
-
Update Access Gateway.
Viewing the Logged Apache Errors
Apache generates and logs errors when it fails to start. A summary is displayed on the health page.
-
In Administration Console Dashboard, click .
The page displays a summary of the problem from the Apache error log file. For Access Gateway Service, information from the rcnovell-apache2.out file might also be displayed.
-
To view the entire contents of the Apache error log file, open a terminal window to Access Gateway.
-
Change to the following directory and open the Apache error log file.
/var/log/novell-apache2
-
iew the contents of the rcnovell-apache2.out file.
-
If you still do not have enough information to solve the configuration problem, continue with Viewing the Errors as Apache Generates Them.
Viewing the Errors as Apache Generates Them
Apache allows only a few errors to be sent to log files. To view all the errors, use the following procedure to display the errors in a terminal window.
-
Copy the config.xml file in the current directory to a temporary location. Access Gateway allows only one XML file to reside in the current directory.
/opt/novell/nam/mag/webapps/agm/WEB-INF/config/current
-
Copy the XML file from the pending directory to the current directory and rename it config.xml.
The file in the pending directory has a long numeric name.
-
Change the ownership of the file from root to novlwww:novlwww.
-
Use one of the following commands to restart Tomcat:
/etc/init.d/novell-mag restart OR rcnovell-mag restart
-
Restart Apache by using the following command:
/etc/init.d/novell-apache2 restart OR rcnovell-apache2 restart
Apache uses the terminal window to write the errors it discovers as it tries to process the config.xml file.
-
At Administration Console, fix the configuration problems, then update Access Gateway.
The ActiveMQ Module Fails to Start
The Active MQ module is used for real-time communication between Administration Console and Access Gateway Service. Real-time communication is needed for commands such as purging cache, gathering statistics, and updating health. Figure 30-3 illustrates this communication flow.
Figure 30-3 Real-Time Communication
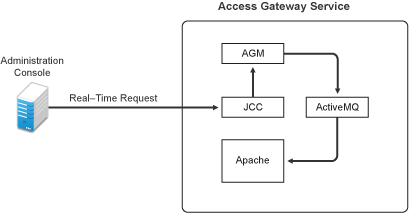
When the ActiveMQ module fails to start, you cannot apply any configuration changes, and Access Gateway does not set a listener for the configured port.
To start the module, it must be able to resolve the listening IP address to a DNS name. To install an Access Gateway Service, the machine must have a DNS name and the IP address must resolve to this name.
30.2.7 Understanding the Authentication Process of Access Gateway Service
When a user requests access to a protected resource, the request can be in one of the following states:
-
No session or cookie is established, because this is the user’s first request.
-
The user’s session is a public session because only public resources have been accessed.
-
A session is established, the user is authenticated, and the requested resource is from the same cookie domain and uses the same contract.
-
A session is established, the user is authenticated, and the requested resource is from the same cookie domain but uses a different contract or the contract has expired.
-
A session is established, the user is authenticated, but the request does not’ have a session cookie because the resource is on a different cookie domain.
-
A session no longer exists or does not’ exist on the proxy servicing the request.
Access Gateway Service must handle these conditions and others as it determines whether it needs to forward a login request to the Embedded Service Provider or use the user’s existing authentication credentials. The following flow charts take you through this process:
Figure 30-4 Identifying the Requester
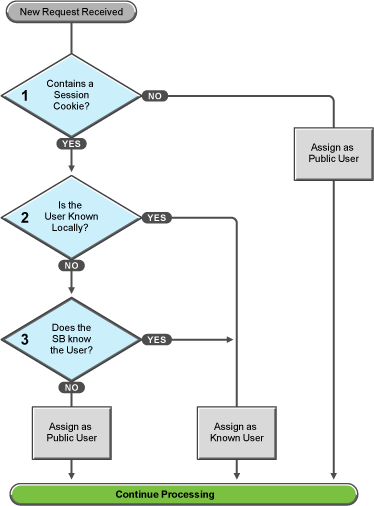
These first steps determine whether Access Gateway knows the user that has submitted the request. In decision point 1, Access Gateway checks for a session cookie in the request.
-
If the request contains a session cookie, the session cookie needs to be validated. Processing continues with the task in decision point 2.
-
If the request does not contain a session cookie, the user is unknown and is assigned as a public user. Access Gateway continues processing with the tasks outlined in Figure 30-5.
When the request contains a session cookie, Access Gateway checks its local user store for a user that matches the session cookie. Each Access Gateway in the cluster maintains its own list of known users.
-
If the session cookie matches one of the locally known users, the user is assigned that identity. Access Gateway continues with the tasks outlined in Figure 30-5.
-
If the session cookie does not’ match one of the locally known users, Access Gateway needs to know if one of the other Access Gateways in the cluster knows the user. Processing continues with the task in decision point 3.
Access Gateway queries the session broker to see if one of the other Access Gateways in the cluster knows this user.
-
If a match is found, the user is assigned that identity. Access Gateway continues with tasks outlined in Figure 30-5.
-
If a match is not found, the user is unknown and is assigned as a public user. Access Gateway continues with the tasks outlined in Figure 30-5.
Figure 30-5 Determining the Type of Request
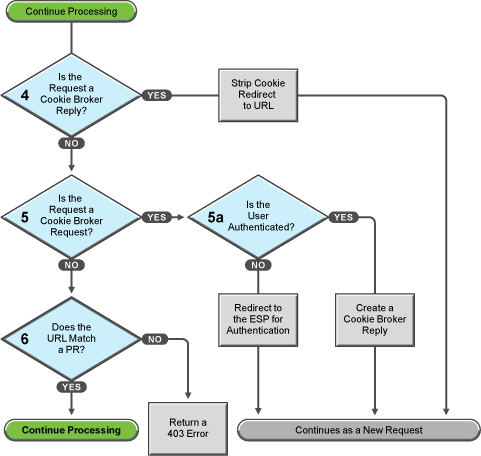
Access Gateway examines the request to determine what type of request it is.
If the request is a cookie broker reply, Access Gateway strips the cookie from the URL and redirects the request to the URL. The redirect is handled as a new request, and this new request flows to the task in decision point 6, where the URL is examined.
If the request is not’ a cookie broker reply, Access Gateway examines the request to see if it is a cookie broker request. If it is a cookie broker request, Access Gateway determines whether the user is authenticated with the contract required by the protected resource.
-
If the user is authenticated, Access Gateway creates a cookie broker reply. This reply is handled as a new request, and flows to the task in decision point 4.
-
If the user is not authenticated, the request is redirected to the Embedded Service Provider (ESP). The ESP interacts with Identity Server to authenticate the user. Identity Server, the ESP, and the reverse proxy all maintain authentication information. The ESP returns a new request, which flows to the task in decision point 6, where the URL is examined.
If the URL does not match a URL of a protected resource (PR), Access Gateway returns an HTTP 403 error to the user.
If the URL in the request matches a URL of a protected resource, Access Gateway needs to examine the protection type assigned to the resource. Access Gateway continues with the tasks outlined in Figure 30-6.
Figure 30-6 Determining the Protection Type Assigned to the Resource
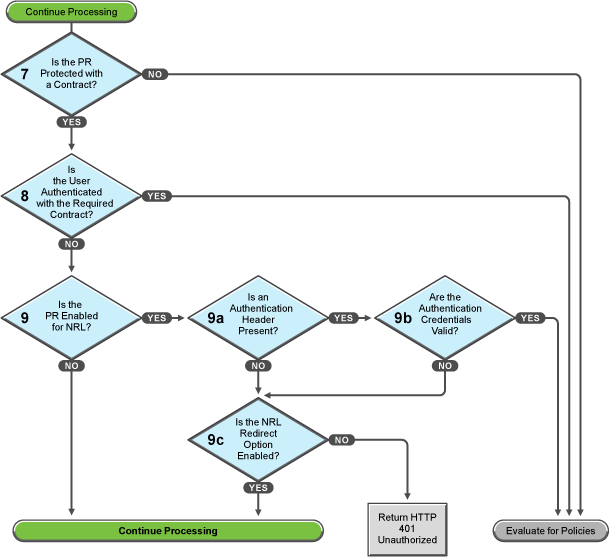
You configure a protected resource as a public resource when an authentication procedure/contract is not assigned to the protected resource. In decision point 7, Access Gateway checks to see if a contract has been assigned to the protected resource.
-
If the protected resource has not been assigned a contract, Access Gateway is finished with its authentication checks and continues with policy evaluation.
-
If the protected resource has been assigned a contract, Access Gateway continues with the task in decision point 8.
For a user to gain access to a resource protected by a contract, the user must have authenticated with that contract, or if the contract is configured for it, the user can authenticate with another contract as long as the contract is of a equal or higher level.
-
If the user is authenticated with the required contract, Access Gateway is finished with its authentication checks and continues with policy evaluation.
-
If the user is not authenticated with the required contract, Access Gateway continues with the task in decision point 9.
Before the user is prompted for credentials, Access Gateway needs to know whether the protected resource has been enabled for non-redirected login (NRL).
-
If the resource has not been configured for non-redirected login, Access Gateway continues with the tasks outlined in Figure 30-7.
-
If the resource has been configured for non-redirected login, Access Gateway needs to examine the request for an authentication header and determine whether the header is valid. Processing continues with the tasks outlined in decision points 9a, 9b, and 9c.
If the request does not contain an authentication header, Access Gateway needs to determine how non-redirected login has been configured. On the Authentication Procedure configuration page, you can select to enable the option.
-
If this option is enabled, Access Gateway continues with the tasks outlined in Figure 30-7.
-
If this option is disabled, Access Gateway returns an HTTP 401 unauthorized message.
If the request does contain an authentication header, Access Gateway must verify that the credentials are valid.
-
If the authentication credentials are valid, Access Gateway is finished with its authentication checks and continues with evaluating the protected resource for policies.
-
If the authentication credentials are not valid, the process is the same as if the request did not contain an authentication header and continues with the task in decision point 9c.
Figure 30-7 Evaluating the Cookie Domain
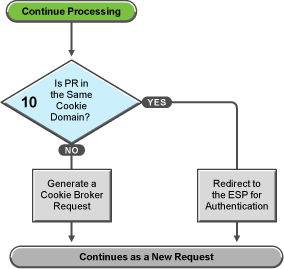
If you have configured your Access Gateway to use multiple domain-based proxy services, you can configure them to share the same cookie domain (domains of development.novell.com and support.novell.com can share the cookie domain of novell.com) or configure them so that they cannot share a cookie domain (domains of a.slc.com and b.provo.com cannot share a cookie domain).
When Access Gateway reaches the task in decision point 10, it has determined that the protected resource requires a contract and that user is not authenticated with that contract.
-
If the protected resource is in the same cookie domain, Access Gateway redirects the request to the Embedded Service Provider (ESP). The ESP interacts with Identity Server to authenticate the user. The ESP returns a new request, which flows to the task in decision point 6, where the URL is examined.
-
If the protected resource is in a different cookie domain, Access Gateway generates a cookie broker request. This new request flows to the task in decision point 5.