3.4 Identity Servers Cluster
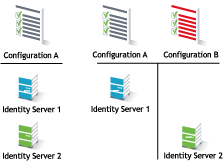
After you install an Identity Server, you must create a cluster configuration to configure the Identity Server. Even if you have only one Identity Server, you must assign it to a cluster configuration to configure it. If you have multiple Identity Servers, you can create multiple configurations and assign different Identity Servers to them as shown in Figure 3-3.
Figure 3-3 Identity Server Configurations
A cluster of Identity Servers must reside behind a Layer 4 (L4) switch. Clients access the virtual IP address of the cluster presented on the L4 switch, and the L4 switch alleviates server load by balancing traffic across the cluster. If your Identity Server is on the same machine as an Administration Console, and your second Identity Server is on the same machine as a secondary Administration Console, ensure that you are familiar with Installing Secondary Versions of the Administration Console before proceeding.
Whenever a user accesses the virtual IP address (port 8080) assigned to the L4 switch, the system routes the user to one of the Identity Servers in the cluster, as traffic necessitates.
The system automatically enables clustering when multiple Identity Servers exist in a group. If only one Identity Server exists in a group, clustering is disabled.
IMPORTANT:You must not use a DNS round robin setup instead of an L4 switch for load balancing. The DNS solution works only as long as all members of the cluster are working and in a good state. If one of them goes down and traffic is still sent to that member, the entire cluster is compromised and all devices using the cluster start generating errors.
This section describes how to set up and manage a cluster of Identity Servers:
3.4.3 Setting Up a Cluster
-
Install the additional Identity Servers.
During the installation, choose option 2, , from CD 1 of the Access Manager installation discs. Specify the IP address and administration credentials of each additional Identity Server. If you are installing on a machine without the Administration Console, the installation asks you for the Administration Console’s IP address. After you install the Identity Servers, the servers are displayed on the Servers page in Identity Servers.
-
Assign the Identity Servers to the same cluster configuration.
For more information about assigning servers to a configuration, see Assigning an Identity Server to a Cluster Configuration.
-
Ensure that the L4 VIP is the DNS for the Identity Server clusters configuration.
-
In the Administration Console, click , then click the configuration name you created for the cluster.
-
On the Cluster Details page, click the configuration name.
-
Specify the following details as required:
Name: Lets you change the name of the Identity Server cluster configuration.
Cluster Communication Backchannel: Provides a communications channel over which the cluster members maintain the integrity of the cluster. For example, this TCP channel is used to detect new cluster members as they join the cluster, and to detect members that leave the cluster. A small percentage of this TCP traffic is used to help cluster members determine which cluster member would best handle a given request. This back channel must not be confused with the IP address/port over which cluster members provide proxy requests to peer cluster members.
-
Port: Specifies the TCP port of the cluster back channel on all of the Identity Servers in the cluster. 7801 is the default TCP port.
-
Encrypt: Encrypts the content of the messages that are sent between cluster members.
Level Four Switch Port Translation: Provides an alternative to using iptables when you want to use port 443 on the L4 switch and port 8443 for cluster communication. This option only works if firewalls do not separate the Identity Servers from each other and the L4 switch supports port translation. To use this option, configure the base URL to use port 443, then configure the following options:
-
Port translation is enabled on switch: Indicates that L4 switch has been configured to support port translation and that incoming traffic is using a different port than the cluster members.
-
Cluster member translated port: Specifies the port the cluster members are configured to use. The default port that must be used for HTTPS is 8443.
If you have firewalls separating your Identity Servers or your L4 switch does not support port translation, you can use iptables to translate the port. For more information about iptables, see Translating the Identity Server Configuration Port in the NetIQ Access Manager 4.2 Installation and Upgrade Guide.
IDP Failover Peer Server Count: Enables session failover. For more information about this feature, see Configuring Session Failover.
-
-
Click .
-
Under , you can refresh, start, stop, and assign servers to Identity Server configurations.
-
Click , then update the Identity Server as prompted.
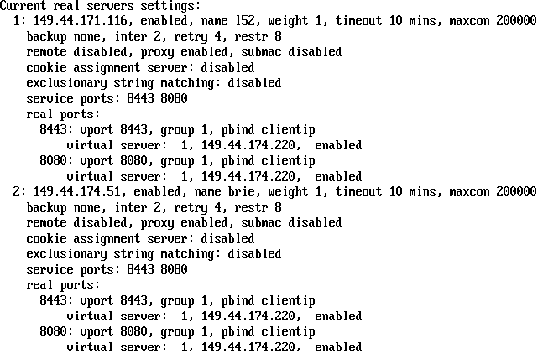
Real Server Settings Example
Virtual Server Settings Example

3.4.4 Managing a Cluster of the Identity Servers
When you assign multiple Identity Servers to the same configuration, you need to install a load balancer that supports either Layer 4 or Layer 7. This device is referred to as an L4 switch in this manual. The L4 switch allows the work load to be balanced among the machines.
Whether you have one machine or multiple machines in a cluster, the Access Manager software configuration process is the same. This section describes the following cluster management tasks:
Creating a Cluster Configuration
This section discusses all the settings available when creating an Identity Server configuration. If you want a description of just the options required to get a functional configuration, see Configuring an Identity Server.
An Identity Server always operates as an identity provider and can optionally be configured to run as an identity consumer (also known as a service provider), by using Liberty, SAML 1.1, SAML 2.0, or WS Federation protocols. These topics are not described in this section.
In an Identity Server configuration, you specify the following information:
-
The DNS name for the Identity Server or clustered server site.
-
Certificates for the Identity Server.
-
Organizational and contact information for the server, which is published in the metadata of the Liberty and SAML protocols.
-
The LDAP directories (user stores) used to authenticate users, and the trusted root for secure communication between the Identity Server and the user store.
To create an Identity Server configuration:
-
In the Administration Console, click > > .
-
Select the Identity Server’s check box, then click .
Selecting the server is one way to assign it to the cluster configuration.
-
In the dialog box, specify a name for the cluster configuration.
If you did not select the server in the previous step, you can now select the server or servers that you want to assign to this configuration.
For more information about assigning servers to a configuration, see Assigning an Identity Server to a Cluster Configuration.
-
Click .
-
Fill in the following fields to specify the Base URL for your Identity Server configuration:
Name: Specify a name by which you want to refer to the configuration. This field is populated with the name you provided in the dialog box. You can change this name here, if necessary.
IMPORTANT:Carefully determine your settings for the base URL, protocol, and domain. After you have configured trust relationships between providers, changing these settings invalidates the trust model and requires a reimport of the provider’s metadata.
Modifying the base URL also invalidates the trust between the Embedded Service Provider of Access Manager devices. To re-establish the trust after modifying the base URL, you must restart the Embedded Service Provider on each device.
Base URL: Specify the application path for the Identity Server. The Identity Server protocols rely on this base URL to generate URL endpoints for each protocol.
-
Protocol: Select the communication protocol. Specify HTTPS to run securely (in SSL mode) and for provisioning. Use HTTP only if you do not require security or have installed an SSL terminator in front of the Identity Server.
-
Domain: Specify the DNS name assigned to the Identity Server. When you are using an L4 switch, this DNS name must resolve to the virtual IP address set up on the L4 switch for the Identity Servers. Using an IP address is not recommended.
-
Port: Specify the port value for the protocol. Default ports are 8080 for HTTP or 8443 for HTTPS. If you want to use port 80 or 443, specify the port here.
-
If you are configuring a Linux Identity Server, you must also configure the operating system to translate the port. See Translating the Identity Server Configuration Port in the NetIQ Access Manager 4.2 Installation and Upgrade Guide.
-
If you are configuring a Windows Identity Server, you must also modify the Tomcat server.xml file located in the \Program Files (x86)\Novell\Tomcat\conf directory for Windows Server 2012. Change the ports from 8080 and 8443 to 80 and 443, then restart the Tomcat service.
-
-
Application: Specify the Identity Server application. Leave the default value .
SSL Certificate: Displays the currently assigned SSL certificate.
The Identity Server comes with a test-connector certificate that you must replace to use SSL in your production environment. You can replace the test certificate now or after you configure the Identity Server. If you create the certificate and replace the test-connector certificate now, you can save some time by restarting Tomcat only once. Tomcat must be restarted whenever you assign an Identity Server to a configuration and whenever you update a certificate key store. See Managing the Keys, Certificates, and Trust Stores.
For information about how to replace the test-connector certificate, see Section 15.0, Enabling SSL Communication.
-
-
To configure session limits, fill in the following fields:
LDAP Access: Specify the maximum number of LDAP connections the Identity Server can create to access the configuration store. You can adjust this amount for system performance.
Default Timeout: Specify the session timeout you want assigned as a default value when you create a contract. This value is also assigned to a session when the Identity Server cannot associate a contract with the authenticated session. During federation, if the authentication request uses a type rather than a contract, the Identity Server cannot always associate a contract with the request.
Limit User Sessions: Specify whether user sessions are limited. If selected, you can specify the maximum number of concurrent sessions a user is allowed to authenticate.
If you decide to limit user sessions, you must also give close consideration to the session timeout value (the default is 60 minutes). If the user closes the browser without logging out (or an error causes the browser to close), the session is not cleared until the session timeout expires. If the user session limit is reached and those sessions have not been cleared with a logout, the user cannot log in again until the session timeout expires for one of the sessions.
When you enable this option, it affects performance in a cluster with multiple Identity Servers. When a user is limited to a specific number of sessions, the Identity Servers must check with the other servers before establishing a new session.
-
Deleting Previous User Sessions: You can configure the Identity Server to delete the previous user sessions if the number of open sessions reaches the maximum limit of allowed sessions that you have specified in the field. Set the DELETE OLD SESSIONS OF USER option to true and restart the Identity Server. For information about how to configure this option, see Configuring Identity Server Global Options. Previous sessions are cleared across Identity Server clusters only when a fresh authentication request comes in. When the Identity server deletes previous user sessions, it sends a logout request to the service provider through the SOAP back channel.
Use case: In this scenario, a user is accessing a protected resource from a machine and wants to access the same protected resource from another device. The Identity Server will not give access to the user if the has reached a maximum limit. The Identity Server must terminate the old session of the user so that the user can access the new session seamlessly.
Allow multiple browser session logout: Specify whether a user with more than one session to the server is presented with an option to log out of all sessions. If you do not select this option, only the current session can be logged out. Deselect this option in instances where multiple users log in as guests. Then, when one user logs out, none of the other guests are logged out.
When you enable this option, you must also restart any Embedded Service Providers that use this Identity Server configuration.
-
-
To configure TCP timeouts, fill in the following fields:
LDAP: Specify how long an LDAP request to the user store can take before timing out.
Proxy: Specify how long a request to another cluster member can take before timing out. When a member of a cluster receives a request from a user who has authenticated with another cluster member, the member sends a request to the authenticating member for information about the user.
Request: Specify how long an HTTP request to another device can take before timing out.
-
To control which protocols can be used for authentication, select one or more of the following protocols:
IMPORTANT:Enable only the protocols that you are using.
If you are using other Access Manager devices such as Access Gateway, you need to enable the Liberty protocol. Access Manager devices use an Embedded Service Provider. If you disable the Liberty protocol, you disable the trusted relationships these devices have with the Identity Server, and authentication fails.
Liberty: Uses a structured version of SAML to exchange authentication and data between trusted identity providers and service providers and provides the framework for user federation.
SAML 1.1: Uses XML for exchanging authentication and data between trusted identity providers and service providers.
SAML 2.0: Uses XML for exchanging encrypted authentication and data between trusted identity providers and service providers and provides the framework for user federation.
WS Federation: Allows disparate security mechanisms to exchange information about identities, attributes, and authentication.
WS-Trust: Allows secure communication and integration between services by using security tokens.
-
To continue creating the Identity Server configuration, click .
The system displays the Organization page.

Use this page to specify organization information for the Identity Server configuration. The information you specify on this page is published in the metadata for the Liberty 1.2 and SAML protocols. The metadata is traded with federation partners and supplies various information regarding contact and organization information located at the Identity Server.
The following fields require information:
-
Name: The name of the organization.
-
Display Name: The display name for the organization.
-
URL: The organization’s URL for contact purposes.
Optional fields include Company, First Name, Last Name, Email, Telephone, and Contact Type.
-
-
Click to configure the user store.
You must reference your own user store and auto-import the SSL certificate. See Configuring Identity User Stores for information about this procedure.
-
After you configure the user store, the system displays the new configuration on the Servers page.
The status icons for the configuration and the Identity Server must turn green. It might take several seconds for the Identity Server to start and for the system to display a green icon. If it does not, it is likely that the Identity Server is not communicating with the user store you set up. Ensure that you have entered the user store information correctly, and that you imported the SSL certificate to the user store. ( > > .)
Assigning an Identity Server to a Cluster Configuration
After you create a configuration, you must assign an Identity Server to it. For clustering, you can assign more than one Identity Server to the configuration (see Configuring a Cluster with Multiple Identity Servers for the steps to set up a cluster). A configuration uses any shared settings you have specified, such as attribute sets, user matching expressions, and custom attributes that are defined for the server.
-
In the Administration Console, click > .
-
On the Servers page, select the server’s check box.
You can select all displayed servers by selecting the top-level Server check box.
-
Click
-
Select the configuration’s check box, then click .
You are prompted to restart Tomcat. The status icon for the Identity Server must turn green. It might take several seconds for the Identity Server to start and for the system to display the green icon.
Configuring a Cluster with Multiple Identity Servers
To add capacity and to enable system failover, you can cluster a group of Identity Servers and configure them in a cluster configuration to act as a single server. You can also configure the cluster to support session failover, so that users don’t have to re-authenticate when an Identity Server goes down.
A cluster of Identity Servers must reside behind an L4 switch. Clients access the virtual IP (VIP) address of the cluster presented on the L4 switch, and the L4 switch alleviates server load by balancing traffic across the cluster. Whenever a user accesses the virtual IP address assigned to the L4 switch, the system routes the user to one of the Identity Servers in the cluster, as traffic necessitates.
To set up a cluster, complete the following tasks:
-
Install an L4 switch. You can use the same switch for Identity Server clustering and Access Gateway clustering, provided that you use different virtual IPs. The LB algorithm can be anything (hash/sticky bit), defined at the Real server levelFor configuration tips, see Configuration Tips for the L4 Switch.
-
Enable persistence (sticky) sessions on the L4 switch. Normally you define this at the virtual server level.
-
Create an Identity Server configuration for the cluster. You assign all the Identity Servers to this configuration.
-
See Creating a Cluster Configuration for information about creating an Identity Server configuration.
-
See Assigning an Identity Server to a Cluster Configuration for information about assigning identity servers to configurations.
-
-
Ensure that the DNS name of the base URL for the cluster configuration resolves via DNS to the IP address of the L4 virtual IP address. The L4 switch balances the load between the Identity Servers in the cluster.
-
Ensure that the L4 administration server using port 8080 has the following TCP ports open:
-
8443 (secure Administration Console)
-
7801 (for back-channel communication with cluster members).
-
636 (for secure LDAP)
-
389 (for clear LDAP)
-
524 (network control protocol on the L4 switch for server communication)
The identity provider ports must also be open:
-
8080 (non-secure login)
-
8443 (secure login)
-
1443 (server communication)
-
-
If you are using introductions (see Configuring General Provider Settings), you must configure the L4 switch to load balance on ports 8445 (identity provider) and 8446 (identity consumer).
-
To enable session failover so users don’t have to re-authenticate when an Identity Server goes down, see Configuring Session Failover.
-
To modify the name of the cluster or edit communication details, see Editing Cluster Details.
Configuring Session Failover
When you set up an Identity Server cluster and add more than one Identity Server to the cluster, you have set up fault tolerance. This ensures that if one of the Identity Servers goes down, users still have access to your site because the remaining Identity Server can be used for authentication. However, it does not’ provide session failover. If a user has authenticated to the failed Identity Server, that user is prompted to authenticate and the session information is lost.
When you enable session failover and an Identity Server goes down, the user’s session information is preserved. Another peer server in the cluster re-creates the authoritative session information in the background. The user is not required to log in again and experiences no interruption of services.
Prerequisites
-
An Identity Server cluster with two or more Identity Servers.
-
Sufficient memory on the Identity Servers to store additional authentication information. When an Identity Server is selected to be a failover peer, the Identity Server stores about 1 KB of session information for each user authenticated on the other machine.
-
Sufficient network bandwidth for the increased login traffic. The Identity Server sends the session information to all the Identity Servers that have been selected to be its failover peers.
-
All trusted Embedded Services Providers need to be configured to send the attributes used in Form Fill and Identity Injection policies at authentication. If you use any attributes other than the standard credential attributes in your contracts, you also need to send these attributes. To configure the attributes to send, click > > > > > .
Configuring Session Failover
-
In the Administration Console, click > .
-
In the list of clusters and Identity Servers, click the name of an Identity Server cluster.
-
Click the , then select the number of failover peers you want each Identity Server to have.
-
To disable this feature, select 0.
-
To enable this feature, select one or two less than the number of servers in your cluster. For example, if you have 4 servers in your clusters and you want to allow for one server being down for maintenance, select 3 (4-1=3). If you want to allow for the possibility of two servers being down, select 2 (4-2=2).
If you have eight or more servers in your cluster, the formula 8-2=6 gives each server 6 peers. This is probably more peers than you need for session failover. In a larger cluster, you must probably limit the number of peers to 2 or 3. If you select too many peers, your machines might require more memory to hold the session data and you might slow down your network with the additional traffic for session information.
-
-
Click .
How Failover Peers Are Selected
The failover peers for an Identity Server are selected according to their proximity. Access Manager sorts the members of the cluster by their IP addresses and ranks them according to how close their IP addresses are to the server who needs to be assigned failover peers. It selects the closest peers for the assignment. For example, if a cluster member exists on the same subnet, that member is selected to be a failover peer before a peer that exists on a different subnet.
Editing Cluster Details
The Cluster Details page lets you manage the configuration’s cluster details, health, alerts, and statistics.
-
In the Administration Console, click > .
-
Click the name of the cluster configuration.
-
Select from the following actions:
Details: To modify the cluster name or its settings, click , then continue with Step 4.
Health: To view the health of the cluster, click the tab.
Alerts: To view the alerts generated by members of the cluster, click the tab.
Statistics: To view the statistics of the cluster members, click the tab.
-
Modify the following fields as required:
Cluster Communication Backchannel: Specify a communications channel over which the cluster members maintain the integrity of the cluster. For example, this TCP channel is used to detect new cluster members as they join the cluster, and to detect members that leave the cluster. A small percentage of this TCP traffic is used to help cluster members determine which cluster member would best handle a given request. This back channel must not be confused with the IP address/port over which cluster members provide proxy requests to peer cluster members.
-
Port: Specify the TCP port of the cluster back channel on all of the Identity Servers in the cluster. 7801 is the default TCP port.
-
Encrypt: Encrypts the content of the messages that are sent between cluster members.
Level Four Switch Port Translation: Configure the L4 switch to translate the port of the incoming request to a new port when the request is sent to a cluster member. Because the cluster members communicate with each other over the same IP address/port as the L4 switch, the cluster implementation needs to know what that port is. The translated port is the port on the cluster members where other cluster members can contact it. This is the IP address and port where cluster members provide proxy requests to other cluster members.
-
Port translation is enabled on switch: Specify whether the port of the L4 switch is different from the port of the cluster member. For example, enable this option when the L4 switch is using port 443 and the Identity Server is using port 8443.
-
Cluster member translated port: Specify the port of the cluster member.
IDP Failover Peer Server Count: For configuration information, see Configuring Session Failover.
-
-
Click , then update the Identity Server when prompted.
Removing a Server from a Cluster Configuration
Removing an Identity Server from a configuration disassociates the Identity Server from the cluster configuration. The configuration, however, remains intact and can be reassigned later or assigned to another server.
-
In the Administration Console, click > .
-
Select the server, then click . Wait for the Health indicator to turn red.
-
Select the server, then choose .
For information about deleting an Identity Server, see Managing a Cluster of the Identity Servers.
IMPORTANT:When there are only two identity providers in a cluster, then introduce a new identity provider to the cluster and remove the other identity provider.
Enabling and Disabling Protocols
You can control which protocols can be used for authenticating with an Identity Server configuration. A protocol must be enabled and configured before users can use the protocol for authentication. For tight security, consider disabling the protocols that you are not going to use for authentication.
When you disable a protocol, updating the Identity Server configuration is not enough. You must stop and start the Identity Server.
-
In the Administration Console, click > > .
-
In the section, select the protocols to enable
-
To disable a protocol, deselect it.
-
Click .
-
(Conditional) If you have enabled a protocol, update the Identity Server.
-
(Conditional) If you have disabled a protocol, stop and start the Identity Server.
-
Select the Identity Server, then click .
-
When the health turns red, select the Identity Server, then click .
-
Repeat the process for each Identity Server in the cluster.
-
Modifying the Base URL
When you configure an Identity Server, you must carefully determine your settings for the base URL, protocol, and domain. Changing the base URL invalidates the trust model and requires a re-import of the provider’s metadata, and a restart of the affected Embedded Service Providers. It also changes the ID of the provider and the URLs that others use for access.
When you change the base URL of the Identity Server, you invalidate the following trusted relationships:
-
The trusted relationships that the Identity Server has established with each Access Manager device that has been configured to use the Identity Server for authentication
-
The trusted relationship that each Access Manager device has established with the Identity Server when the Identity Server configuration was selected.
-
The trusted relationships that the Identity Server has established with other service providers.
The sessions of any logged-in users are destroyed and no user can log in and access protected resources until the trust relationships are reestablished.
To modify the base URL and reestablish trust relationships:
-
In the Administration Console, click > > .
-
Change the protocol, domain, port, and application settings, as necessary.
-
Click .
-
On the Identity Servers page, click .
This re-creates the trusted Identity Server configuration to use the new base URL and metadata.
-
Restart Tomcat on each Identity Server in the configuration:
-
Linux Identity Server: Specify one of the following commands:
/etc/init.d/novell-idp restart
rcnovell-idp restart
-
Windows Identity Server: Specify the following commands:
net stop Tomcat7 net start Tomcat7
-
-
For each Access Manager device configured to trust the configuration of this modified base URL, you must update the device so that the Embedded Service Provider trusts the new Identity Server configuration:
Click , then click for any servers with a of .
-
For each service provider you have configured to trust the configuration of this modified base URL, you must send them the new metadata and have them re-import it.
For information about setting up SSL and changing an Identity Server from HTTP to HTTPS, see Section 15.0, Enabling SSL Communication.
Configuring Identity Server Global Options
Global options are applicable for all Identity Servers in a cluster.
NOTE:Access Manager 4.2 onwards, configuring the following options through files is deprecated. You must configure these option by using the Administration Console.
Perform the following steps to configure Identity Server global options:
-
In the Administration Console, click > > > .
-
Click .
-
Set the following properties based on your requirement:
Property Type
Property Value
Allow Auth Policy Execution
Select false to disable the Identity Server to execute authorization policies.
The default value is true.
For example, see Executing Authorization Based Roles Policy During SAML 2.0 Service Provider Initiated Request.
Cluster Cookie Domain
Set this property to change the Domain attribute for the Identity Server custer cookie.
For example, see Configuring X.509 Authentication to Provide Access Manager Error Message.
Cluster Cookie Path
Set this property to change the Path attribute for the Identity Server custer cookie.
The default value is /nidp.
For example, see Configuring X.509 Authentication to Provide Access Manager Error Message.
DECODE RELAY STATE PARAM
Select true to enable the relay state URL decoding.
The default value is false.
DELETE OLD SESSIONS OF USER
Select true to enable the Identity Server to delete the previous user sessions if the number of open sessions reaches the maximum limit of allowed sessions that you have specified in the field.
The default value is false.
HTTP ONLY CLUSTER COOKIE
Select false to disable the HTTPOnly flags for Identity Server cluster cookies.
The default value is true.
For example, see Enabling Secure or HTTPOnly Flags for Cluster Cookies.
IS SAML2 POST INFLATE
Select true to enable the Identity Server to receive deflated SAML 2.0 POST messages from its trusted providers.
The default value is false.
You can configure post binding to be sent as a compressed option by configuring this property. For example, see the note in Step 4.
IS SAML2 POST SIGN RESPONSE
Select true to enable the identity provider to sign the entire SAML 2.0 response for all service providers.
LOGOUT IDP SESSION ON IP CHANGE
Select true to enable Identity Server to logout from the current session if the IP Address changes.
The default value is false.
RENAME SESSION ID
Select false to prevent changing the session ID automatically.
The default value is true.
SAML1X ATTRIBUTE MATCH BY NAME
Select true to perform a strict check on the name space of the attributes received in assertion.
For example, see SAML 1.1 Service Provider Re-requests for Authentication.
SECURE CLUSTER COOKIE
Select false to disable the secure flags for cluster cookies.
The default value is true.
For example, see Enabling Secure or HTTPOnly Flags for Cluster Cookies.
STS CHANGE ISSUER
Specify the value in this format: SPentityID:UPNDomain -> new IssuerID. For example, urn:federation:MicrosoftOnline:support.namnetiq.in -> https://namnetiq.in/nidp/wsfed/
In case of multiple child domains, add each parent domain and child domain separated by a comma. For example, if namnetiq.in is the parent domain and support.namnetiq.in and engineering.namnetiq.in are the child domains, specify the following entries:
urn:federation:MicrosoftOnline:namnetiq.in -> https://namnetiq.in/nidp/wsfed/, urn:federation:MicrosoftOnline:support.namnetiq.in -> https://namnetiq.in/nidp/wsfed/, urn:federation:MicrosoftOnline:engineering.namnetiq.in -> https://namnetiq.com/nidp/wsfed/
For example, see Configuring Federation for Multiple Domains that Include Child Domains.
STS OFFICE365 MULTI DOMAIN SUPPORT AUTO
Select true to enable users to access Office 365 services by using the Issuer URI specific to the domain they belong to.
The default value is false.
For example, see Creating Multiple Domains in Office 365 and Establishing Federation with Access Manager.
WSF SERVICES LIST
Select full to enable users to access the Services page.
Select 404 to return an HTTP 404 status code: Not Found.
Select 403 to return an HTTP 403 status code: Forbidden.
Select empty to return an empty services list.
The default value is full.
For example, see Blocking Access to the WSDL Services Page.
WSFED ASSERTION VALIDITY
Specify the assertion validity time in second for WS Federation Provider (SP) to accommodate clock skew between the service provider and SAML identity provider.
The default value is 1800 seconds.
For example, see Assertion Validity Window.
WSTRUST AUTHORIZATION ALLOWED ACTAS VALUES
Specify the user names who can perform ActAs operations. Allowed user names are the user accounts that the intermediate web service provider uses to authenticate with STS when sending a request with ActAs elements.
You can specify more than one user name separated by a comma.
For example, see Adding Policy for ActAs and OnBehalfOf.
WSTRUST AUTHORIZATION ALLOWED ONBEHALF VALUES
Specify the user names who can perform OnBehalfOf operations. Allowed user names are the user accounts that the intermediate web service provider uses to authenticate with STS when sending a request with OnBehalfOf elements.
You can specify more than one user name separated by a comma.
For example, see Adding Policy for ActAs and OnBehalfOf.
WSTRUST AUTHORIZATION ALLOWED VALUES
Specify the user names who can perform both ActAs and OnBehalfOf operations.
You can specify more than one user name separated by a comma.
For example, see Adding Policy for ActAs and OnBehalfOf.
OTHER
Specify and if you want to configure any other property.
-
Click > .