3.7 Access Gateways Clusters
A cluster of Access Gateways must reside behind a Layer 4 (L4) switch. Clients access the virtual IP on the L4, and the L4 alleviates server load by balancing traffic across the cluster of Access Gateways. Whenever a user enters the URL for an Access Gateway resource, the request is routed to the L4 switch, and the switch routes the user to one of the Access Gateways in the cluster, as traffic necessitates.
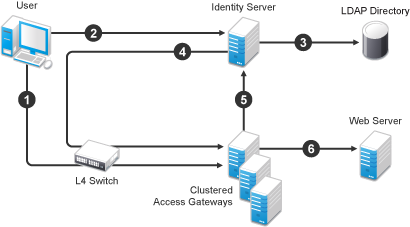
Figure 3-4 illustrates the flow of a user request when the Access Gateways are clustered behind an L4 switch.
Figure 3-4 Clustering Access Gateways
-
The user requests access to a protected resource by sending a request to the L4 switch. The request is sent to one of the Access Gateway servers in the cluster.
-
The Access Gateway redirects the request to the Identity Server for authentication. The Identity Server presents the user with a login page, requesting a user name and a password.
-
The Identity Server verifies the user’s credentials with the directory.
-
The validated credentials are sent through the L4 switch to the same Access Gateway that first received the request.
-
The Access Gateway verifies the user credentials with the Identity Server.
-
If the credentials are valid, the Access Gateway forwards the request to the Web server.
If the Access Gateway where the user's session was established goes down, the user’s request is sent to another Access Gateway in the cluster. This Access Gateway pulls the user’s session information from the Identity Server. This allows the user to continue accessing resources, without having to re-authenticate.
IMPORTANT:You should not use a DNS round robin setup instead of an L4 switch for load balancing. The DNS solution works only as long as all members of the cluster are working and in a good state. If one of them goes down and traffic is still sent to that member, the entire cluster is compromised and starts generating errors.
The following sections describe how to set up and manage a cluster of Access Gateways.
3.7.1 Prerequisites
-
An L4 switch is installed. You can use the same switch for an Identity Server cluster and an Access Gateway cluster, provided that you use different virtual IPs.
-
One or more Access Gateways is installed.
When you install a new Access Gateway, configure it to use the same Administration Console.
-
Your DNS server must to be configured to resolve the published DNS names that you specify for your proxy services to the L4 switch.
-
Persistent (sticky) sessions on the L4 switch is enabled (highly recommended, but not mandatory).
IMPORTANT:If you have created a configuration for one or more of the Access Gateways you are going to put in a cluster, you need to carefully select the primary cluster server. The current configuration of the primary cluster server is pushed to the other servers in the cluster. If you have created configurations for the other servers in the cluster, these configurations are overwritten.
3.7.2 Designing the Membership Type for a Cluster
You can create a cluster of all Gateway Appliances or of all Gateway Services. The Gateway Services cluster can contain both Linux and Windows versions of the Access Gateway Service. When you create a cluster of Access Gateways that are of the same type, you can guarantee that the user experience is always the same, regardless of which Access Gateway the user establishes a connection to. For a list of the differences between the Access Gateway Appliance and the Access Gateway Service, see Feature Comparison of Different Types of Access Gateways in the NetIQ Access Manager 4.1 Installation and Upgrade Guide.
3.7.3 Configuring a Cluster
-
In the Administration Console, click Access Managers > New Cluster.
-
Specify the following details:
Cluster Name: Specify a display name for the cluster.
Type: Select the type of cluster you want to create: Gateway Appliance or Gateway Service.
Primary Cluster Server: Select the server that is to be the primary server in the cluster.
-
In the Server Name list, select the servers that you want to be members of the cluster.
You can create a cluster of one, and add additional servers later. You cannot create a cluster that contains Access Gateway Appliances and Access Gateway Services. The cluster can contain only one type of Access Gateway.
Each server you add to the cluster adds about 30 seconds to the time it takes to configure the cluster because certificates must be synchronized and configuration options must be sent to that server. If you create a very large cluster of twenty servers, it can take up to ten minutes to configure and create the cluster.
-
Click OK.
-
After the cluster has been created, each server in the cluster needs be restarted. On the Access Gateways page, click Update All by the name of the cluster.
-
(Conditional) If the Access Gateways in the cluster have multiple network adapters or IP addresses, you need to configure the listening address for each reverse proxy.
When you create the cluster configuration for newly added servers, the listening address is always the IP address of eth0. If this is not the address where you want the reverse proxy to listen for requests, click Access Gateways > Edit > [Name of Reverse Proxy], select the Access Gateway as the Cluster Member, then enable the Listening Address you want to use.
-
To configure the cluster, click Access Gateways > Edit.
A cluster of Access Gateways has the same configuration options as a single Access Gateway. The only difference is that for some options you need to select the Access Gateway to configure. For example, the Date & Time option allows you to set the time separately for each member of the cluster.
Applying the configuration to a cluster is slightly different. You have the option to apply the changes to all servers in the cluster by selecting the Update All option, or to apply them to one server at a time by selecting the Update option for each server. When you update the servers one at time, your site remains up. For more information on the Update and Update All options, see Configuration Options.
If you prefer to apply changes to the servers one at time, you should save the changes to the configuration datastore on the Server Configuration page. (The OK buttons on the other configuration pages save the changes to browser cache.) If your session times out before you update all servers in the cluster and the changes have been saved only in browser cache, the changes are lost and are not applied to the servers that are still in an Update status.
3.7.4 Managing the Access Gateway Cluster Configuration
This section describes the tasks that are specific to managing the servers in a cluster:
Creating a New Cluster
-
In the Administration Console, click Access Manager > New Cluster.
-
Specify the following details:
Cluster Name: Specify a display name for the cluster.
Type: Select the type of cluster you want to create: Gateway Appliance or Gateway Service.
Primary Cluster Server: Select the server that is to be the primary server in the cluster. This field is empty until you have selected one or more servers to be members of the cluster.
-
In the Server Name list, select the servers that you want to be members of the cluster.
You can create a cluster of one and add additional servers later.You cannot create a cluster that contains Access Gateway Appliances and Access Gateway Services. The cluster can contain only one type of Access Gateway.
Each server you add to the cluster adds about 30 seconds to the time it takes to configure the cluster because certificates must be synchronized and configuration options must be sent to that server. If you create a very large cluster of twenty servers, it can take up to ten minutes to configure and create the cluster.
-
Select the server you want to be the Primary Cluster Server.
-
Click OK.
-
After the cluster has been created, each server in the cluster needs be restarted. On the Access Gateways page, click Update All by the name of the cluster.
For information on additional required configuration tasks, see Section 3.7.4, Managing the Access Gateway Cluster Configuration.
Managing the Access Gateway Servers in the Cluster
To view the servers that are currently members of clusters:
-
In the Administration Console, click Devices > Access Gateways.
The members of a cluster are listed under the cluster name. The red double dagger symbol identifies the server that is the primary cluster server.
-
To add a server to a cluster, select the server, then click Actions > Assign to Cluster > [Name of Cluster].
A cluster cannot contain both Access Gateway Appliances and Access Gateway Services. The cluster can contain only one type of Access Gateway.
-
To remove a server from a cluster, select the server, then click Actions > Remove from Cluster.
Usually when you delete a server from a cluster, you have discovered that traffic is lighter than anticipated and that it can be handled with fewer machines while another cluster is experiencing higher traffic and can benefit from having another cluster member. When the server is removed, its configuration object maintains all the configuration settings from the cluster. When it is added to a new cluster, its configuration object is updated with the configuration settings of the new cluster. If your clusters are behind an L4 switch, you need to reconfigure the switch so that the server is assigned to the correct cluster.
When a server is removed from a cluster, its Embedded Service Provider is stopped. If you are not going to assign it to another cluster, you need to reconfigure the server so that it is protecting resources other than the ones it protected in the cluster. When you apply the changes by clicking Update, the Embedded Service Provider is restarted.
You cannot remove the primary cluster server unless it is the only server in the cluster. If you need to remove the primary cluster server from a multiple server cluster, you need to assign another the server to be the primary cluster server.
-
To modify which server is the primary cluster server, see Changing the Primary Cluster Server.
-
To view detailed information about a server in the group, click the name of the server.
-
To view detailed health information about a server, click the health icon of the server.
-
Click Close.
Managing Cluster Details
Use the Cluster Details page to perform general maintenance actions on the selected cluster and to display server information about the selected cluster.
-
In the Administration Console, click Devices > Access Gateways > [Cluster Name].
-
View the following fields:
Name: Specifies the name of the cluster.
Description: Specifies the purpose of the cluster. This is optional, but useful if your network has multiple Access Gateway clusters. If the field is empty, click Edit to add a description.
Primary Server: Indicates which server in the cluster has been assigned to be the primary server.
-
To modify the information, click Edit. For more information, see Editing Cluster Details.
-
To select a different Access Gateway to be the primary cluster member, click Edit.
-
To modify details about a cluster member, click the server name in the Cluster member list.
-
Click Close.
Editing Cluster Details
Use the Cluster Detail Edit to change the name of the cluster and assign a different server to be the primary cluster member.
-
In the Administration Console, click Devices > Access Gateways > [Cluster Name] > Edit.
-
Modify the following fields:
Name: Specify a name for the cluster.
Description: Specify the purpose of the cluster. This is optional, but useful if your network has multiple Access Gateway clusters.
Primary Server: Indicates which server in the cluster has been assigned to be the primary server. To change this assignment, select the server from the drop-down list. For more information on this process, see Changing the Primary Cluster Server.
-
Click OK.
Changing the Primary Cluster Server
If the current primary cluster server is down and will be down for an extended period of time, you should select another server to be the primary cluster server
-
In the Administration Console, click Devices > Access Gateways > [Name of Cluster] > Edit.
-
In the Primary Server list, select the name of a server, then click OK.
Wait until this configuration change has completed, before doing any other configuration updates.
-
To update the Identity Server, click Identity Servers > Update.
Applying Changes to the Access Gateway Cluster Members
When you are configuring services of the Access Gateway, the OK button saves the change to browser cache except on the Configuration page. The Configuration page (Devices > Access Gateways > Edit) provides a summary of the changes you have made. The Cancel Change column allows you to cancel changes to individual services. When you click OK, the changes are saved to the configuration datastore, and you no longer have the option to cancel changes to individual services.
If you don’t save the changes to the configuration datastore and your session times out or you log out, any configuration changes that are saved to browser cache are flushed. These changes cannot be applied to other members of the cluster because they are no longer available. To prevent this from happening, save the changes to the configuration datastore.
It is especially important to save the changes to the configuration datastore when you select to update individual members one at a time rather than update all members of the cluster at the same time. Updating members one at a time has the following benefits:
-
When you update all servers at the same time, the site goes down until one server has finished updating its configuration. If you update the cluster members one at a time, only the member that is updating its configuration becomes unavailable.
-
If you update the servers one at time, you can verify that the changes are behaving as expected. After testing the configuration on one server, you can then apply the saved changes to the other servers in the cluster. If you decide that the configuration changes are not behaving as expected, you can revert to the previously applied configuration. See Reverting to a Previous Configuration.
Some configuration changes cannot be applied to individual cluster members. For a list of these changes, see Modifications Requiring an Update All.
Reverting to a Previous Configuration
If you have updated only one server in the cluster, you can use the following procedure to revert back to the previous configuration.
-
Remove the server that you have applied the configuration changes from the cluster.
-
Access the Configuration page for the cluster, then click Revert.
The servers in the cluster revert to the last applied configuration.
-
Add the removed server to the cluster.
The server is configured to use the same configuration as the other cluster members.
Modifications Requiring an Update All
When you make the following configuration changes, the Update All option is the only option available and your site is unavailable while the update occurs:
-
If you change the Identity Server configuration that is used for authentication (Access Gateways > Edit > Reverse Proxy/Authentication, then select a different value for the Identity Server Cluster option).
-
If you select a different reverse proxy to use for authentication (Access Gateways > Edit > Reverse Proxy/Authentication, then select a different value for the Reverse Proxy option).
-
If you modify the protocol or port of the authenticating reverse proxy (Access Gateways > Edit > Reverse Proxy/Authentication > [Name of Reverse Proxy], then change the SSL options or the port options).
-
If you modify the published DNS name of the authentication proxy service (Access Gateways > Edit > Reverse Proxy/Authentication > [Name of Reverse Proxy] > [Name of First Proxy Service], then modify the Published DNS Name option).