6.4 Identity Injection Policies

Identity injection allows you to add information to the URL or to the HTML page before it is posted to a Web server. The Web server uses this information to determine whether the user can access to the resource, so it is the Web server that determines the information that you need to inject to allow access to the resource.

Identity injection is one of the features of Access Manager Appliance that enable you to provide single sign-on for your users. When the policy is configured, the user is unaware that additional information is required to access a Web server.

IMPORTANT:Identity Injection policies allow you to inject the user’s password into the HTTP header. If you set up such a policy, you should also configure the Access Gateway to use SSL between itself and the back-end Web server. This is the only way to ensure that the password is encrypted on the wire.

This section describes the elements available for an Identity Injection policy, but your Web servers determine which elements you use.

6.4.1 Designing an Identity Injection Policy

Before setting up an Identity Injection policy, you need to know the following about your Web application:

  • Does it require an authentication header? Does this header need just the username or does it also need the password?

  • Does it use a custom header with custom names (x-names)? If so, you need to know their names and their expected values.

  • Does the custom header require any custom names (x-names) with tags? If so, gather this information.

  • Does the application expect specific values in the query string of the URL? If so, gather this information.

  • Does it require the authentication information from the Kerberos tickets? If so, gather this information.

After gathering the information, you need to determine whether you need to create one policy with one rule, one policy with multiple rules, or multiple policies. If you have multiple applications that require the same type of authentication header, you might want to create an authentication header policy and separate policies for the application-specific information. You can then enable both the authentication header policy and the application-specific policy for the resource that is protecting the application. You should design your policies so that the application receives just what it needs. It should not inject custom names and values it does not use.

Everything defined in a policy is injected into the header, even if the values are empty because Access Manager Appliance could not obtain the value for the item. For some applications, this is still useful information and the application uses it to make access decisions.

Whether you create a policy with one rule or multiple rules is a personal design decision. If you put all the actions in one rule, you have only one description field to describe the function of the policy. If you put each action type in a separate rule, you have multiple description fields to describe the function of the policy. Select the method that is easiest for you.

Rules are evaluated by priority. The first rule that is evaluated with an authentication header is processed, and the authentication header is rejected if it is found in any of the other rules. Your policy can inject only one authentication header, one cookie header, and one query string, but it can inject multiple custom headers and custom headers with tags.

Using the Refresh Data Option

Identity Injection policies are processed when a user requests access to a resource. The results and the values of the data items are cached for the user session. This means that when the user requests a second time to access the resource, the policy is evaluated, but the data values from the first evaluation are used. When a data item is cached for the user session, the user must log out and log back in to trigger new data values. (For information about how long the data items are cached, see Section 26.7.3, The Policy Is Using Old User Data.)

The LDAP Attribute and the Shared Secret actions can be configured to refresh their values. This means the attribute or secret value is read not just on the first request that triggers the policy evaluation, but when the specified refresh interval expires. You can select to cache the value for the session, for the request, or for a time interval varying from 5 seconds to 60 minutes.

You can use this feature for situations when you do not want to force the user to log in again to gain rights to resources or to revoke rights to resources. For example, suppose that you have an Identity Injection policy that grants access based on an LDAP attribute in a custom header having a “yes” value. Users with a “no” value in custom header are denied access.

If you don’t enable the Refresh Data option on this attribute in the policy, the policy is evaluated when the user first tries to access the resource. The value for the attribute is cached for the user session, and until the user logs out, that is the value that is used.

However, if you enable the Refresh Data option on this attribute in the policy, the policy is evaluated when the user first tries to access the resource. When the user sends a second request to access the resource and the specified interval has expired, the Refresh Data option causes the value of the attribute to be read again from the LDAP server. This new value is injected into the custom header, and any other policy that is triggered by the request and uses the new value for its policy.

  • If the value from the first request to the second request changes from no to yes, the user gets access to the resource.

  • If the value from the first request to the second request changes from yes to no, the user is denied access to the resource.

For example:

  • If the attribute controls access to employee resources and an employee leaves, a quick change of this attribute value cuts the employee off from the resources that should be available to employees only.

  • If the attribute controls access to a software download site and a user has just purchased a product, a quick change to this attribute value can grant access to the download site.

IMPORTANT:This feature needs to be used with caution. Because querying the LDAP server slows down the processing of a policy, LDAP attribute and secret store values are normally cached for the user session. Enable this option only on those attributes and secrets that are critical to the security of your system or to the design of your work flow.

6.4.2 Configuring an Identity Injection Policy

  1. In the Administration Console, click Policies > Policies.

  2. Select the policy container, then click New.

  3. Specify a name for the policy, select Access Gateway: Identity Injection for the type of policy, then click OK.

  4. Fill in the following fields:

    Description: (Optional) Describe the purpose of this policy. Because Identity Injection policies are customized to match the content of a specific Web server, you might want to include the name of the Web server as part of the description.

    Priority: Specify the order in which a rule is applied in the policy, when the policy has multiple rules. The highest priority is 1 and the lowest priority is 10.

  5. In the Actions section, click New, then select one of the following.

  6. (Optional) Repeat Step 5.

    Repeat this process to add multiple actions to the same rule. If a particular action is allowed only once per rule, then the action does not appear in the New menu if that action has already been defined in the rule. If an action is allowed multiple times per rule, you can select it from the New menu or use the Copy Action icon and modify the new entry.

  7. To save the policy, click OK twice, then click Apply Changes.

  8. For information about how to assign the policy to a protected resource, see Assigning an Identity Injection Policy to a Protected Resource.

6.4.3 Configuring an Authentication Header Policy

To inject values into the authentication header, you need to know what the Web server requires. For basic authentication, you need to inject the username and password. For a sample policy for a Web server that requires the LDAP username and password to be injected into the header, see Section 3.6.3, Setting Up Policies.

To create and configure an authentication header policy:

  1. In the Administration Console, click Policies > Policies.

  2. Select the policy container, then click New.

  3. Specify a name for the policy, select Access Gateway: Identity Injection for the type, then click OK.

  4. (Optional) Specify a description for the injection policy. This is useful if you plan to create multiple policies to be used by multiple resources.

  5. In the Actions section, click New, then select Inject into Authentication Header.

  6. Fill in the User Name field.

    Select Credential Profile to insert the name the user entered when the user authenticated. This is the most common value type to use for the username.

    The default contracts assign the cn attribute to the Credential Profile. If you have created a custom contract that uses credentials other than the ones listed below, do not use the Credential Profile as a condition.

    If your user store is an Active Directory server, the SAMAccountName attribute is used for the username and stored in the cn field of the LDAP Credential Profile.

    Depending upon what the user must supply for authentication, select one of the following:

    • LDAP Credentials: If you prompt the user for a username, select this option, then select either LDAP User Name (the cn attribute of the user) or LDAP User DN (the fully distinguished name of the user). Your Web server requirements determine which one you use.

    • X509 Credentials: If you prompt the user for a certificate, select this option, then select one of the following options depending upon your Web server requirements.

      • X509 Public Certificate Subject: Injects just the subject field from the certificate, which can match the DN of the user, depending upon who issued the certificate.

      • X509 Public Certificate Issuer: Injects just the issuer field from the certificate, which is the name of the certificate authority (CA) that issued the certificate.

      • X509 Public Certificate: Injects the entire certificate.

      • X509 Serial Number: Injects the certificate serial number.

    • SAML Credential: Although this option is available for the username, most applications that use SAML assertions use them for the user’s password. For the username, you should probably select an option that allows you to supply the user’s name, such as LDAP Credentials or LDAP Attribute.

    Your Web server requirements determine the data type you select for the username. LDAP, X509, and SAML credentials are available from the Credential Profile. If you have created a custom contract that uses a credential other than the ones listed in the Credential Profile, you can select one of the following values to insert into the header as the username:

    • Authentication Contract: Injects the URI of the authentication contract the user used for authentication.

    • Client IP: Injects the IP address associated with the user.

    • LDAP Attribute: Injects the value of the selected attribute. For Active Directory servers, specify the SAMAccountName attribute for the username. If the attribute you require does not appear in the list, click New LDAP Attribute to add the attribute.

      The Refresh Data Every option allows you to determine when to send a query to the LDAP server to verify the current value of the attribute. Because querying the LDAP server slows down the processing of a policy, LDAP attribute values are normally cached for the user session.

      Change the value of this option from session to a more frequent interval only on those attributes that are critical to the security of your system or to the design of your work flow. You can select to cache the value for the session, for the request, or for a time interval varying from 5 seconds to 60 minutes.

      For more information, see Using the Refresh Data Option.

    • Liberty User Profile: Injects the value of the selected attribute. If no profile attributes are available, you have not enabled their use in the Identity Server configuration. See Managing Web Services and Profiles.

    • Proxy Session Cookie: Injects the session cookie associated with the user.

    • Roles: Injects the roles that have been assigned to the user.

    • Shared Secret: Injects the username that has been stored in the selected shared secret store.

      You can create your own username attribute. Click New Shared Secret, specify a display name for the store, and Access Manager Appliance creates the store. Select the store, click New Shared Secret Entry, specify a name for the attribute, then click OK. The store can contain one name/value pair or a collection of name/value pairs. For more information, see Section 6.5.4, Creating and Managing Shared Secrets.

      The Refresh Data Every option allows you to determine when to send a query to verify the current value of the secret. Because querying slows down the processing of a policy, secret values are normally cached for the user session.

      Change the value of this option from session to a more frequent interval only on those secrets that are critical to the security of your system or to the design of your work flow. You can select to cache the value for the session, for the request, or for a time interval varying from 5 seconds to 60 minutes. For more information, see Using the Refresh Data Option.

    • X-Forwarded-For IP: Injects the X-Forwarded-For IP address of the client.

    • String Constant: Injects a static value that you specify in the text box. This value is used by all users who access the resources assigned to this policy.

    • Data Extension: (Conditional) If you have installed a data extension for Identity Injection policies, this option injects the value that the extension retrieves. For more information about creating a data extension, see Access Manager SDK Sample Code.

    The value type you use depends upon how you have set up the application.

    NOTE:To improve the policy's performance, configure the LDAP Attributes, Credential Profile, Liberty User Profile, and Shared Secret attributes to be sent with authentication. For more information, see Configuring the Attributes Sent with Authentication.

  7. Fill in the Password field.

    Select Credential Profile to insert the password the user entered when the user authenticated. This is the most common value type to use for the password. If you have created a custom contract that uses credentials other than the ones listed below for the password, do not use the Credential Profile for the password.

    • LDAP Credentials: If you prompt the user for a password, select this option, then select LDAP Password. If the user’s password is the same as the name of the user, you can select either LDAP User Name (the cn attribute of the user) or LDAP User DN (the fully distinguished name of the user).

    • X509 Credentials: If you use a certificate for the password, select this option, then select one of the following:

      • X509 Public Certificate Subject: Injects just the subject from the certificate, which can match the DN of the user, depending upon who issued the certificate.

      • X509 Public Certificate Issuer: Injects just the issuer from the certificate, which is the name of the certificate authority (CA) that issued the certificate.

      • X509 Public Certificate: Injects the entire certificate.

      • X509 Serial Number: Injects the certificate serial number.

    • SAML Credential: Injects the SAML assertion in the authentication header as the user’s password.

    Your Web server requirements determine the data type you select for the password. LDAP, X509, and SAML credentials are available from the Credential Profile. You can also select one of the following values to insert into the header as the password:

    • Authentication Contract: Injects the URI of a local authentication contract that the user used for authentication.

    • Client IP: Injects the IP address associated with the user.

    • LDAP Attribute: Injects the value of the selected attribute. For Active Directory servers, specify the SAMAccountName attribute for the username. If the attribute you require does not appear in the list, click New LDAP Attribute to add the attribute.

      The Refresh Data Every option allows you to determine when to send a query to the LDAP server to verify the current value of the attribute. Because querying the LDAP server slows down the processing of a policy, LDAP attribute values are normally cached for the user session.

      Change the value of this option from session to a more frequent interval only on those attributes that are critical to the security of your system or to the design of your work flow. You can select to cache the value for the session, for the request, or for a time interval varying from 5 seconds to 60 minutes. For more information, see Using the Refresh Data Option.

    • Liberty User Profile: Injects the value of the selected attribute.

    • Proxy Session Cookie: Injects the session cookie associated with the user.

    • Roles: Injects the roles that have been assigned to the user.

    • Shared Secret: Injects the password that has been stored in the selected shared secret store.

      You can create your own password attribute. Click New Shared Secret, specify a display name for the store, and the Access Manager Appliance creates the store. Select the store, click New Shared Secret Entry, specify a name for the attribute, then click OK. The store can contain one name/value pair or a collection of name/value pairs. For more information, see Section 6.5.4, Creating and Managing Shared Secrets.

      The Refresh Data Every option allows you to determine when to send a query to verify the current value of the secret. Because querying slows down the processing of a policy, secret values are normally cached for the user session.

      Change the value of this option from session to a more frequent interval only on those secrets that are critical to the security of your system or to the design of your work flow. You can select to cache the value for the session, for the request, or for a time interval varying from 5 seconds to 60 minutes. For more information, see Using the Refresh Data Option.

    • X-Forwarded-For IP: Injects the X-Forwarded-For IP address of the client.

    • String Constant: Injects a static value that you specify in the text box. This value is used by all users who access the resources assigned to this policy.

    • Data Extension: (Conditional) If you have installed a data extension for Identity Injection policies, this option injects the value that the extension retrieves. For more information about creating a data extension, see NetIQ Access Manager Developer Tools and Examples.

    The value type you use depends upon how you have set up the application.

  8. Specify the format for the value:

    Multi-Value Separator: Select a value separator, if the value type you have select is multi-valued. For example, Roles can contain multiple values.

    DN Format: If the value is a DN, select the format for the DN:

    • LDAP: Specifies LDAP typed comma notation:

      cn=jsmith,ou=Sales,o=novell
      
    • NDAP Partial Dot Notation: Specifies eDirectory™ typeless dot notation.

      jsmith.sales.novell
      
    • NDAP Leading Partial Dot Notation: Specifies eDirectory typeless leading dot notation.

      .jsmith.sales.novell
      
    • NDAP Fully Qualified Partial Dot Notation: Indicates eDirectory typed dot notation.

      cn=jsmith.ou=Sales.o=novell
      
    • NDAP Fully Qualified Leading Dot Notation: Indicates eDirectory typed leading dot notation.

      .cn=jsmith.ou=Sales.o=novell
      
  9. Click OK.

  10. (Optional) To add a second rule, click New in the Rule List.

    You can inject only one authentication header into an Identity Injection rule. However, your policy can have multiple rules. If you inject two authentication headers, each in a separate rule, the authentication header in the rule with the highest priority is applied, and the authentication header action in the second rule is ignored.

  11. To save the policy, click OK, then click Apply Changes.

6.4.4 Configuring a Custom Header Policy

To inject values into a custom header, you need to know the name of the tag and its expected value type. The names are specific to the application. The names might be case sensitive. They might require an X- prefix. Because the requirements vary, you need to enter them in the format as specified by the application. For example, an application might require the following to be in the custom header:

Name/Value Pair

Description

X-First_Name=givenName

A first name tag with an LDAP attribute value

X-Last_Name=sn

A last name tag with an LDAP attribute value

X-Role=sales_role

A role tag with the role name as the value.

If you create a custom header policy with these name/value pairs, the policy injects these names with their values into a custom header, before sending the request to the Web server.

To create such a policy:

  1. In the Administration Console, click Policies > Policies.

  2. Select the policy container, then click New.

  3. Specify a name for the policy, select Access Gateway: Identity Injection for the type, then click OK.

  4. (Optional) Specify a description for the injection policy. This is useful if you plan to create multiple custom header policies to be used for multiple resources.

  5. In the Actions section, click New, then select Inject into Custom Header.

  6. Fill in the following fields:

    Custom Header Name: Specify the name to be inserted into the custom header. These are the names required by your application. If your application requires the X- prefix, ensure that you include the prefix in this field.

    Value: Select the value required by the name. Select one of the following:

    • Authentication Contract: Injects the URI of a local authentication contract that the user used for authentication.

    • Client IP: Injects the IP address associated with the user.

    • Credential Profile: Injects the credentials that the user specified at login. You can select LDAP Credentials, X509 Credentials, or SAML Credentials. For more information, see Section 6.4.3, Configuring an Authentication Header Policy.

    • LDAP Attribute: Injects the value of the selected attribute. For Active Directory servers, specify the SAMAccountName attribute for the username. If the attribute you require does not appear in the list, click New LDAP Attribute to add the attribute.

      The Refresh Data Every option allows you to determine when to send a query to the LDAP server to verify the current value of the attribute. Because querying the LDAP server slows down the processing of a policy, LDAP attribute values are normally cached for the user session.

      Change the value of this option from session to a more frequent interval only on those attributes that are critical to the security of your system or to the design of your work flow. You can select to cache the value for the session, for the request, or for a time interval varying from 5 seconds to 60 minutes.

      For more information, see Using the Refresh Data Option.

    • Liberty User Profile: Injects the value of the selected attribute. If no profile attributes are available, you have not enabled their use in the Identity Server configuration. See Managing Web Services and Profiles.

    • Proxy Session Cookie: Injects the session cookie associated with the user.

    • Roles: Injects the roles that have been assigned to the user.

    • Shared Secret: Injects a value that has been stored in the selected shared secret store. Select the shared secret store and the name of the value you want injected.

      You can create your own value. Click New Shared Secret, specify a display name for the store, and the Access Manager Appliance creates the store. Select the store, click New Shared Secret Entry, specify a name for the attribute, then click OK. The name you select for the attribute should match the Custom Header name. The store can contain one name/value pair or a collection of name/value pairs. For more information, see Section 6.5.4, Creating and Managing Shared Secrets.

      The Refresh Data Every option allows you to determine when to send a query to verify the current value of the secret. Because querying slows down the processing of a policy, secret values are normally cached for the user session.

      Change the value of this option from session to a more frequent interval only on those secrets that are critical to the security of your system or to the design of your work flow. You can select to cache the value for the session, for the request, or for a time interval varying from 5 seconds to 60 minutes. For more information, see Using the Refresh Data Option.

    • X-Forwarded-For IP: Injects the X-Forwarded-For IP address of the client.

    • String Constant: Injects a static value that you specify in the text box. This value is used by all users who access the resources assigned to this policy.

    • Data Extension: (Conditional) If you have installed a data extension for Identity Injection policies, this option injects the value that the extension retrieves. For more information about creating a data extension, see NetIQ Access Manager Developer Tools and Examples.

    NOTE:To improve the policy's performance, configure the LDAP Attributes, Credential Profile, Liberty User Profile, and Shared Secret attributes to be sent with authentication. For more information, see Configuring the Attributes Sent with Authentication.

  7. Specify the format for the value:

    Multi-Value Separator: Select a value separator, if the value type you have select is multi-valued. For example, Roles can contain multiple values.

    DN Format: If the value is a DN, select the format for the DN:

    • LDAP: Specifies LDAP typed comma notation.

      cn=jsmith,ou=Sales,o=novell
      
    • NDAP Partial Dot Notation: Specifies eDirectory typeless dot notation.

      jsmith.sales.novell
      
    • NDAP Leading Partial Dot Notation: Specifies eDirectory typeless leading dot notation.

      .jsmith.sales.novell
      
    • NDAP Fully Qualified Partial Dot Notation: Indicates eDirectory typed dot notation.

      cn=jsmith.ou=Sales.o=novell
      
    • NDAP Fully Qualified Leading Dot Notation: Indicates eDirectory typed leading dot notation.

      .cn=jsmith.ou=Sales.o=novell
      
  8. (Optional) To add additional custom header actions, click New, then select Inject into Custom Header or use the Copy Action icon and modify the new entry.

  9. To save the policy, click OK twice, then click Apply Changes.

6.4.5 Configuring a Custom Header with Tags

Some Web applications require more than a name and a value to be injected into the custom header. Sometimes they require a custom name, a tag, and a value. Sometimes the application requires a custom name with multiple tags and values. The Inject into Custom Header with Tags option provides you with the flexibility to add such values to the custom header. For example, your application could be expecting the following custom header with tag:

X-Custom_Role Role=Manager

You can inject this information by setting the Custom Header Name to X-Custom, the Tag Name to Role, and the Tag Value to Manager. The value can be set as a static variable or you can retrieve it from various sources such as a Liberty User Profile attribute or the roles assigned to the current user.

  1. In the Administration Console, click Policies > Policies.

  2. Select the policy container, then click New.

  3. Specify a name for the policy, select Access Gateway: Identity Injection for the type, then click OK.

  4. (Optional) Specify a description for the injection policy. This is useful if you plan to create multiple custom header policies to be used for multiple resources.

  5. In the Actions section, click New, then select Inject into Custom Header with Tags.

  6. Fill in the following fields:

    Custom Header Name: Specify the name that the application expects. If your application requires the X- prefix, ensure that you include the prefix in this field.

    Tag Name: Specify the tag name that the application expects.

    Tag Value: Specify the value. Select from the following data types:

    • Authentication Contract: Injects the URI of a local authentication contract that the user used for authentication.

    • Client IP: Injects the IP address associated with the user.

    • Credential Profile: Injects the credentials that the user specified at login. You can select LDAP Credentials, > X509 Credentials, or SAML Credential. For more information, see Section 6.4.3, Configuring an Authentication Header Policy.

    • LDAP Attribute: Injects the value of the selected attribute. For Active Directory servers, specify the SAMAccountName attribute for the username. If the attribute you require does not appear in the list, click New LDAP Attribute to add the attribute.

      The Refresh Data Every option allows you to determine when to send a query to the LDAP server to verify the current value of the attribute. Because querying the LDAP server slows down the processing of a policy, LDAP attribute values are normally cached for the user session.

      Change the value of this option from session to a more frequent interval only on those attributes that are critical to the security of your system or to the design of your work flow. You can select to cache the value for the session, for the request, or for a time interval varying from 5 seconds to 60 minutes. For more information, see Using the Refresh Data Option.

    • Liberty User Profile: Injects the value of the selected attribute. If no profile attributes are available, you have not enabled their use in the Identity Server configuration. See Managing Web Services and Profiles.

    • Proxy Session Cookie: Injects the session cookie associated with the user.

    • Roles: Injects the roles that have been assigned to the user.

    • Shared Secret: Injects a value that has been stored in the selected shared secret store. The name specified as the Tag Name must match the name of a name/value pair stored in the shared secret.

      You can create your own value. Click New Shared Secret, specify a display name for the store, and the Access Manager Appliance creates the store. Select the store, click New Shared Secret Entry, specify a name for the attribute, then click OK. The name must match the expected Tag Name. The store can contain one name/value pair or a collection of name/value pairs. For more information, see Section 6.5.4, Creating and Managing Shared Secrets.

      The Refresh Data Every option allows you to determine when to send a query to verify the current value of the secret. Because querying slows down the processing of a policy, secret values are normally cached for the user session.

      Change the value of this option from session to a more frequent interval only on those secrets that are critical to the security of your system or to the design of your work flow. You can select to cache the value for the session, for the request, or for a time interval varying from 5 seconds to 60 minutes. For more information, see Using the Refresh Data Option.

    • X-Forwarded-For IP: Injects the X-Forwarded-For IP address of the client.

    • String Constant: Injects a static value that you specify in the text box. This value is used by all users who access the resources assigned to this policy.

    • Data Extension: (Conditional) If you have installed a data extension for Identity Injection policies, this option injects the value that the extension retrieves. For more information about creating a data extension, see NetIQ Access Manager Developer Tools and Examples.

    NOTE:To improve the policy's performance, configure the LDAP Attributes, Credential Profile, Liberty User Profile, and Shared Secret attributes to be sent with authentication. For more information, see Configuring the Attributes Sent with Authentication.

  7. To add multiple tag and value pairs to the custom name, click New in the Tags section.

    Use the up-arrow and down-arrow buttons to order the tags.

  8. Specify the format for the value:

    Multi-Value Separator: Select a value separator, if the value type you have select is multi-valued. For example, Roles can contain multiple values.

    DN Format: If the value is a DN, select the format for the DN:

    • LDAP: Specifies LDAP typed comma notation.

      cn=jsmith,ou=Sales,o=novell
      
    • NDAP Partial Dot Notation: Specifies eDirectory typeless dot notation.

      jsmith.sales.novell
      
    • NDAP Leading Partial Dot Notation: Specifies eDirectory typeless leading dot notation.

      .jsmith.sales.novell
      
    • NDAP Fully Qualified Partial Dot Notation: Indicates eDirectory typed dot notation.

      cn=jsmith.ou=Sales.o=novell
      
    • NDAP Fully Qualified Leading Dot Notation: Indicates eDirectory typed leading dot notation.

      .cn=jsmith.ou=Sales.o=novell
      
  9. (Optional) To add additional custom header actions, click New, then select Inject into Custom Header with Tags or use the Copy Action icon and modify the new entry.

  10. To save the policy, click OK twice, then click Apply Changes.

6.4.6 Specifying a Query String for Injection

Some applications require custom information in a query string of the URL. The Inject into Query String option allows you to inject this information without prompting the user for it. To inject the information, you must specify a tag name and a tag value. The tag name is what your application requires. For example, suppose your application expects the following query string for user jsmith:

?name=jsmith

You can inject this information into the URL by specifying a name for the Tag Name and Credential Profile for the Tag Value. The Credential Profile value type inserts the name that the current user specified when authenticating to the Access Gateway.

  1. In the Administration Console, click Policies > Policies.

  2. Select the policy container, then click New.

  3. Specify a name for the policy, select Access Gateway: Identity Injection for the type, then click OK.

  4. (Optional) Specify a description for the injection policy.

  5. In the Actions section, click New, then select Inject into Query String.

  6. Fill in the following fields:

    Tag Name: Specify the tag name that the application expects.

    Tag Value: Specify the value. Select from the following data types:

    • Authentication Contract: Injects the URI of a local authentication contract that the user used for authentication.

    • Client IP: Injects the IP address associated with the user.

    • Credential Profile: Injects the credentials that the user specified at login. You can select LDAP Credentials, > X509 Credentials, or SAML Credential. For more information, see Section 6.4.3, Configuring an Authentication Header Policy.

    • LDAP Attribute: Injects the value of the selected attribute. For Active Directory servers, specify the SAMAccountName attribute for the username. If the attribute you require does not appear in the list, click New LDAP Attribute to add the attribute.

      The Refresh Data Every option allows you to determine when to send a query to the LDAP server to verify the current value of the attribute. Because querying the LDAP server slows down the processing of a policy, LDAP attribute values are normally cached for the user session.

      Change the value of this option from session to a more frequent interval only on those attributes that are critical to the security of your system or to the design of your work flow. You can select to cache the value for the session, for the request, or for a time interval varying from 5 seconds to 60 minutes. For more information, see Using the Refresh Data Option.

    • Liberty User Profile: Injects the value of the selected attribute. If no profile attributes are available, you have not enabled their use in the Identity Server configuration. See Managing Web Services and Profiles.

    • Proxy Session Cookie: Injects the session cookie associated with the user.

    • Roles: Injects the roles that have been assigned to the user.

    • Shared Secret: Injects a value that has been stored in the selected shared secret store. The name specified as the Tag Name must match the name of a name/value pair stored in the shared secret.

      You can create your own value. Click New Shared Secret, specify a display name for the store, and the Access Manager Appliance creates the store. Select the store, click New Shared Secret Entry, specify a name for the attribute, then click OK. The name you specify must match the Tag Name. The store can contain one name/value pair or a collection of name/value pairs. For more information, see Section 6.5.4, Creating and Managing Shared Secrets.

      The Refresh Data Every option allows you to determine when to send a query to verify the current value of the secret. Because querying slows down the processing of a policy, secret values are normally cached for the user session.

      Change the value of this option from session to a more frequent interval only on those secrets that are critical to the security of your system or to the design of your work flow. You can select to cache the value for the session, for the request, or for a time interval varying from 5 seconds to 60 minutes. For more information, see Using the Refresh Data Option.

    • X-Forwarded-For IP: Injects the X-Forwarded-For IP address of the client.

    • String Constant: Injects a static value that you specify in the text box. This value is used by all users who access the resources assigned to this policy.

    • Data Extension: (Conditional) If you have installed a data extension for Identity Injection policies, this option injects the value that the extension retrieves. For more information about creating a data extension, see NetIQ Access Manager Developer Tools and Examples.

      NOTE:To improve the policy's performance, configure the LDAP Attributes, Credential Profile, Liberty User Profile, and Shared Secret attributes to be sent with authentication. For more information, see Configuring the Attributes Sent with Authentication.

  7. (Optional) To add multiple tag and value pairs, click New in the Tags section.

    You can inject only one query string into a rule, but you can inject multiple tag-name and tag-value pairs in the single query string.

    Use the up-arrow and down-arrow buttons to order the tags.

  8. Specify the format for the values:

    Multi-Value Separator: Select a value separator, if the value type you have select is multi-valued. For example, Roles can contain multiple values.

    DN Format: If the value is a DN, select the format for the DN:

    • LDAP: Specifies LDAP typed comma notation.

      cn=jsmith,ou=Sales,o=novell
      
    • NDAP Partial Dot Notation: Specifies eDirectory typeless dot notation.

      jsmith.sales.novell
      
    • NDAP Leading Partial Dot Notation: Specifies eDirectory typeless leading dot notation.

      .jsmith.sales.novell
      
    • NDAP Fully Qualified Partial Dot Notation: Indicates eDirectory typed dot notation.

      cn=jsmith.ou=Sales.o=novell
      
    • NDAP Fully Qualified Leading Dot Notation: Indicates eDirectory typed leading dot notation.

      .cn=jsmith.ou=Sales.o=novell
      
  9. To save the policy, click OK twice, then click Apply Changes.

6.4.7 Injecting into the Cookie Header

Some applications require access to the Access Gateway session cookie and expect to find it in the cookie header. You can create an Identity Injection policy that adds this cookie to the cookie header.

  1. In the Administration Console, click Policies > Policies.

  2. Select the policy container, then click New.

  3. Specify a name for the policy, select Access Gateway: Identity Injection for the type, then click OK.

  4. (Optional) Specify a description for the injection policy.

  5. In the Actions section, click New, then select Inject into Cookie Header.

    This action allows only one value unless you have installed a data extension. If you have installed a data extension, you can select either Proxy Session Cookie or the Data Extension.

    Proxy Session Cookie: Injects the session cookie for the user.

    Data Extension: Injects the value retrieved from the extension. For more information about creating a data extension, see NetIQ Access Manager Developer Tools and Examples.

  6. To save the policy, click OK twice, then click Apply Changes.

6.4.8 Configuring an Inject Kerberos Ticket Policy

This policy allows the authentication information in the Kerberos tickets to be passed to the Access Gateway.

To create and configure an Inject Kerberos Ticket policy, perform the following steps:

  1. In the Administration Console, click Policies > Policies.

  2. Select the policy container, then click New.

  3. Specify a name for the policy, select Access Gateway: Identity Injection for the type, then click OK.

  4. (Optional) Specify a description for the injection policy. This is useful if you plan to create multiple policies to be used by multiple resources.

  5. In the Actions section, click New, then select Inject Kerberos Ticket.

  6. Select an appropriate option in User Name.

    Select Credential Profile to insert the name a user enters during the authentication process.

    This is the most common value. The default contracts assign the cn attribute to the Credential Profile.

    If your user store is an Active Directory server, the SAMAccountName attribute is used for the username and stored in the cn field of the LDAP Credential Profile.

    Depending upon what a user must supply for authentication, select one of the following:

    • LDAP Credentials: If you prompt the user for a username, select this option. Then select either LDAP User Name (the cn attribute of the user) or LDAP User DN (the fully distinguished name of the user). Your Web server requirements determine which one you use.

    • X509 Credentials: If you prompt the user for a certificate, select this option. Then select one of the following options depending upon your Web server requirements:

      • X509 Public Certificate Subject: Injects the subject field from the certificate, which can match the DN of the user, depending upon who issued the certificate.

      • X509 Public Certificate Issuer: Injects the issuer field from the certificate, which is the name of the certificate authority (CA) that issued the certificate.

      • X509 Public Certificate: Injects the entire certificate.

      • X509 Serial Number: Injects the certificate serial number.

    • SAML Credential: Although this option is available for the username, most applications that use SAML assertions, use them for the user’s password. For the username, select an option that allows you to supply the user’s name, such as LDAP Credentials or LDAP Attribute.

    Your Web server requirements determine the data type you select for the username. LDAP, X509, and SAML credentials are available from the Credential Profile. If you have created a custom contract that uses a credential other than the ones listed in the Credential Profile, you can select one of the following values to insert into the Kerberos ticket as the username:

    • Authentication Contract: Injects the URI of the authentication contract the user specified for authentication.

    • Client IP: Injects the IP address associated with the user.

    • LDAP Attribute: Injects the value of the selected attribute. For Active Directory servers, specify the SAMAccountName attribute for the username. If the attribute you require does not appear in the list, click New LDAP Attribute to add the attribute.

      The Refresh Data Every option allows you to determine when to send a query to the LDAP server to verify the current value of the attribute. Because querying the LDAP server slows down the processing of a policy, LDAP attribute values are cached for a user session.

      Change the value of this option from session to a more frequent interval only on those attributes that are critical to the security of your system or to the design of your work flow. You can select to cache the value for the session, for the request, or for a time interval varying from 5 seconds to 60 minutes.

      For more information, see Using the Refresh Data Option.

    • Liberty User Profile: Injects the value of the selected attribute. If no profile attributes are available, you have not enabled their use in the Identity Server configuration. See Managing Web Services and Profiles.

    • Proxy Session Cookie: Injects the session cookie associated with the user.

    • Roles: Injects the roles that have been assigned to the user.

    • Shared Secret: Injects the username that has been stored in the selected shared secret store.

      You can create your own username attribute.

      1. Click New Shared Secret, specify a display name for the store, and Access Manager Appliance creates a store.

      2. Select the store, click New Shared Secret Entry, specify a name for the attribute, then click OK.

        The store can contain one name/value pair or a collection of name/value pairs. For more information, see Section 6.5.4, Creating and Managing Shared Secrets.

      The Refresh Data Every option allows you to determine when to send a query to verify the current value of the secret. Because querying slows down the processing of a policy, secret values are cached for a user session.

      Change the value of this option from session to a more frequent interval only on those secrets that are critical to the security of your system or to the design of your work flow. You can select to cache the value for the session, for the request, or for a time interval varying from 5 seconds to 60 minutes. For more information, see Using the Refresh Data Option.

    • X-Forwarded-For IP: Injects the X-Forwarded-For IP address of the client.

    • String Constant: Injects a static value that you specify in the text box. This value is used by all users who access the resources assigned to this policy.

    • Data Extension: (Conditional) If you have installed a data extension for Identity Injection policies, this option injects the value that the extension retrieves. For more information about creating a data extension, see NetIQ Access Manager Developer Tools and Examples.

    The value type you use depends upon your application setup.

  7. Specify values in the following fields:

    Domain: Select one of the following:

    • LDAP Attribute: When the user is authenticated at the Identity Serer by using a Kerberos authentication. This attribute uses userPrincipalName of the user from Active directory.

    • String Constant: When the user is authenticated at the Identity Server by using a non-Kerberos authentication. If the required domain is not available in any LDAP attribute, the administrator can specify the domain name manually.

    Target Host: Select from request: Selects the Web server FQDN that user has configured while configuring Web servers of the proxy service.

    Multi-Value Separator: Select a value separator, if the value type you have select is multi-valued. For example, Roles can contain multiple values.

    DN Format: If the value is a DN, select the format for the DN:

    • LDAP: Specifies LDAP typed comma notation:

      cn=jsmith,ou=Sales,o=novell
      
    • NDAP Partial Dot Notation: Specifies eDirectory™ typeless dot notation.

      jsmith.sales.novell
      
    • NDAP Leading Partial Dot Notation: Specifies eDirectory typeless leading dot notation.

      .jsmith.sales.novell
      
    • NDAP Fully Qualified Partial Dot Notation: Indicates eDirectory typed dot notation.

      cn=jsmith.ou=Sales.o=novell
      
    • NDAP Fully Qualified Leading Dot Notation: Indicates eDirectory typed leading dot notation.

      .cn=jsmith.ou=Sales.o=novell
      
  8. Click OK.

  9. (Optional) To add a second rule, click New in the Rule List.

    You can inject only one Kerberos ticket into an Identity Injection rule. However, your policy can have multiple rules. If you inject two Kerberos tickets, each in a separate rule, the Kerberos ticket in the rule with the highest priority is applied. The Kerberos ticket action in the second rule is ignored.

  10. Click OK > Apply Changes.

6.4.9 Importing and Exporting Identity Injection Policies

You can import and export Identity Injection policies to run them in other Access Manager Appliance configurations. The policy is exported as a text file with XML tags.

NOTE:We do not recommend editing the exported file with a text editor. Any changes you want to make to a policy should to be done through the Administration Console.

To export an Identity Injection policy:

  1. In the Administration Console, click Policies > Policies.

  2. Select the policy container.

  3. Select an Identity Injection policy, then click Export.

  4. (Optional) Modify the name suggested for the file.

  5. Click OK.

  6. Using the features of your browser, specify where the file is to be copied.

To import a policy:

  1. Ensure that any referenced shared secret stores have been created. See Section 6.5.4, Creating and Managing Shared Secrets.

  2. If the policy uses LDAP or Liberty Profile attributes, ensure that the Identity Server has been configured for these same attributes.

  3. Ensure that any referenced role policies have been imported.

    See Section 6.2.8, Importing and Exporting Role Policies.

  4. In the Administration Console, click Access Manager > Policies.

  5. Click Import, then browse to the location of the file.

  6. Click OK.

  7. When the policy appears in the list, click Apply Changes.

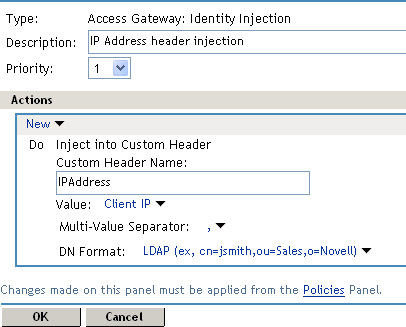
6.4.10 Sample Identity Injection Policy

One of the common uses of an Identity Injection policy is to differentiate between internal users and external users. Web servers that have been configured for this logic can then display one set of pages to internal users and another set of pages to external users. The following sample policy is based on an environment that has the following characteristics:

  • The Web server has been configured to look for a custom tag called IPAddress and to differentiate between internal IP addresses and external IP addresses.

  • The internal customers have NAT IP addresses.

  • The protected resource is a page called mycompany.html. This page is a public protected resource (no authentication required) because the IP address of the client is available before authentication.

To configure your site for this type of policy:

  1. In the Administration Console, click Policies > Policies.

  2. Select the policy container.

  3. Click New, specify a name for the policy, select Access Gateway: Identity Injection for the type, then click OK.

  4. In the Actions section, click New > Inject into Custom Header.

  5. Fill in the following fields:

    Custom Header Name: Specify IPAddress in the text box.

    Value: Select Client IP.

    The other fields do not need to be modified. Your policy should look similar to the following:

  6. Click OK twice, then click Apply Changes.

  7. Assign the policy to the mycompany.html page of the Web server. Click Access Gateways > Edit > [Name of Reverse Proxy] > [Name of Proxy Service] > Protected Resources.

  8. In the Protected Resource List, select the protected resource for the page or click New to create one, then specify a name for it.

  9. In the URL Path List, ensure that the path ends with the name of the page. For example:

    /mycompany.html
    
  10. Click Identity Injection, select the name of the IP address policy, then click Enable.

  11. To save the changes, click Configuration Panel > OK.

  12. On the Configuration page, click OK, then click Update.

  13. Configure the Web server to use the IPAddress values in the custom header to distinguish between external and internal customers.

    In this sample scenario, the Web server is configured to recognize IP addresses starting with 10. as internal customers and all other addresses as external customers.