6.3 Authorization Policies
Authorization policies are used when you want to protect a resource based on criteria other than authentication, and you want Access Manager Appliance to enforce the access restrictions. Authorization policies are enforced when a user requests data from a resource.
Access Manager Appliance supports Access Gateway Authorization policies for protecting resources of the Access Gateway.
The first step in creating an Authorization policy is determining the criteria for restricting access. The second step is translating those criteria into rules and conditions for a policy. This section describes the policy elements, but your resource and your security requirements determine which elements to use when creating the policy.
6.3.1 Designing an Authorization Policy
When you create an Authorization policy, you need to configure one or more rules. Each rule consists of two parts: (1) one or more conditions the user must meet and (2) the action to perform when the user meets the conditions or doesn’t meet the conditions. The action can be to either allow or deny access to the resource. This section describes how to use the following elements when creating a policy:
Controlling Access with a Deny Rule and a Negative Condition
To deny access to the correct set of users, you need to know the characteristics of the users you don’t want to access the resource, as well as the characteristics of the users you do want to access the resource.
Some very simple policies can be created by using a Deny action. For example, suppose you have an application that you only want managers to access. If you have set up a role that assigns all managers to the Manager role, you can use this characteristic for an Authorization policy. Such a rule would be similar to the following:
Figure 6-15 Simple Rule
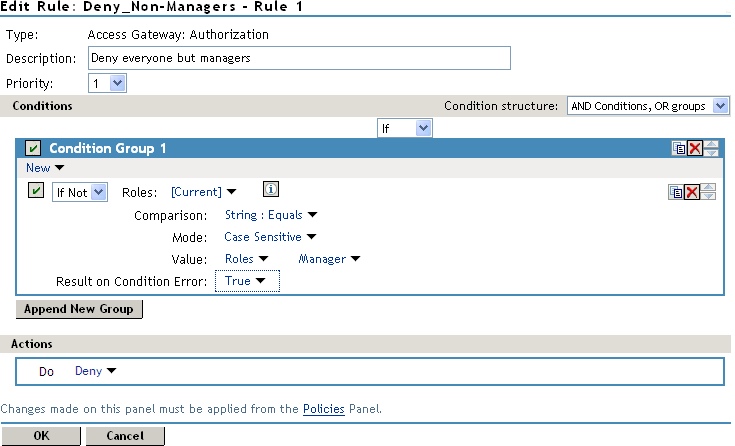
This rule evaluates the user, and if the user does not belong to the Manager role, the user matches the condition. The action for matching the condition is to deny access. The managers, who belong to the Manager role, do not match the condition and the Deny action is not applied to them.
The option is set to True. You don’t want an error to cause the policy to assume that the user is a manager. If an error occurs, you want the policy to assume that the user is not a manager, so he or she matches the condition and the Deny action is applied.
Configuring the Result on Condition Error Option
The option allows you to specify what the condition returns when the comparison of the two values returns an error rather than the results of the comparison. Select either or . You need to analyze the logic of your policy carefully, because if you set up this option incorrectly, error conditions can allow access to a resource. Consider the following:
-
If your rule is a Permit rule and you do not want the action applied when an error occurs, select for this option.
-
If your rule is a Deny rule with an condition and you want the action applied when an error occurs, select .
Many Rules or Many Conditions
You can design your policy to have many rules with a single condition and action, or you can design your policy to have fewer rules, with each rule containing many conditions.
For example, suppose you have a resource that you don’t want users accessing on Monday, Wednesday, and Friday between 1:00 a.m. and 2:00 a.m. You could set up three rules, one for each day, or you could set up one rule with three conditions. If all the conditions have the same action (for example, deny access with the same reason), it is simpler to put them in the same rule. However, if you have a customized message to return for each day, you need to put them in separate rules.
Each rule contains the following:
-
Zero or more conditions. A condition specifies how the request data is evaluated for a True or False match. Conditions are evaluated in the order in which they are listed.
-
One or more condition groups. Conditions are placed in condition groups, which gives you the flexibility of creating a policy that allows the user to match the conditions in one group but not the conditions in the other condition groups. Or you can set up the condition groups to require that the user matches at least one condition in each condition group.
-
An action, which grants access, denies access, or redirects the users.
Conditions, conditions groups, and the interaction among them allow you to create very simple rules (if A, then grant access) to very complex rules (if A, B, and C, but not D and E, then grant access).
Using Multiple Conditions
The option controls how conditions within a condition group interact with each other and how condition groups interact with each other. Select one of the following:
-
AND Conditions, OR groups: If the conditions are ANDed, the user must meet all the conditions in a condition group to match the profile. If the condition groups are ORed, the user must meet all of the conditions of one group to match the profile. This option allows you to set up two or more profiles into which a user could fit and be considered a match. For example, suppose you create the following Permit rule:
The first condition group contains the following conditions:
-
The user’s department must be Engineering.
-
The request must come on a weekday.
The second condition group contains the following conditions:
-
The user’s department must be Information Services and Technology (IS&T).
-
The request must come on a weekend.
With this rule, the engineers who match the first condition group have access to the resource during the week, and the IS&T users who match the second condition group have access to the resource on the weekend.
-
-
OR Conditions, AND groups: If the conditions are ORed, the user must meet at least one condition in the condition group to match the profile. If the conditions groups are ANDed, the user must meet at least one condition in each condition group to match the profile. For example, suppose you create the following allow rule:
The first condition group contains the following conditions:
-
The user’s department is Engineering.
-
The user’s department is Sales.
The second condition group contains the following conditions:
-
The user has been assigned the Party Planning role.
-
The user has been assigned the Vice President role.
With this rule, the Vice Presidents of both the Engineering and Sales departments can access the resource, and the users from the Engineering and Sales department who have been assigned to the Party Planning role can access the resource.
-
At the top of each condition group, there is an option that allows you to control whether the user must match the conditions to match the profile or whether the user matches the profile if the user doesn’t match any of the conditions. Depending upon your selection for the Condition structure, you can select from the following:
-
If/If Not
-
Or/Or Not
-
And/And Not
Conditions also have similar Not options, so that a user can match a condition by not matching the specified value.
Adding Multiple Conditions
To add another condition to a condition group, click , then select a condition. To copy an existing condition, click the icon  . New conditions are always added to the end of the condition group. Use the
  buttons to order the conditions in the condition group.
Adding New Condition Groups
To add another condition group to the rule, click . To copy the existing condition group, click the icon . New condition groups are always added to the end to the Conditions section. Use the buttons to order the condition groups.
Disabling or Moving Conditions and Condition Groups
Condition groups and conditions within them can be disabled by clicking the Enabled check mark  , which changes the icon to the icon
  .
.
You usually disable a condition or condition group when testing a new rule, and if you decide that the condition or condition group is not needed, you can then use the  button to delete the condition or condition group from the rule. Use the buttons next to the button to move a condition up or down within its group. Condition groups also have buttons.
Controlling Access with Multiple Conditions
A policy requires multiple conditions when you have more than one required condition for granting access. For example, suppose you can easily identity your managers because they have all been assigned the role of Manager, and you have a resource that only the sales managers should access. Such a policy requires two conditions for granting access: the Manager role and membership in the sales department. For a Deny rule, the rule needs two condition groups:
-
The first condition group matches all users who are not managers. This causes the Deny action to be applied.
-
The second condition group matches the users who are managers but don’t belong to the sales department. Because they match both conditions, the Deny action is applied. For these two condition groups to work with this logic, the is set to .
The users who are managers and who belong to the sales department do not match either condition group. The Deny action is not applied, and they are allowed access.
Such a rule would look similar to the following:
Figure 6-16 A Rule with Two Condition Groups
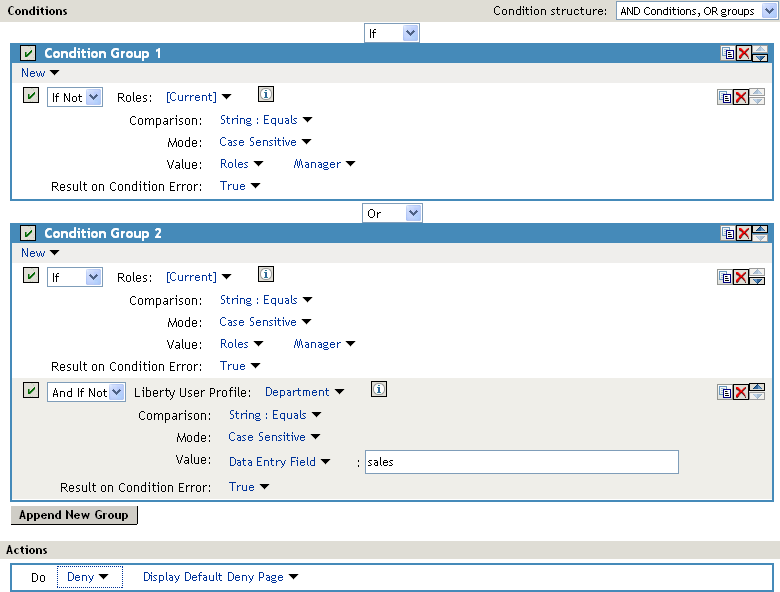
This second condition group could be implemented as the second rule of the policy. If so, it should be set as a lower priority than the first rule. Because most systems would have more users than managers, the user rule would be used more frequently, so it should come first.
Using Permit Rules with a Deny Rule
You can also create policies that contain one or more Permit rules and then create the lowest priority rule in the policy as a Deny rule with no conditions. In such a policy, as soon as an allow match is processed, the rest of the rules are not processed and the user is granted access to the resource. The Deny rule is only processed if the user does not match one of the allow rules, and because all users match a rule with no conditions, the user is denied access to the resource.
The first rule in such a policy for the sales application would look similar to the following.
Figure 6-17 Rule 1 Granting Access
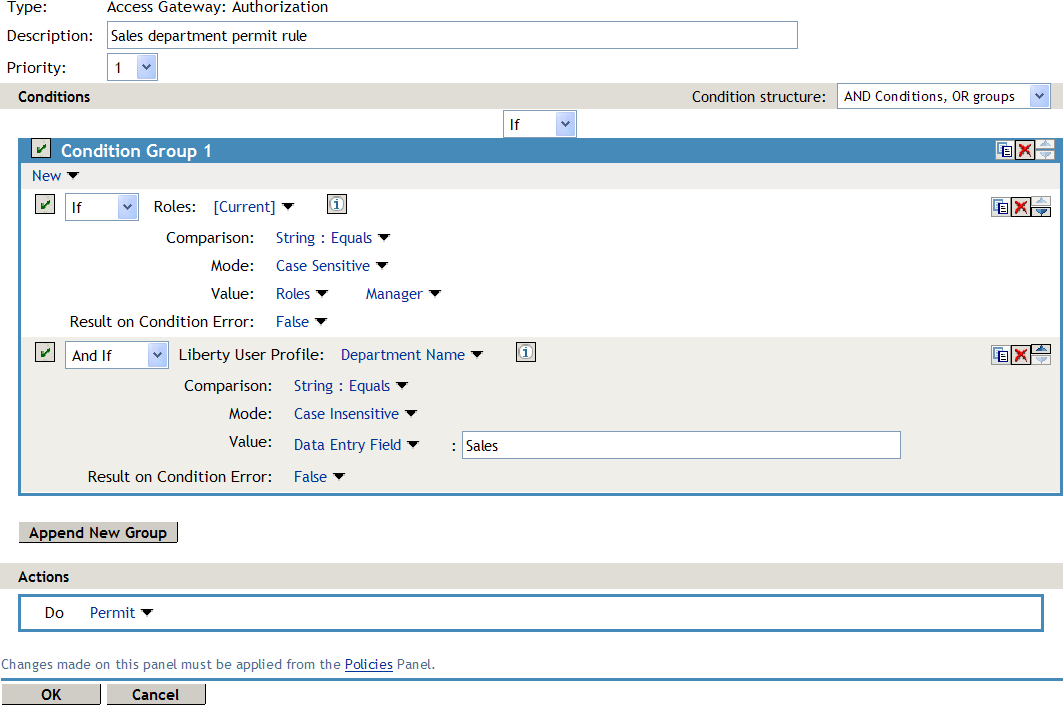
The conditions in Rule 1 are ANDed, which requires the user to match both conditions before they are granted access to the resource. The priority is set to 1, so this rule is the first rule that the Access Gateway processes.
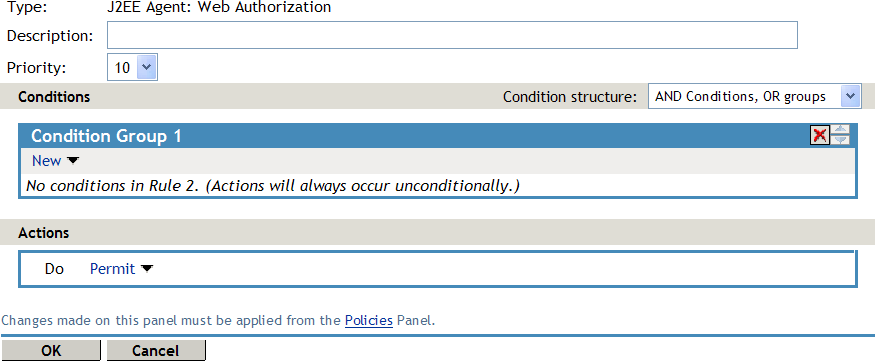
The second rule would look similar to the following:
Figure 6-18 Rule 2 Denying Access
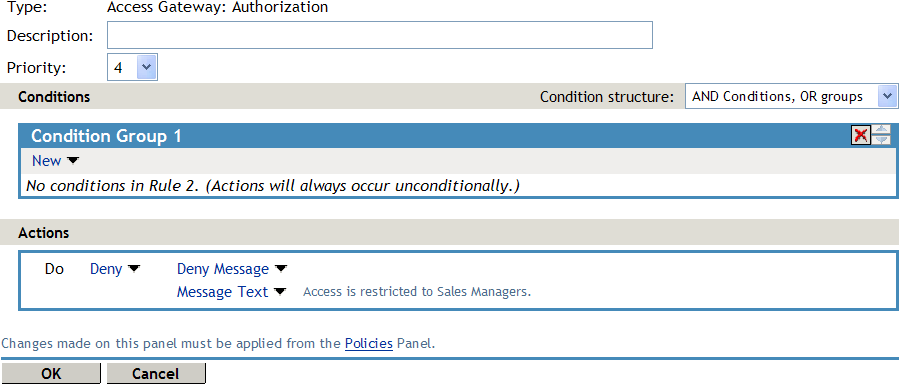
Because this rule has no conditions, any user who does not match the first rule does match this rule and is denied access. The priority of this rule is set lower than the Permit rule so that the Permit rule is processed first.
Using Deny Rules with a General Permit Rule
You can also create policies that contain one or more Deny rules and then create the lowest priority rule in the policy as a Permit rule with no conditions. In such a policy, as soon as a Deny rule matches a user, the rest of the rules are not processed and the user is denied access to the resource. The Permit rule is only processed if the user does not match one of the Deny rules. Because all users match a rule with no conditions, the user is allowed access to the resource.
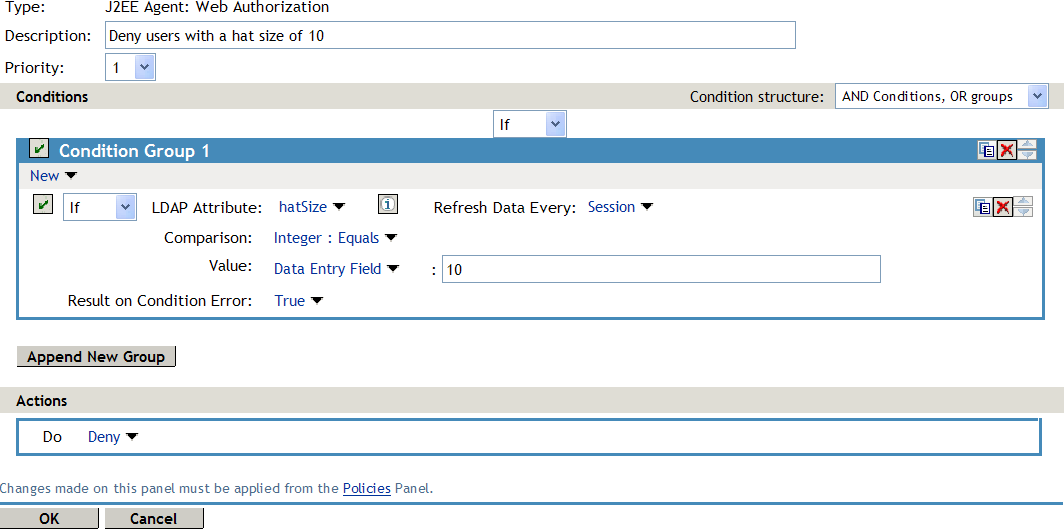
The key to creating this type of policy is making sure all the Deny rules match the users you do not want accessing the resource and making sure that the option is set correctly.
For example, suppose one of the Deny rules uses an LDAP attribute for the condition and that the attribute is a hatSize attribute. Some of your users do not have a hatSize attribute, so when they access the resource, the comparison generates an error. If option is set to False, the action (Deny) is not applied, and the next rule in the policy is processed. If that rule is the general Permit rule, then they are allowed access to the resource because they experienced an error. To prevent this behavior, you need to set the option to True, so that the Deny action is applied. Your rule then denies access to everyone whose hatSize attribute matches the specified value and everyone who does not have the attribute.
The Deny rule for such a policy would look similar to the following:
Figure 6-19 Deny Rule Configured for Error Conditions
For most people, Deny rules are harder to write than Permit rules. You not only need to carefully configure the option, you must also carefully consider the consequences of the condition not matching a user. When a user doesn’t match the condition, the Action is not applied and the next rule in the policy is evaluated. For example, suppose the URL condition is set to the compare the following value:
http://sales.provo.novell.com/meetings/?
If the URL in the request is http://sales.provo.novell.com/meetings/january, the user does not match the condition, because the ? applies only to the files in the meetings directory and not to the subdirectories. The Action is not applied, and the next rule or policy is evaluated. Consider the following possibilities:
-
If you want the condition to match all files and subdirectories, you need to change the ? wildcard to the wildcard.
-
If you want the condition to allow access to the files in the /meetings directory but deny access to the subdirectories, you need to negate the condition so it evaluates as follows: if the URL is not a request for the /meetings/? directory, deny access. If you select this type of condition, you need to set the option to True. If the comparison returns an error and there is the possibility that the request is for a subdirectory, you want the user to be denied access.
The general Permit rule for a Deny policy would look similar to the following:
Figure 6-20 General Permit Rule
Public Policies
You can create public authorization policies, which are policies that apply to everyone, by leaving the section empty. In the section, you specify either to deny or to permit access to the resource. Then you assign the policy to the protected resource.
General Design Principles
When you design a policy, remember the following principles:
-
Logged-in users are allowed access to a protected resource unless the policy denies access.
-
Priority determines the order in which rules are applied.
-
The Conditions section of the rule must evaluate to True in order for the Action section to be applied. If the Condition section evaluates to False, the Action section is ignored and the policy moves to the next rule. If another rule does not exist, the user is granted access to the resource.
-
Rules are only processed until a user matches the conditions in a rule and its action is applied. If a user matches the first rule in a policy, that action is applied, and the rest of the rules in the policy are ignored.
-
If two rules have the same priority, Deny rules are applied before Permit rules.
-
After you have designed your policy, created it, and assigned it to a resource, you need to test the policy. You need to log in as the type of user who should be granted access, as the type of user who should not be granted access, and as a user who generates an error on condition evaluation.
Using the Refresh Data Option
Authorization policies are processed when a user requests access to a resource. The results and the values of the data items are cached for the user session. This means that when the user requests a second time to access the resource, the policy is evaluated, but the data values from the first evaluation are used. When a data item is cached for the user session, the user must log out and log back in to trigger new data values. (For information about how long the data items are cached, see Section 26.7.3, The Policy Is Using Old User Data.)
The LDAP Attribute can be configured to refresh its value according to a specified interval. This means the attribute value is read not just on the first request that triggers the policy evaluation, but when the interval expires. You can select to cache the value for the user session, the current request, or a time interval varying from 5 seconds to 60 minutes.
If the requested page contains links, you should usually cache the data for more than a single request. Each link on the page generates a new request.
You can use this feature for situations when you do not want to force the user to log in again to gain rights to resources or to revoke rights to resources. For example, suppose that you have an Authorization policy that grants access based on an LDAP attribute having a “yes” value. Users with a “no” value in this attribute are denied access.
If you don’t enable the Refresh Data option on this attribute in the policy condition, the policy is evaluated when the user first tries to access the resource. The value for the attribute is cached for the user session, and until the user logs out, that is the value that is used.
However, if you enable the Refresh Data option on this attribute in the policy condition, the policy is evaluated when the user first tries to access the resource. When the user sends a second request to access the resource and the cached value has been marked old, the Refresh Data option causes the value of the attribute to be read again from the LDAP server. This new value is used to evaluate the policy and any other policy that is triggered by the request.
-
If the value from the first request to the second request changes from no to yes, the user gets access to the resource.
-
If the value from the first request to the second request changes from yes to no, the user is denied access to the resource.
For example:
-
If the attribute controls access to employee resources and an employee leaves, a quick change of this attribute value cuts the employee off from the resources that should be available to employees only.
-
If the attribute controls access to a software download site and a user has just purchased a product, a quick change to this attribute value can grant access to the download site.
IMPORTANT:This feature needs to be used with caution. Because querying the LDAP server slows down the processing of a policy, LDAP attribute values are normally cached for the user session. Enable this option only on those attributes that are critical to the security of your system or to the design of your work flow.
Assigning Policies to Resources
For information about how to assign the Access Gateway policy, see Assigning an Authorization Policy to a Protected Resource.
6.3.3 Sample Access Gateway Authorization Policies
Sample Policy Based on Organizational Rules
The following sections describe a scenario with an organizational division, then describe two types of policies that enforce the requirements of the scenario:
Company Scenario
Suppose that the company LDAP directory has the following organization:
- ou=sales,o=acme
- ou=dev,o=acme
- ou=hr,o=acme
Suppose that this company has the following configuration and requirements:
-
Under each branch of the tree, the system administrator has created the users who work in these departments.
-
Each department has its own Web resources, and other departments must be denied access to these resources.
With this type of configuration, you can use the LDAP context condition to create authorization policies or you can create role policies that are used in conjunction with authorization policies.
LDAP Context Policies
With such an organization, you can create a policy that either allows or denies access based on the LDAP context of the user’s DN. You can use the LDAP context of the user DN to separate the users into their departments and then grant access based on the context match. You need to create protected resources for the Web resources of the department, create a policy for each protected resource, and assign a policy to the protected resources.
The following procedure explains how to configure such a policy for the sales department.
-
Click > > , specify a name for the policy, select as the type, then click .
-
For , click , then select .
-
Fill in the following fields:
LDAP Credentials: Select .
If/If Not: Select .
Comparison: Select .
Mode: Select
Value: Select. In the text box, type the following value:
ou=sales,o=acme
Result on Condition Error: Select .
-
In the section, select .
Your policy should look similar to the following:

This sets up the condition so that the following occurs:
-
When the user does not belong to the sales department, the user is denied access.
-
When the user belongs to the sales department, the user is granted access.
-
When an error occurs evaluating the conditions in the rule, the user is denied access.
-
-
Assign the policy to the protected Web resources of the sales department (see Assigning an Authorization Policy to a Protected Resource).
-
Repeat these steps for the other two departments, changing the field to match the appropriate department.
Role Policies with Authorization Policies
Because of the company’s organization, you need to create three role policies, one for the sales users, one for the development users, and one for the human resource users. You can then use these roles as conditions in authorization policies to allow and deny access. The first time you use roles in an authorization policy, there is extra setup because you must create the role policies. However, after the role policies are created, you can use them in multiple authorization policies.
The following instructions explain how to use the Sales role to create a policy that controls access to a protected resource. For instructions on how to create the Sales role, see Creating a Role by Using the Location of the User Objects.
You need to decide on the type of Authorization policy you want to create. For example, you can create a Deny policy that denies access to everyone who does not match the condition (in this case, the Sales role).
Or you can create a two-rule policy that allows access to everyone that matches the condition. The first rule grants access to everyone who has the Sales role, and the second rule denies access to everyone who did not match the conditions of the first rule. (Other methods are also possible.) Because the proposed Deny policy is very similar to the LDAP Context Policies example, the following procedures explain how to create the two-rule policy.
-
In the Administration Console, click > > .
-
Specify a name for the policy, select as the type, then click .
-
(Optional) Provide a description for the rule.
-
In , click , and select .
-
Fill in the following fields:
If/If Not: Select .
Roles: Select.
Comparison: Select .
Mode: Select
Value: Select then select
Result on Condition Error: Select .
-
Under , select , then click OK.
These steps create the Permit rule and set up the condition so that the following occurs:
-
When the user does not match the condition because the user does not belong to the Sales role, the policy engine moves to the next rule in the policy.
-
When the user does match the condition because the user belongs to the Sales role, the user is granted access.
-
If an error occurs when evaluating the condition of the policy, the user does not match the condition and the policy engine moves to the next rule in the policy.
-
-
In the , click .
This second rule is for denying access to everyone who does not match the condition in Rule 1. Processing of the policy stops when a user matches a rule; therefore all users who match Rule 1 are granted access and the policy engine does not evaluate the second rule.
-
Set the to be 2 or greater.
You want the Permit rule to be processed first, so it should have a priority of 1. The Deny rule needs to be processed last, so it needs a lower priority than the Permit rule.
-
Leave the empty.
The section is left empty so that everyone who does not match the conditions of the Permit rule is denied access to the resource.
-
In the section, select and either accept the default action or select one of the other actions.
-
Click twice.
-
Click on the Policies page.
-
Assign the policy to the protected Web resources of the sales department (see Assigning an Authorization Policy to a Protected Resource).
Sample Workflow Policy
One of the common workflow problems that an Authorization policy can solve is what to do with users who are denied access to resource. Most of the time they have a legitimate reason for trying to access the resource and need contact information to request access to the resource. You can add this contact information to a Web page and redirect the users to this page when the policy denies the user access.
To create such a workflow, you need to create an HTML page with the necessary information for making the request for access. It can be as simple as a contact name or it can be an actual form that the user submits to the organization that controls access to the resource.
You then need to create an Authorization policy that redirects the denied users to this page. The following sample policy uses a role for the access condition, but the same workflow can be created using any of the other conditions available for an Authorization policy. For this example, assume that the user is granted a Master role if the user is a member of the Master group. The organization that controls access to the resource is the owner of the Master group and can add and delete members from the group. When the owner of the Master group receives a request for access to the resource, the owner can evaluate the user, and if the user meets their standards, the owner adds the user to the Master group.
You can use the Master group to create an Access Manager Appliance Role policy. This policy for the Master role should look similar to the following:
Figure 6-21 A Role Policy with an LDAP Group Condition
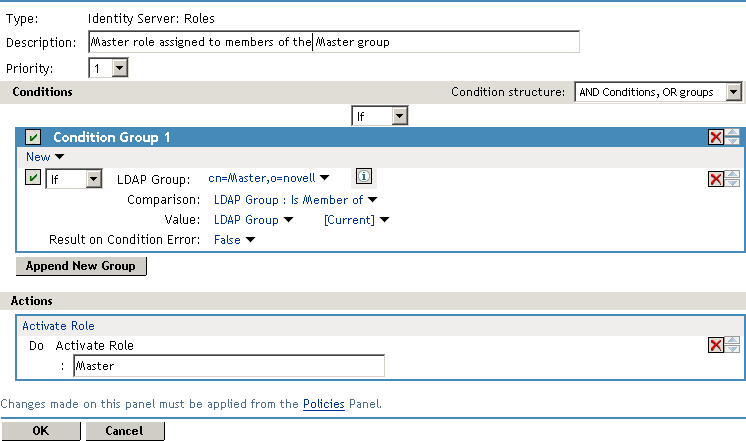
This rule grants the user the Master role if the user belongs to the cn=Master,o=novell LDAP group. If the user doesn’t belong to this group or if an error occurs trying to get the data, the user is not assigned the role. This occurs because both the condition and the evaluate to False, which prevents the Action from being applied.
After creating the Role policy, apply the changes and enable the Role for the Identity Server.
You can then use this role to create an Authorization policy that contains two rules. The first rule grants access to the users who have the Master role (and are therefore members of the Master group). This rule should look similar to the following:
Figure 6-22 A Permit Rule with a Role Condition
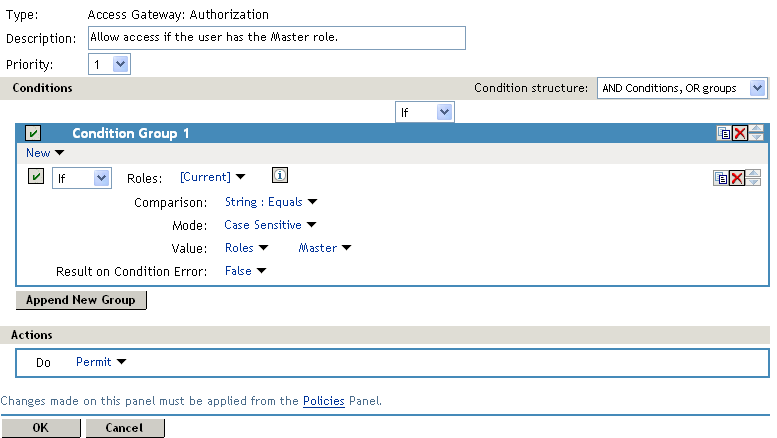
This rule permits users who are assigned the Master role to have access to the resource. If the user does not match the condition or if an error occurs accessing the user’s role information, the user is sent to the next rule because both the condition and the evaluate to False.
The second rule in the policy should deny access to those who are not assigned the Master role and should redirect them to the page where they can request access. You can do this with a rule that checks to see if they are assigned the Master role. In this type of rule, the condition needs to be an condition.
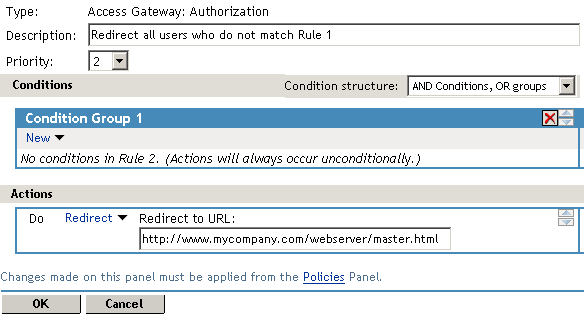
Figure 6-23 A Deny Rule with a Redirect URL

With an condition, the condition evaluates to True when the user does not match the condition. With such a rule, you want the to also evaluate to True. If there is an error obtaining role information for the user, you don’t want the rule to assume that the user had the Master role. You want the rule to assume that the user had no roles, or in other words, you want the error condition to evaluate to True.
Because the condition evaluated to True, the Action is applied to the user. The value specified in the text box should specify the page that contains the information about how to request access.
This redirect rule could be the only rule in the Authorization policy, because the users who are assigned to the Master role do not match the rule and are thus allowed access. Having the first rule that grants access because they have the Master role just makes the logic of the policy clearer.
If you create the first rule that grants users with the Master role access, you can use a general Deny rule for the second rule.
It should look similar to the following:
Figure 6-24 A General Deny Rule
A general Deny rule has no conditions, so it matches everyone that does not match the first rule in the policy. You can add more rules to this policy to tighten security so that not all users are redirected to the site that contains the information about how to request access. For this type of policy, the last rule would be a general Deny rule with no conditions and without a redirect. The rules between Rule 1, which granted access to people assigned to the Master role, and the last rule, which denies everyone, should be rules that identify the types of users who have legitimate reasons for requesting access, and these rules should contain the redirect action.
After you have saved the Authorization policy, you need to assign it to the protected resource or resources that require the Master role, then update the Access Gateway.
6.3.4 Conditions
This section describes the possible conditions for an Authorization policy. Some conditions can be set up so that the current values in the request are compared against static values (A to B), or you can compare static values to current values in the request (B to A). Within one policy, you should probably decide which direction to set up the comparisons and remain consistent unless there is a compelling reason to switch the direction for a particular condition.
For example, suppose you set up a rule to allow access to a resource only during the weekdays (Monday through Friday). You set up four of these conditions to compare if the date when the request is made matches with Monday, Tuesday, Wednesday, or Thursday. You set up the fifth condition to compare whether Friday matches the date when the request is made. This works, but maintaining this policy is more difficult because each new policy manager will look at the Friday condition and wonder why it is configured differently.
Many conditions, when used as the sole condition of a rule, do not make very useful rules. For example, you can create a rule that grants access if the user specifies a specific URL in the request. Such a rule has limited application. But a rule that requires that the request contain a specific URL and that the user have a specific role has greater application because it can be used to limit access to the URL based on the user’s role. For information about how conditions can be ANDed or ORed together or placed in different condition groups, see Using Multiple Conditions.
Authorization policies use the following conditions:
For the specific policies they can be used in Section 6.3.2, Creating Access Gateway Authorization Policies
Authentication Contract Condition
The Authentication Contract condition matches the contract the user logged in with to the contract specified in this condition. The Identity Server has the following default contracts:
|
Name |
URI |
|---|---|
|
Name/Password - Basic |
basic/name/password/uri |
|
Name/Password - Form |
name/password/uri |
|
Secure Name/Password - Basic |
secure/basic/name/password/uri |
|
Secure Name/Password - Form |
secure/name/password/uri |
To configure other contracts for your system, click > > > > .
To specify an Authentication Contract condition, fill in the following fields:
Authentication Contract: To compare the contract that the user used with a static value, select . To compare a static value with what the user used, select a contract from the list.
If you have created more than one Identity Server configuration, select the configuration that corresponds to the configuration your Access Gateway is configured to trust, then select the contract. The name of the contract is displayed. When you select this name, the configurations that contain a definition for this contract are highlighted.
If you select a contract that is defined on only one of your configurations, be aware that you must change this policy when you change configurations. If you select a contract that is defined in all your configurations, this policy requires no modifications and continues to function when you change configurations.
For example, the following policy has selected Name/Password - Basic as the contract:
Figure 6-25 An Authentication Contract Defined by Multiple Identity Server Configurations
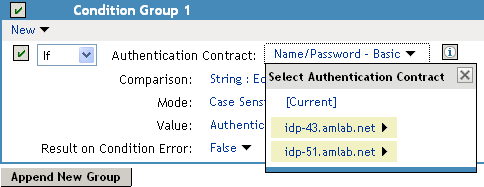
Two Identity Server configurations have been defined (idp-43.amlab.net and idp-51.amlab.net). Both configurations are highlighted because Name/Password - Basic is a contract that is automatically defined for all Identity Server configurations. Because it is defined on both configurations, this policy’s function is the same, regardless of which configuration is selected as the trusted configuration.
Comparison: Specify how the contract is compared to the data in the field. Select either a string comparison or a regular expression:
-
Comparison: String: Specifies that you want the values compared as strings and how you want the string values compared. Select one of the following:
-
Equals: Indicates that the values must match, letter for letter.
-
Starts with: Indicates that the Authentication Contract value must begin with the letters specified in the field.
-
Ends with: Indicates that the Authentication Contract value must end with the letters specified in the field.
-
Contains Substring: Indicates that the Authentication Contract value must contain the letters, in the same sequence, as specified in the field.
-
-
Comparison: Regular Expression: Matches: Specifies that you want the values compared as regular expressions.
Mode: Select the mode appropriate for the comparison type:
-
Comparison: String: Specify whether case is important by selecting or .
-
Comparison: Regular Expression: Matches: Select one or more of the following:
- Canonical Equivalence
- Case Insensitive
- Comments
- Dot All
- Multi-Line
- Unicode
- Unix Lines
For regular expression syntax information, see the Javadoc for java.util.regex.Pattern.
Value: Specify the value you want to compare with the Authentication Contract value. If you select a static value for the Authentication Contract value, select and . If you select for the Authentication Contract value, select , then select the name of a contract.
Other value types are possible if you selected for the Authentication Contract value. For example:
-
You can select . The value specified in the text box must be the URI of the contract for the conditions to match. For a list of these values, click > > > > .
-
If you have defined a Liberty User Profile attribute for the URI of authentication contracts, you can select and your defined attribute.
-
If you have defined an LDAP attribute for the URI of the authentication contracts, you can select and your defined attribute.
Result on Condition Error: Specify what the condition returns when the comparison of the two values returns an error rather than the results of the comparison. Select either or . If you do not want the action applied when an error occurs, select . If you want the action applied when an error occurs, select .
Client IP Condition
The Client IP condition allows you to use the IP address of the user making the request to determine whether the user is allowed access to a resource.
NOTE:Client IP will support IPv4 addresses and not IPv6 addresses.
Fill in the following fields:
Comparison: Specify how the client IP address is compared to the data in the field. Select either an IP comparison or a regular expression:
-
Comparison: IP: Specifies that you want the values compared as IP addresses. Select one of the following:
-
Equals: Allows you to specify an IP address that the client must match. You can specify more than one.
-
In Range: Allows you to specify a range of IP addresses that the client’s address must fall within. You can specify more than one range.
-
In Subnet: Allows you to specify the subnet that the client’s address must belong to. You can specify more than one subnet.
-
-
Comparison: Regular Expression: Matches: Specifies that you want the values compared as regular expressions. If you select this option, you must also specify a mode. Select one or more of the following:
- Canonical Equivalence
- Case Insensitive
- Comments
- Dot All
- Multi-Line
- Unicode
- Unix Lines
For regular expression syntax information, see the Javadoc for java.util.regex.Pattern.
Value: Select and specify a value appropriate for your comparison type. Use the button to access a text box where you can enter multiple values, each on a separate line. (For more information, see Edit Button.) Use the button to add values one at a time. For example:
|
Comparison Type |
Value |
|---|---|
|
Equals |
10.10.10.10 10.10.10.11 |
|
In Range |
10.10.10.10 - 10.10.10.100 10.10.20.10 - 10.10.20.100 |
|
In Subnet |
10.10.10.12 / 22 10.10.20.30 / 22 |
Other values types are possible. For example, if your user store contains an LDAP attribute with the IP address of your users, you could select to compare the client’s current IP address with the stored value by using an LDAP attribute or a Liberty User Profile value.
Result on Condition Error: Specify what the condition returns when the comparison of the two values returns an error rather than the results of the comparison. Select either or . If you do not want the action applied when an error occurs, select . If you want the action applied when an error occurs, select .
Credential Profile Condition
The Credential Profile condition allows you to control access based on the credentials the user entered when authenticating to the system.
To set up the matching for this condition, fill in the following fields:
Credential Profile: Specify the type of credential your users are using for authentication. If you have created a custom contract that uses credentials other than the ones listed below, do not use the Credential Profile as a condition.
To configure the Credential Profile condition, select one of the following:
-
LDAP Credentials: If you prompt the user for a username, select this option, then select (the cn of the user), (the fully distinguished name of the user), or .
The default contracts assign the cn attribute to the Credential Profile. If your user store is an Active Directory server, the SAMAccountName attribute is used for the username and stored in the cn field of the LDAP Credential Profile.
-
X509 Credentials: If you prompt the user for a certificate, select this option, then select one of the following:
-
X509 Public Certificate Subject: Retrieves the subject field from the certificate, which can match the DN of the user, depending upon who issued the certificate.
-
X509 Public Certificate Issuer: Retrieves the issuer field from the certificate, which is the name of the certificate authority (CA) that issued the certificate.
-
X509 Public Certificate: Retrieves the entire certificate, Base64 encoded.
-
X509 Serial Number: Retrieves the serial number of the certificate.
-
-
SAML Credential: If your users authenticate using a SAML assertion, select this option.
Comparison: Select one of the following types:
-
Comparison: String: Specifies that you want the values compared as strings and how you want the string values compared. Select one of the following:
-
Equals: Indicates that the values must match, letter for letter.
-
Starts with: Indicates that the Credential Profile value must begin with the letters specified in the field.
-
Ends with: Indicates that the Credential Profile value must end with the letters specified in the field.
-
Contains Substring: Indicates that the Credential Profile value must contain the letters, in the same sequence, as specified in the field.
-
-
Comparison: Regular Expression: Matches: Specifies that you want the values compared as regular expressions.
Mode: Select the mode appropriate for the comparison type:
-
Comparison: String: Specify whether case is important by selecting or .
-
Comparison: Regular Expression: Matches: Select one or more of the following:
- Canonical Equivalence
- Case Insensitive
- Comments
- Dot All
- Multi-Line
- Unicode
- Unix Lines
For regular expression syntax information, see the Javadoc for java.util.regex.Pattern.
Value: Specify the second value for the comparison. Select one of the following data types:
-
LDAP Attribute: If you have an LDAP attribute that corresponds to the Credential Profile you have specified, select this option and the attribute.
-
Liberty User Profile: If you have a Liberty User Profile attribute that corresponds to the Credential Profile you have specified, select this option and the attribute.
-
Data Entry Field: Specify the string you want matched. Be aware of the following requirements:
-
If you selected as the credential, you need to specify the DN of the user in the text box. If the comparison type is set to , you can match a group of users by specifying a common object that is part of their DNs, for example ou=sales.
-
If you selected as the credential, you need to specify all elements of the Subject Name of the certificate in the text box. Separate the elements with a comma and a space, for example, o=novell, ou=sales. If the comparison type is set to , you can match a group of certificates by specifying a name that is part of their Subject Name, for example ou=sales.
-
Other values are possible. Your policy requirements determine whether they are useful.
Result on Condition Error: Specify what the condition returns when the comparison of the two values returns an error rather than the results of the comparison. Select either or . If you do not want the action applied when an error occurs, select . If you want the action applied when an error occurs, select .
Current Date Condition
The Current Date condition allows you to use the date to determine whether the user is allowed access to a resource.
Fill in the following fields:
Comparison: Specify how the current date is compared to the data in the field. Select one of the following types:
-
Comparison: Date: Specifies that you want the values compared as dates. Select one of the following date operators:
-
Equals: Requires that the current date must equal the specified value.
-
Greater Than: Requires that the current date be after the specified value.
-
Greater Than or Equal to: Requires that the current date be after or equal to the specified value.
-
Less Than: Requires that the current date be before the specified value.
-
Less Than or Equal to: Requires that the current date be before or equal to the specified value.
-
-
Comparison: Regular Expression: Matches: Specifies that you want the values compared as regular expressions. Be aware the regular expression matching uses the entire date of the server in its matching. Therefore if the value you are matching is 8, the 8 can produce a match for the year (2008), the month (8), and the day (8, 18, 28).
If you select this option, you must also specify a mode. Select one or more of the following:
- Canonical Equivalence
- Case Insensitive
- Comments
- Dot All
- Multi-Line
- Unicode
- Unix Lines
For regular expression syntax information, see the Javadoc for java.util.regex.Pattern.
Date Format: If you selected a date comparison, specify the format of the field. Select one of the following formats:
-
D/M/Y = 1/Jul/2009 or 1/7/2009
-
D-M-Y = 1-Jul-2009 or 1-7-2009
-
D.M.Y = 1.Jul.2009 or 1.7.2009
-
M/D/Y = Jul/1/2009 or 7/1/2009
-
M-D-Y = Jul-1-2009 or 7-1-2009
-
M.D.Y = Jul.1.2009 or 7.1.2009
-
YYYY-MM-DD = 2009-07-01
-
YYYY.MM.DD = 2009.07.01
specifies a number from 1 to 31. specifies a number from 1 to 12 or the name of the month in three letters (Sep) or complete (September). specifies the year in a four-digit format.
Value: Specify the second value for the comparison. If you select as the value type, specify the date in the format you select in the field.
Other value types are possible. Your policy requirements determine whether they are useful. If you have set up a Liberty User Profile or an LDAP attribute that corresponds to the date, you can use this option and select your attribute. The field does not apply to these value types.
Result on Condition Error: Specify what the condition returns when the comparison of the two values returns an error rather than the results of the comparison. Select either or . If you do not want the action applied when an error occurs, select . If you want the action applied when an error occurs, select .
Day of Week Condition
The Current Day of Week condition allows you to restrict access based on which day of the week the request is made. Fill in the following fields:
Current Day of Week: Select the name of the day from the list. To compare the day specified in the current request with a static value, select . To compare a static value with the day specified in the current request, select the name of a day from the list.
Comparison: Specify how the current day of the week is compared to the data in the field. Select one of the following types:
-
Comparison: Day of Week: Specifies that you want the values compared as a day of the week. Select one of the following operators:
-
Equals: Allows you to specify a day that the client must match.
-
In Range: Allows you to specify a range of days that the client’s request must fall within, for example, Monday to Friday.
-
-
Comparison: Regular Expression: Matches: Specifies that you want the values compared as regular expressions. Be aware that regular expression matching uses the entire date of the server in its matching. Therefore if the value you are matching is M, the M can produce a match for months (March and May) and for time zones (such as MST).
If you select this option, you must also specify a mode. Select one or more of the following:
- Canonical Equivalence
- Case Insensitive
- Comments
- Dot All
- Multi-Line
- Unicode
- Unix Lines
For regular expression syntax information, see the Javadoc for java.util.regex.Pattern.
Value: Specify the second value for the comparison. If you select for the field, you need to specify a static value. If you select a static value for the field, you need to select for the field.
If you select as the value type, days of the week are specified in the following format:
Sun or Sunday
Mon or Monday
Tue or Tuesday
Wed or Wednesday
Thu or Thursday
Fri or Friday
Sat or Saturday
If you selected as the comparison type, specify the first day of the range in the left text box and the end day of the range in the right text box.
Other value types are possible. Your policy requirements determine whether they are useful. If you have set up a Liberty User Profile or an LDAP attribute that corresponds to a day of the week, you can use this option and select your attribute.
Result on Condition Error: Specify what the condition returns when the comparison of the two values returns an error rather than the results of the comparison. Select either or . If you do not want the action applied when an error occurs, select . If you want the action applied when an error occurs, select .
Current Day of Month Condition
The Current Day of Month condition allows you to restrict access based on the day of the month the request is made. Fill in the following fields:
Comparison: Specify how the current day of the month is compared to the data in the field. Select one of the following types:
-
Comparison: Day of Month: Specifies that you want the values compared as a day of the month. Select one of the following operators:
-
Equals: Allows you to specify a day that the client must match.
-
In Range: Allows you to specify a range of days that the client’s request must fall within.
-
-
Comparison: Regular Expression: Matches: Specifies that you want the values compared as regular expressions. Regular expression matching uses the entire date of the server in its matching. Therefore if the value you are matching is 8, the 8 can produce a match for the year (2008), the month (8), and the day (8, 18, 28). If you want to match only on a day of the month (1-31), you need to use the Day of Month comparison rather than a Regular Expression comparison.
If you select this option, you must also specify a mode. Select one or more of the following:
- Canonical Equivalence
- Case Insensitive
- Comments
- Dot All
- Multi-Line
- Unicode
- Unix Lines
For regular expression syntax information, see the Javadoc for java.util.regex.Pattern.
Value: Specify the second value for the comparison:
-
If you select for the comparison type, you would normally select for the field and specify a number from 1 to 31 in the text box.
-
If you select for the comparison type, you would normally select for the field and specify the first value of the range in the first text box and the second value of the range in the second text box. If you specify 1 in the first box and 15 in the second box, you can use this condition to restrict access between the first day of the month and the 15th day.
Other value types are possible. Your policy requirements determine whether they are useful. If you have set up a Liberty User Profile or an LDAP attribute that corresponds to a day of the month, you can use this option and select your attribute.
Result on Condition Error: Specify what the condition returns when the comparison of the two values returns an error rather than the results of the comparison. Select either or . If you do not want the action applied when an error occurs, select . If you want the action applied when an error occurs, select .
Current Time of Day Condition
The Current Time of Day condition allows you to restrict access based on the time the request is made. Fill in the following fields:
Comparison: Specify how the current time of day is compared to the data in the field. Select one of the following types:
-
Comparison: Time: Specifies that you want the values compared as time. Select one of the following:
-
Greater Than: Requires that the current time is greater than the specified value.
-
Greater Than or Equal to: Requires that the current time is greater than or equal to the specified value.
-
Less Than: Requires that the current time is less than the specified value.
-
Less Than or Equal to: Requires that the current time is less than or equal to the specified value.
-
In Range: Requires that the current time must fall within the specified range, such as 08:00 and 17:00.
If you specify this type of comparison, you must also specify a time zone. Select either the time zone or (Greenwich Mean Time).
-
-
Comparison: Regular Expression: Matches: Specifies that you want the values compared as regular expressions. Regular expression matching uses the entire date and time of the server in its matching. Therefore if the value you are matching is 8, the 8 can produce a match for the year (2008), the month (8), the day (8, 18, 28), the hour (8), the minute (8, 18, 28, 38, 48) and the second (8, 18, 28, 38, 48).
If you select this option, you must also specify a mode. Select one or more of the following:
- Canonical Equivalence
- Case Insensitive
- Comments
- Dot All
- Multi-Line
- Unicode
- Unix Lines
For regular expression syntax information, see the Javadoc for java.util.regex.Pattern.
Value: Specify the second value for the comparison. If you select as the value type, hours and minutes are specified in the following format:
hour:minute
Hour is a number from 00 to 23, and minute is a number from 00 to 59.
Time can only be specified in a 24-hour clock format. For example, 8 am is 08:00 and 5:30 pm is 17:30.
Other value types are possible. Your policy requirements determine whether they are useful. If you have set up a Liberty User Profile or an LDAP attribute that corresponds to the time of day, you can use this option and select your attribute.
Result on Condition Error: Specify what the condition returns when the comparison of the two values returns an error rather than the results of the comparison. Select either or . If you do not want the action applied when an error occurs, select . If you want the action applied when an error occurs, select .
HTTP Request Method Condition
The HTTP Request Method condition allows you to restrict accessed based on the request method in the current request.
HTTP Request Method: Select the request method from the list or select to specify the method in the current request.
Comparison: Specify how the HTTP Request Method is compared to the data in the field. Select one of the following types:
-
Comparison: String: Specifies that you want the values compared as strings and how you want the string values compared. Select one of the following:
-
Equals: Indicates that the values must match, letter for letter.
-
Starts with: Indicates that the HTTP Request Method value must begin with the letters specified in the field.
-
Ends with: Indicates that the HTTP Request Method value must end with the letters specified in the field.
-
Contains Substring: Indicates that the HTTP Request Method value must contain the letters, in the same sequence, as specified in the field.
-
-
Comparison: Regular Expression: Matches: Specifies that you want the values compared as regular expressions.
Mode: Select the mode appropriate for the comparison type:
-
Comparison: String: Specify whether case is important by selecting or .
-
Comparison: Regular Expression: Matches: Select one or more of the following:
- Canonical Equivalence
- Case Insensitive
- Comments
- Dot All
- Multi-Line
- Unicode
- Unix Lines
For regular expression syntax information, see the Javadoc for java.util.regex.Pattern.
Value: Specify the value you want compared to the HTTP Request Method value. If you selected a method from the list for the HTTP Request Method value, select > . If you selected for the HTTP Request Method value, select a request method from the list.
Other value types are possible. Your policy requirements determine whether they are useful. If you have set up a Liberty User Profile or an LDAP attribute that corresponds to an HTTP Request Method, you can use this option and select your attribute.
Result on Condition Error: Specify what the condition returns when the comparison of the two values returns an error rather than the results of the comparison. Select either or . If you do not want the action applied when an error occurs, select . If you want the action applied when an error occurs, select .
LDAP Attribute Condition
The LDAP Attribute condition allows you to restrict access based on a value in an LDAP attribute defined for the inetOrgPerson class or any other LDAP attribute you have added. You can have the user’s attribute value retrieved from your LDAP directory and compared to a value of the following type:
-
Roles from an identity provider
-
Date and time and its various elements
-
URL and its various elements
-
IP address
-
Authentication contract
-
Credential profile
-
HTTP request method
-
Liberty User Profile attribute
-
Static value in a data entry field
This condition is one of the slower conditions to process because the value needs to be retrieved from the LDAP server. If the value is not time sensitive, you can have attribute value sent in the assertion when the user authenticates. Its value is then in cache and available. For configuration information, click .
To set up the matching for this condition, fill in the following fields:
LDAP Attribute: Specify the LDAP attribute you want to use in the comparison. Select from the listed LDAP attributes. To add an attribute that isn’t in the list, scroll to the bottom of the list, click , then specify the name of the attribute.
Refresh Data Every: Sends a query to the LDAP server to verify the current value of the attribute according to the specified interval. Because querying the LDAP server slows down the processing of a policy, LDAP attribute values are normally cached after the value has been obtained. The default cache interval is for the user session. You should change the value of this option from Session to a more frequent interval only on those attributes that are critical to the security of your system or to the design of your work flow.
You can select to cache the value for the session, for the request, or for a time interval varying from 5 seconds to 60 minutes. For more information about this option, see Using the Refresh Data Option.
Comparison: Specify how you want the values compared. All data types are available. Select one of the following that matches the value type of your attribute:
-
Date: Specifies that you want the values compared as dates. Select one of the following date operators:
-
Equals: Indicates that the current date must be equal to the specified value.
-
Greater Than: Indicates that the current date be after the specified value.
-
Greater Than or Equal to: Indicates that the current date be after or equal to the specified value.
-
Less Than: Indicates that the current date be before the specified value.
-
Less Than or Equal to: Indicates that the current date be before or equal to the specified value.
-
-
Day of Week: Specifies that you want the values compared as a day of the week. Select one of the following operators:
-
Equals: Allows you to specify a day that the specified value must match.
-
In Range: Allows you to specify a range of days that the specified value must fall within, for example, Monday to Friday.
-
-
Day of Month: Specifies that you want the values compared as a day of the month. Select one of the following operators:
-
Equals: Allows you to specify a day that the specified value must match.
-
In Range: Allows you to specify a range of days that the specified value must fall within.
-
-
Integer: Specifies that you want the values compared as integers. Select one of the following:
-
Equals: Indicates that the integer value must be equal to the specified value.
-
Greater Than: Indicates that the integer value must be greater than the specified value.
-
Greater Than or Equal to: Indicates that the integer value must be greater than or equal to the specified value.
-
Less Than: Indicates that the integer value is less than the specified value.
-
Less Than or Equal to: Indicates that the integer value is less than or equal to the specified value.
-
-
IP: Specifies that you want the values compared as IP addresses. Select one of the following:
-
Equals: Allows you to specify an IP address that the specified value must match. You can specify more than one.
-
In Range: Allows you to specify a range of IP addresses that the specified value must fall within. You can specify more than one range.
-
In Subnet: Allows you to specify the subnet that the specified value must belong to. You can specify more than one subnet.
-
-
LDAP OU: Contains: Specifies that you want the condition to determine whether the user is contained by a specified organizational unit.
-
Attribute: Does Exist? Specifies that you want the condition to determine whether the user has an LDAP attribute. This is a unary condition.
-
Regular Expression: Matches: Specifies that you want the values compared as regular expressions.
-
String: Specifies that you want the values compared as strings and how you want the string values to be compared. Select one of the following:
-
Equals: Indicates that the values must match, letter for letter.
-
Starts with: Indicates that the attribute value must begin with the letters specified in the field.
-
Ends with: Indicates that the attribute value must end with the letters specified in the field.
-
Contains Substring: Indicates that the attribute value must contain the letters, in the same sequence, as specified in the field.
-
-
Time: Specifies that you want the values compared as time. Select one of the following:
-
Greater Than: Indicates that the current time is greater than the specified value.
-
Greater Than or Equal to: Indicates that the current time is greater than or equal to the specified value.
-
Less Than: Indicates that the current time is less than the specified value.
-
Less Than or Equal to: Indicates that the current time is less than or equal to the specified value.
-
In Range: Indicates that the current time must fall within the specified range, such as 08:00 and 17:00.
-
-
URL: Equals: Specifies that you want the values compared as URLs.
-
URL Scheme: Specifies that you want the values compared as scheme strings and how you want the values compared. Select one of the following:
-
Equals: Indicates that the URL scheme must contain the same letters, in the same order as specified in the value.
-
Starts with: Indicates that the URL scheme must begin with the letters specified in the value.
-
Ends with: Indicates that the URL scheme must end with the letters specified in the value.
-
Contains Substring: Indicates that the URL scheme must contain the letters, in the same sequence, as specified in the value.
-
-
URL Host: Equals: Specifies that you want the values compared as hostnames.
-
URL Path: Specifies that you want the values compared as paths and how you want the string values compared. Select one of the following:
-
Equals: Indicates that the URL path must contain the same letters, in the same order as specified in the value.
-
Starts with: Indicates that the URL path must begin with the letters specified in the value.
-
Ends with: Indicates that the URL path must end with the letters specified in the value.
-
Contains SUbstring: Indicates that the URL path must contain the letters, in the same sequence, as specified in the Value field.
-
-
URL File: Specifies that you want the values compared as filenames and how you want the names compared. Select one of the following:
-
Equals: Indicates that the filenames must contain the same letters, in the same order as specified in the value.
-
Starts with: Indicates that the filenames must begin with the letters specified in the value.
-
Ends with: Indicates that the filenames must end with the letters specified in the value.
-
Contains Substring: Indicates that the filenames must contain the letters, in the same sequence, as specified in the Value field.
-
-
URL File Extension: Specifies that you want the values compared as file extensions and how you want the file extensions compared. Select one of the following:
-
Equals: Indicates that the file extensions must contain the same letters, in the same order as specified in the value.
-
Starts with: Indicates that the file extensions must begin with the letters specified in the value.
-
Ends with: Indicates that the file extensions must end with the letters specified in the value.
-
Contains Substring: Indicates that the file extensions must contain the letters, in the same sequence, as specified in the Value field.
-
Mode: Select the mode, if available, that matches the comparison type. For example, if you select to compare the values as strings, you can select either a mode or a mode.
Value: Specify the second value for the comparison. All data types are available. For example, you can select to compare the value of one LDAP attribute to the value of another LDAP attribute. Only you can determine if such a comparison is meaningful.
Result on Condition Error: Specify what the condition returns when the comparison of the two values returns an error rather than the results of the comparison. Select either or . If you do not want the action applied when an error occurs, select . If you want the action applied when an error occurs, select .
LDAP OU Condition
The LDAP OU condition allows you to compare the DN of an OU against the DN that was used when the user authenticated. If the user’s DN contains the OU, the condition matches.
LDAP OU: Select .
Comparison: Specify how you want the values compared. Select one of the following:
-
Contains: Specifies that you want the condition to determine whether the user is contained by a specified organizational unit.
-
Comparison: Regular Expression: Matches: Specifies that you want the values compared as regular expressions.
Mode: Select the mode appropriate for the comparison type.
-
Contains: Select whether the user must be contained in the specified OU (or whether the user can be contained in the specified OU or a child container (.
-
Comparison: Regular Expression: Matches: Select one or more of the following:
- Canonical Equivalence
- Case Insensitive
- Comments
- Dot All
- Multi-Line
- Unicode
- Unix Lines
For regular expression syntax information, see the Javadoc for java.util.regex.Pattern.
Value: Specify the second value for the comparison. If you select > > , you can browse to the name of the OU.
If you have more than 250 OUs defined in your tree, you are prompted to enter an LDAP query string. In the text box, you need to add only the <strFilter> value for the query. For example:
|
<strFilter> Value |
Description |
|---|---|
|
admin* |
Returns all OUs that begin with admin, such as adminPR, adminBG, and adminWTH. |
|
*test |
Returns all OUs that end with test, such as doctest, softtest, and securtest. |
|
*low* |
Returns all OUs that have “low” in the name, such as low, yellow, and clowns. |
For more information about the <strFilter> parameter, see RFC 2254 “LDAP Search Filter.”
If you select you can enter the DN of the OU in the text field. For example:
cn=users,dc=bcf2,dc=provo,dc=novell,dc=com
ou=users,o=novell
If you have defined a Liberty User Profile or an LDAP attribute for the OU you want to match, select this option, then select your attribute.
Result on Condition Error: Specify what the condition returns when the comparison of the two values returns an error rather than the results of the comparison. Select either or . If you do not want the action applied when an error occurs, select . If you want the action applied when an error occurs, select .
Liberty User Profile Condition
The Liberty User Profile condition allows you to restrict access based on a value in a Liberty User Profile attribute. The Liberty attributes must be enabled before you can use them in policies (click > > > > , then enable one or more of the following: , ).
These attributes can be mapped to LDAP attributes (click > > > > ). When mapped, the actual value comes from your user store. If you are using multiple user stores with different LDAP schemas, mapping similar attributes to the same Liberty User Profile attribute allows you to create one policy with the Liberty User Profile attribute rather than multiple policies for each LDAP attribute.
The selected attribute is compared to a value of the following type:
-
Roles from an identity provider
-
Date and time and its various elements
-
URL and its various elements
-
IP address
-
Authentication contract
-
Credential profile
-
HTTP request method
-
LDAP attribute
-
Static value in a data entry field
To set up the matching for this condition, fill in the following fields:
Liberty User Profile: Select the Liberty User Profile attribute. These attributes are organized into two main groups: Corporate Employment Identity and Entire Personal Identity. By default, the Common Last Name attribute for Liberty User Profile is mapped to the sn attribute for LDAP. To select this attribute for comparison, click > > > .
Comparison: Select the comparison type that matches the data type of the selected attribute and the value.
Mode: Select the mode, if available, that matches the data type. For example, if you select to compare the values as strings, you can select either a mode or a mode.
Value: Select one of the values that is available from the current request or select to enter a static value. The static value that you can enter is dependent upon the comparison type you selected.
Result on Condition Error: Specify what the condition returns when the comparison of the two values returns an error rather than the results of the comparison. Select either or . If you do not want the action applied when an error occurs, select . If you want the action applied when an error occurs, select .
Roles Condition
If you have configured some Access Manager Appliance role policies (see Section 6.2.3, Creating Roles), you can use these roles as conditions to control access. Roles are not assigned to users until the users authenticate. All authenticated users are assigned the authenticated role. If you use a comparison type of starts with, ends with, or contains substring, carefully evaluate the potential results. For example, if you specify ed as the value for an ends with comparison, the condition matches roles such as contracted and assigned that you created, but it also matches the authenticated role.
Fill in the following fields:
Roles: Select the role. To compare the roles the user is currently assigned with a specific role, select [Current].
Comparison: Select one of the following types:
-
Comparison: String: Specifies that you want the values compared as strings, and how you want the string values compared. Select one of the following:
-
Equals: Indicates that the values must match, letter for letter.
-
Starts with: Indicates that the Roles value must begin with the letters specified in the field.
-
Ends with: Indicates that the Roles value must end with the letters specified in the field.
-
Contains Substring: Indicates that the Roles value must contain the letters, in the same sequence, as specified in the field.
-
-
Comparison: Regular Expression: Matches: Specifies that you want the values compared as regular expressions.
Mode: Select the mode appropriate for the comparison type:
-
Comparison: String: Specify whether case is important by selecting or .
-
Comparison: Regular Expression: Matches: Select one or more of the following:
- Canonical Equivalence
- Case Insensitive
- Comments
- Dot All
- Multi-Line
- Unicode
- Unix Lines
For regular expression syntax information, see the Javadoc for java.util.regex.Pattern.
Value: If you have created Identity Server roles policies, select , then select the role you want the user to have to match this condition. The authenticated role is assigned to all users when they authenticate. If you have defined a Liberty User Profile or an LDAP attribute for a role, you can select this option, then select your attribute.
You can use the option to enter the name of the role you want to test for. If you have activated roles from an external source, use this option to specify the name of the role.
Result on Condition Error: Specify what the condition returns when the comparison of the two values returns an error rather than the results of the comparison. Select either or . If you do not want the action applied when an error occurs, select . If you want the action applied when an error occurs, select .
Risk Score
You can define a condition group as part of the authorization policy that uses the risk score from Identity Server to protect a resource.
-
Specify how the current risk score is compared to the data in the Value field. You can select to do do the comparison as an integer value or as a regular expression. For more details about regular expression, see Comparison: Regular Expression: Matches:
-
Specify the value as a Data Entry and enter the risk score for the rule.
-
Specify the value to return if the rule execution results in an error. Select either or .
-
Configure the actions required to be performed during evaluation of the condition group. For more information, see Step 7
-
Click to save the changes.
URL Condition
The URL condition allows you to restrict access based on the URL specified in the request. If you have users requesting a resource with a URL you don’t want them to use, you can use this condition in an Access Gateway Authorization policy to deny them access to this URL, and use the Actions section to redirect the request to the URL you want them to use.
To set up matching for this condition, fill in the following fields:
Comparison: Specify how the URL is compared to the data in the field. Select one of the following types:
-
Comparison: URL: Equals: Specifies that you want the values compared as URLs.
-
Comparison: Regular Expression: Matches: Specifies that you want the values compared as regular expressions.
Mode: Select the mode appropriate for the comparison type:
-
Comparison: URL: Equals: Specify whether case is important by selecting or .
-
Comparison: Regular Expression: Matches: Select one or more of the following:
- Canonical Equivalence
- Case Insensitive
- Comments
- Dot All
- Multi-Line
- Unicode
- Unix Lines
For regular expression syntax information, see the Javadoc for java.util.regex.Pattern.
The URL query strings can also be used in comparisons. Select Regular Expression Match to implement it. For example, if you want to match against a query string parameter xyz, whose value is abc, you need to enter the following regular expression in the field:
".*\?.*xyz=abc.*"
This follows the java regular expression pattern.
Value: To enter a static value to compare to the URL in the current request, select and specify the URL. This should be the complete URL, starting with the URL scheme (http:// or https://) and including the domain name, but not the port. If the URL contains a path, you must include it. If you do not specify a scheme, HTTP is used.
If you selected , regular expression rules apply.
If you selected for your comparison type, the wildcard characters (?) or (*) can be specified as the last element of the URL path to aid in matching basic URL patterns. These wildcard characters are interpreted as follows:
-
? matches all files at the specified directory level
-
* matches all files and directories at and beyond the specified directory level
For example, if the request URL is http://www.resourcehost.com/path/resource.gif, the following entered URLs would match the request URL:
http://www.resourcehost.com/path/resource.gif
http://www.resourcehost.com/path/?
http://www.resourcehost.com/path/*
http://www.resourcehost.com/*
If you selected for the comparison type, you can add multiple values:
-
Use the button to access a text box where you can enter multiple values, each on a separate line. For more information, see Edit Button.
-
Use the button to add values one at a time.
-
Use the button to display a list of links to use as values. For more information about this option, see Using the URL Dredge Option.
All entered URLs are compared to the request URL until a match is found or the list is exhausted.
If you have defined a Liberty User Profile or an LDAP attribute for a URL, you can select these options for the value type, then select your attribute.
Result on Condition Error: Specify what the condition returns when the comparison of the two values returns an error rather than the results of the comparison. Select either or . If you do not want the action applied when an error occurs, select . If you want the action applied when an error occurs, select .
URL Scheme Condition
The URL Scheme condition allows you to restrict access based on the scheme specified in the URL of the request. For example in an Access Gateway Authorization policy, if the request contains HTTP as the scheme in the URL and you require users to use HTTPS, you can use this condition to deny access and redirect them to another URL.
This condition allows you to compare A to B or B to A. You need to decide whether you want to compare a static value to the current value in the HTTP request, or whether you want to compare the current value in the HTTP request to a specified value. The comparison type you use depends upon the value you want to specify. If you want more flexibility in specifying the value, you should select to compare the current value in the HTTP request with a specified value.
To set up matching for this condition, fill in the following fields:
URL Scheme: Specify the scheme you want compared. You can select for the current value in the HTTP request, or specify a static value of or .
Comparison: Select one of the following types:
-
Comparison: URL Scheme: Specifies that you want the values compared as scheme strings and how you want the values compared. Select one of the following:
-
Equals: Indicates that the URL scheme must contain the same letters, in the same order as specified in the value.
-
Starts with: Indicates that the URL scheme must begin with the letters specified in the value.
-
Ends with: Indicates that the URL scheme must end with the letters specified in the value.
-
Contains Substring: Indicates that the URL scheme must contain the letters, in the same sequence, as specified in the field.
-
-
Comparison: Regular Expression: Matches: Specifies that you want the values compared as regular expressions.
Mode: Select the mode appropriate for the comparison type:
-
Comparison: String: Specify whether case is important by selecting or .
-
Comparison: Regular Expression: Matches: Select one or more of the following:
- Canonical Equivalence
- Case Insensitive
- Comments
- Dot All
- Multi-Line
- Unicode
- Unix Lines
For regular expression syntax information, see the Javadoc for java.util.regex.Pattern.
Value: Specify the value you want to compare with the URL Scheme value. If you select a static value for the URL Scheme value, select and . If you select for the URL Scheme value, select one of the following value types:
-
Data Entry Field: Allows you to specify the scheme value you want to use in the comparison. The scheme cannot be specified with a trailing colon (:) character and must be specified in lowercase ( or ). Use the button to access a text box where you can enter multiple values, each on a separate line. (For more information, see Edit Button.) Use the button to add values one at a time.
All entered URL schemes are compared to the requested URL scheme until a match is found or the list is exhausted.
-
LDAP Attribute: If you have defined an LDAP attribute containing a URL or URL scheme, you can select this option, then select your attribute.
-
Liberty User Profile: If you have defined a Liberty User Profile attribute containing a URL or URL scheme, you can select this option, then select your attribute.
Result on Condition Error: Specify what the condition returns when the comparison of the two values returns an error rather than the results of the comparison. Select either or . If you do not want the action applied when an error occurs, select . If you want the action applied when an error occurs, select .
URL Host Condition
The URL Host condition allows you to restrict access based on the hostname specified in the URL of the request. For example, you can use this condition to create rules that allow access if the URL contains one hostname, but deny access if the URL contains another hostname. The URL Host condition compares the hostname in the URL of the current request to the URL hostname specified in the field.
To set up matching for this condition, fill in the following fields:
Comparison: Specify how the URL Host is compared to the data in the field. Select one of the following types:
-
Comparison: URL Host: Equals: Specifies that you want the values compared as hostnames.
-
Comparison: Regular Expression: Matches: Specifies that you want the values compared as regular expressions. If you select this option, you must also specify a . Select one or more of the following:
- Canonical Equivalence
- Case Insensitive
- Comments
- Dot All
- Multi-Line
- Unicode
- Unix Lines
For regular expression syntax information, see the Javadoc for java.util.regex.Pattern.
Value: Select one of the following value types, then specify a value:
-
Data Entry Field: To specify a static value to compare to the URL host in the current request, select this value type and specify the DNS name of the host.
For example, if the request URL is http://www.resourcehost.com/path/resource.gif, the following hostname matches the resource URL:
www.resourcehost.com
If you selected for the comparison type, you can add multiple values:
-
Use the button to access a text box where you can enter multiple values, each on a separate line. For more information, see Edit Button.
-
Use the button to add values one at a time.
All listed hostnames are compared to the requested URL until a match is found or the list is exhausted.
-
-
LDAP Attribute: If you have defined an LDAP attribute containing a URL or URL host, you can select this option, then select your attribute.
-
Liberty User Profile: If you have defined a Liberty User Profile attribute containing a URL or URL host, you can select this option, then select your attribute.
Result on Condition Error: Specify what the condition returns when the comparison of the two values returns an error rather than the results of the comparison. Select either or . If you do not want the action applied when an error occurs, select . If you want the action applied when an error occurs, select .
URL Path Condition
The URL Path condition allows you to restrict access based on the path specified in the URL of the request. This condition compares the path of the URL in the current request to the path specified in the field.
To set up matching for this condition, fill in the following fields:
Comparison: Select one of the following types:
-
Comparison: URL Path: Specifies that you want the values compared as paths and how you want the string values compared. Select one of the following:
-
Equals: Indicates that the URL path must contain the same letters, in the same order as specified in the value.
-
Starts with: Indicates that the URL path must begin with the letters specified in the value.
-
Ends with: Indicates that the URL path must end with the letters specified in the value.
-
Contains Substring: Indicates that the URL path must contain the letters, in the same sequence, as specified in the field.
-
-
Comparison: Regular Expression: Matches: Specifies that you want the values compared as regular expressions.
Mode: Select the mode appropriate for the comparison type:
-
Comparison: URL Path: Specify whether case is important by selecting or .
-
Comparison: Regular Expression: Matches: Select one or more of the following:
- Canonical Equivalence
- Case Insensitive
- Comments
- Dot All
- Multi-Line
- Unicode
- Unix Lines
For regular expression syntax information, see the Javadoc for java.util.regex.Pattern.
Value: Specify the value type and value for the comparison. Select one of the following:
-
Data Entry Field: To enter a static value to compare to the URL path in the current request, select this value type and specify the path. Start the path with a forward slash.
IMPORTANT:If you need to add a space in the path, you need to enter this encoded value for the space: %20
If you have selected for your comparison type, regular expression rules apply. If you have selected for your comparison type, the path can end with a filename or a wildcard. An asterisk (*) matches all files and directories at and beyond the specified directory level. A question mark (?) matches all files at the specified directory level. For example:
Path
Match Description
/path1/path2/
Requires an exact match of the URL path. It matches if the URL does not contain anything after path2.
/path1/file.ext
Requires an exact match of the URL path, including the extension on the filename.
/path1/path2/?
Matches everything that immediately follows path2. It does not match anything if the path contains another directory, such as /path1/path2/path3/file3.ext.
/path1/path2/*
Matches everything that follows path2, including a filename or another directory, such as /path1/path2/path3/file3.ext.
If you selected for the comparison type, you can add multiple values:
-
Use the button to access a text box where you can enter multiple values, each on a separate line. For more information, see Edit Button.
-
Use the button to add values one at a time.
All entered URL paths are compared to the request URL path until a match is found or the list is exhausted.
-
-
LDAP Attribute: If you have defined an LDAP attribute containing a URL or URL path, you can select this option, then select your attribute.
-
Liberty User Profile: If you have defined a Liberty User Profile attribute containing a URL or URL path, you can select this option, then select your attribute.
Result on Condition Error: Specify what the condition returns when the comparison of the two values returns an error rather than the results of the comparison. Select either or . If you do not want the action applied when an error occurs, select . If you want the action applied when an error occurs, select .
URL File Name Condition
The URL File Name condition allows you to restrict access based on the filename specified in the URL. It compares the filename in the URL of the current request to the filename specified in the field.
To set up matching for this condition, fill in the following fields:
Comparison: Select one of the following types:
-
Comparison: URL File: Specifies that you want the values compared as filenames and how you want the names compared. Select one of the following:
-
Equals: Indicates that the filenames must contain the same letters, in the same order as specified in the value.
-
Starts with: Indicates that the filenames must begin with the letters specified in the value.
-
Ends with: Indicates that the filenames must end with the letters specified in the value.
-
Contains Substring: Indicates that the filenames must contain the letters, in the same sequence, as specified in the field.
-
-
Comparison: Regular Expression: Matches: Specifies that you want the values compared as regular expressions.
Mode: Select the mode appropriate for the comparison type:
-
Comparison: URL File: Specify whether case is important by selecting or .
-
Comparison: Regular Expression: Matches: Select one or more of the following:
- Canonical Equivalence
- Case Insensitive
- Comments
- Dot All
- Multi-Line
- Unicode
- Unix Lines
For regular expression syntax information, see the Javadoc for java.util.regex.Pattern.
Value: Specify the value type and value for the comparison. Select one of the following:
-
Data Entry Field: To specify a static value to compare to the filename in the current request, select this value type and specify the filename.
The value you specify is compared to what follows the last slash in the URL. If you selected for your comparison type, regular expression rules apply. If you selected for your comparison type, enter a value that matches your string comparison type. Do not use wildcards in your value.
If you selected for the comparison type, you can add multiple values:
-
Use the button to access a text box where you can enter multiple values, each on a separate line. For more information, see Edit Button.
-
Use the button to add values one at a time.
All listed filenames are compared to the requested URL filename until a match is found or the list is exhausted.
-
-
LDAP Attribute: If you have defined an LDAP attribute containing a URL or filename, you can select this option, then select your attribute.
-
Liberty User Profile: If you have defined a Liberty User Profile attribute containing a URL or filename, you can select this option, then select your attribute.
Result on Condition Error: Specify what the condition returns when the comparison of the two values returns an error rather than the results of the comparison. Select either or . If you do not want the action applied when an error occurs, select . If you want the action applied when an error occurs, select .
URL File Extension Condition
The URL File Extension condition allows you to restrict access based on the file extension specified in the URL of the request. It compares the file extension in the URL of the current request to the extension specified in the field.
To set up matching for this condition, fill in the following fields:
Comparison: Select one of the following types:
-
Comparison: URL File: Specifies that you want the values compared as file extensions and how you want the file extensions compared. Select one of the following:
-
Equals: Indicates that the file extensions must contain the same letters, in the same order as specified in the value.
-
Starts with: Indicates that the file extensions must begin with the letters specified in the value.
-
Ends with: Indicates that the file extensions must end with the letters specified in the value.
-
Contains Substring: Indicates that the file extensions must contain the letters, in the same sequence, as specified in the field.
-
-
Comparison: Regular Expression: Matches: Specifies that you want the values compared as regular expressions.
Mode: Select the mode appropriate for the comparison type:
-
Comparison: URL File Extension: Specify whether case is important by selecting or .
-
Comparison: Regular Expression: Matches: Select one or more of the following:
- Canonical Equivalence
- Case Insensitive
- Comments
- Dot All
- Multi-Line
- Unicode
- Unix Lines
For regular expression syntax information, see the Javadoc for java.util.regex.Pattern.
Value: Specify the value type and value for the comparison. Select one of the following:
-
Data Entry Field: To specify a static value to compare to the file extension in the current request, select this value type and specify the file extension. You can specify the extension or the period and the extension. For example:
.ext
ext
This condition does not support wildcards. If you selected for the comparison type, you can add multiple values:
-
Use the button to access a text box where you can enter multiple values, each on a separate line. For more information, see Edit Button.
-
Use the button to add values one at a time.
All entered URL file extensions are compared to the requested URL file extension until a match is found or the list is exhausted.
-
-
LDAP Attribute: If you have defined an LDAP attribute containing a URL or file extension, you can select this option, then select your attribute.
-
Liberty User Profile: If you have defined a Liberty User Profile attribute containing a URL or file extension, you can select this option, then select your attribute.
Result on Condition Error: Specify what the condition returns when the comparison of the two values returns an error rather than the results of the comparison. Select either or . If you do not want the action applied when an error occurs, select . If you want the action applied when an error occurs, select .
X-Forwarded-For IP Condition
For added security, you can add the IP address of the reverse proxy as a condition to check before granting access. One way to implement this is to create a rule that requires the X-Forwarded-For IP address in the HTTP header to match the configured IP address of the reverse proxy that is using the policy. The X-Forwarded-For IP condition matches the first IP address in the X-Forwarded-For header with the IP address specified in the field.
To set up matching for this condition, fill in the following fields:
Comparison: Specify how the X-Forwarded-For IP address is compared to the data in the field. Select one of the following types:
-
Comparison: IP: Specifies that you want the values compared as IP addresses. Select one of the following:
-
Equals: Allows you to specify an IP address that the X-Forwarded-For IP address must match. You can specify more than one.
-
In Range: Allows you to specify a range of IP addresses that the X-Forwarded-For IP address must fall within. You can specify more than one range.
-
In Subnet: Allows you to specify the subnet that the X-Forwarded-For IP address must belong to. You can specify more than one subnet.
-
-
Comparison: Regular Expression: Matches: Specifies that you want the values compared as regular expressions. If you select this option, you must also specify a . Select one or more of the following:
- Canonical Equivalence
- Case Insensitive
- Comments
- Dot All
- Multi-Line
- Unicode
- Unix Lines
For regular expression syntax information, see the Javadoc for java.util.regex.Pattern.
Value: Specify the value type and value for the comparison. Select one of the following:
-
Client IP: If you want the first IP address in the X-Forwarded-For header compared to the IP address of the client making the request, select this option.
NOTE:Client IP will not support IPv6 addresses.
-
LDAP Attribute: If you have defined an LDAP attribute for an IP address, you can select this option, then select your attribute.
-
Liberty User Profile: If you have defined a Liberty User Profile attribute for an IP address, you can select this option, then select your attribute.
-
X-Forwarded-For-IP: Allows you to control access based on the value in the X-Forwarded-For IP header of the HTTP request. This supports IPv6 address when you use the X-Forwarded-For IP condition.
-
Data Entry Field: To specify a static value, select and provide a value appropriate for your comparison type. For example:
Comparison Type
IPv4 Value
IPv6 Value
Equals
10.10.10.10
10.10.10.11
2001:1000:1000:1000:1000:1000:1000:1a8a
2001::10a0
In Range
10.10.10.10 - 10.10.10.100
10.10.20.10 - 10.10.20.100
2134::10 -2134::100
2134:1000:1000:1000:1000:1000:2000:1000 - 2134:1000:1000:1000:1000:1000:2000:4000
In Subnet
10.10.10.12 / 22
10.10.20.30 / 22
2001:1000::0002:1000:1a8a/40
2001:1000:1000:2000:3000:4000:5000:1a8a/50
You can now enter an IPv6 IP address. If you enter a zone ID and scope ID in an IP address with % sign, you will get an error. For more information see Section 7.3, Setting up L4 Switch for IPv6 Support.
If you selected for the comparison type, you can add multiple values:
-
Use the button to access a text box where you can enter multiple values, each on a separate line.
-
Use the button to add values one at a time.
All listed values are compared to the IP address in the X-Forwarded-For IP header until a match is found or the list is exhausted.
-
Result on Condition Error: Specify what the condition returns when the comparison of the two values returns an error rather than the results of the comparison. Select either or . If you do not want the action applied when an error occurs, select . If you want the action applied when an error occurs, select .
Condition Extension
If you have loaded and configured an authorization condition extension, this option specifies a condition that is evaluated by an outside source. This outside source returns either true or false. See the documentation that came with the extension for information about what is evaluated.
Data Extension
If you have loaded and configured an authorization data extension, this option specifies the value that the extension retrieves. You can then select to compare this value with an LDAP attribute, a Liberty User Profile attribute, a Data Entry Field, or another Data Extension. For more information, see the documentation that came with the extension.
Using the URL Dredge Option
In the text box, enter the URL of a page on a Web server, then click . A list of links and images appears.
For example, if you enter www.netiq.com/documentation/index.html for the , links such as the following appear in the section of the list:
www.netiq.com/company/careers/index.html
www.netiq.com/company/strategy.html
www.netiq.com/documentation/netiqaccessmanager32/index.html
www.netiq.com/documentation/netiqaccessmanager31/index.html
Depending upon how you have configured your Web site, you need to enter either a target page or just the URL of the site to generate a list of links.
To add all links as values to the URL condition, click . To add links selectively as a value, select the check box next to each name. To dredge a link in the list, click the link.
If the URL contains images, a list of images appears in the section. To add an image as a value, select the check box next to the image name.
To save your changes, click .
IMPORTANT:If you attempt to dredge an HTTPS site that is using a self-signed certificate, you need to import the trusted root of the site into the Trusted Roots store of the Access Gateway before performing the dredge.
Edit Button
Some of the conditions such as Client IP and URL display an button when you select as the condition and as the value. Thebutton displays a text box where you can specify multiple values.
In the text box, enter each value on a separate line.
To save your modifications, click .
To discard your modifications, click .