3.11 Sample Configuration for Protecting an Application Through Access Manager Appliance

This section explains how to use Access Manager Appliance to protect the Web site illustrated in the following figure. The sample application that comes by default with the Access Manager Appliance showcases the various Access Manager features. Ensure that you remove the landing portal in the production environment. Instructions for removing this portal are given on the landing page.

This section explains how to configure the Access Manager Appliance to allow access to this first page and how to create and assign policies that protect the other pages.

The example Web pages are designed to help network administrators understand the basic concepts of Access Manager Appliance by installing and configuring a relatively simple implementation of the software. The example serves as a primer for a more comprehensive production installation of Access Manager Appliance.

3.11.1 Installation Overview and Prerequisites

This section discusses the concepts involved in installing Access Manager Appliance to protect the example Digital Airlines Web site:

After you deploy this example, you should understand the basic features of Access Manager Appliance and know how to configure the software to protect your own Web servers and applications.

Installation Architecture

Access Manager Appliance offers a simplified deployment model. The entire product is deployed as an appliance in a single-box form factor. For more information, see Installing Access Manager Appliance in the NetIQ Access Manager Appliance 4.1 Installation and Upgrade Guide.

The primary purpose of Access Manager Appliance is to protect resources by allowing access only to users you have authorized. You can control access to Web (HTTP) resources as well as traditional server-based (non-HTTP) resources. As shown in the following illustration, those users who are authorized to use the protected resources are allowed access, while unauthorized users are denied access.

The following diagram illustrates how the sample portal is integrated with Access Manager Appliance.

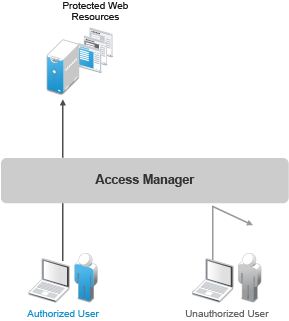
Access Manager Appliance secures your protected Web resources from Internet hackers. The addresses of the servers that host the protected resources are hidden from both external and internal users. The only way to access the resources is by logging in to Access Manager Appliance with authorized credentials.

In the Identity Server Cluster option, the configuration assigned to the Identity Server that is the default IDP-Cluster is displayed. This establishes the trust relationship between the Access Gateway and the Identity Server that is used for authentication. In the Reverse Proxy List NAM-RP which is the default reverse proxy is listed.

You can see the IP address of the Access Gateway installed in the Access Gateways window. The health of the configured Access Gateway is Green. The published DNS name to access your sample web portal site, in this example uses namapp.com. This DNS name resolves the IP address set up as the listening address. When you edit the Reverse Proxy / Authentication, you can see that it is already configured.

Deployment Overview

Prerequisite Tasks

Before starting with the Digital Airlines example, you must perform the following tasks:

3.11.2 Accessing the Sample Web Portal

You can access the sample Web portal by going to the portal Web site, in this example, www.namapp.com/portal. This is because the namportal is already configured with the published DNS name www.namapp.com and the Multi-Homing Path-Based proxy service is defined as /portal.

Protected resource details are displayed in the Protected Resource List. The portal_public is a public resource and do not have an authentication procedure. You can access this page without any credentials from the following URL:

https://www.namapp.com/portal/ takes you to the landing page of the Web portal.

The default protected resources in this example are /portal/payinfos/* and /portal/users/* that have an associated authentication procedure. For example if you want to access the portal go to https://www/namapp.com/portal and click on Sample Application on the portal page. You will be asked for credentials. By default Access Manager creates two sample users Alice and Bob with password novell.

3.11.3 Understanding the Policies Used in the Sample Portal

The sample portal site is configured for authentication and role based authorization.

Access Manager Appliance uses an Identity Server Role policy to assign roles to logged in users. In the sample portal Identity Server with a policy named role_assignment Manager and Employee are defined. A user Alice is assigned with role Manager and Employee. Another user Bob is assigned with role Employee. The users of role Employee and Manager can see and edit their own as well as an employee’s basic information. Payroll information of each user is a protected information. A user who is assigned the role of Employee cannot see the pay information of other users, unless assigned the role of Manager.

Access Manager Appliance uses authorization policy to define access control. Role Based Access Control can conveniently assign a user to a particular job function or set of permissions within an enterprise. Access Manager Appliance enables you to assign roles to users, based on attributes of their identity, and then associate policies with the roles. In designing your own actual production environment, you need to decide which roles you need (such as, sales, administrative, payroll, and accounting). You can create Role policies that assign the roles to your users, and then create Authorization and Identity Injection policies that use the roles to control access.

Access Manager uses the Identity Injection policy for single sign-on to a web resource using the HTTP header, for example, HTTP authentication. There are Identity Injection policies configured with basic_auth and fillRole which are used for single sign-on to the portal. basic_auth Identity Injection policy will inject authentication header with LDAP User DN and LDAP Password. The DN Format used is LDAP, for example, cn=alice,ou=Payroll,o=Novell. Fillrole injects the defined name and value, in this example Roles into the custom header. The main page of the sample payroll site displays the user’s login name.

Access Manager uses the Form Fill policy to fill the forms from the Web server. A default Form Fill policy, fill_allowance is defined. The Input Field Name payinfo.allowances under Fill Options is defined with the value 10000. When you edit the pay info field, the Allowances field is automatically filled with this value. Any request without basic authentication headers and the required role will be forbidden.

You can use the sample application available to understand the roles by following the procedure below:

  1. Login to the portal page for example, and click on Sample Application.

  2. Login with the username alice. The login page is displayed with the published DNS name alice. Alice can access her pay information. If the user belongs to payroll, the Pay Info button is displayed on the page.

  3. Click on Employees. Alice can access Bob’s pay information because Alice is assigned the manager role. Click show against the DNS name, in this example, Bob and click Pay Info.

  4. Click pay edit to edit the pay of the employees. The Allowances field is automatically filled as defined in the Form Fill policy. You can edit the pay information and save your changes.

  5. Click on New Employee to create a new employee.

    NOTE:If you login as Bob, you cannot create a new employee or access the pay information of other employees and will get a Forbidden error as Bob is not assigned a Manager role.