6.2 RBS Configuration
The RBS Configuration task provides complete control over RBS objects. It is a central place for managing and configuring RBS objects. You can list and modify RBS objects by type. The task also gives you useful information about the RBS system, such as the number of modules in a collection, how many are installed, how many are not installed, and how many are outdated. Some tasks let you operate on multiple objects simultaneously. For example, you can associate or disassociate multiple members from a role at the same time.
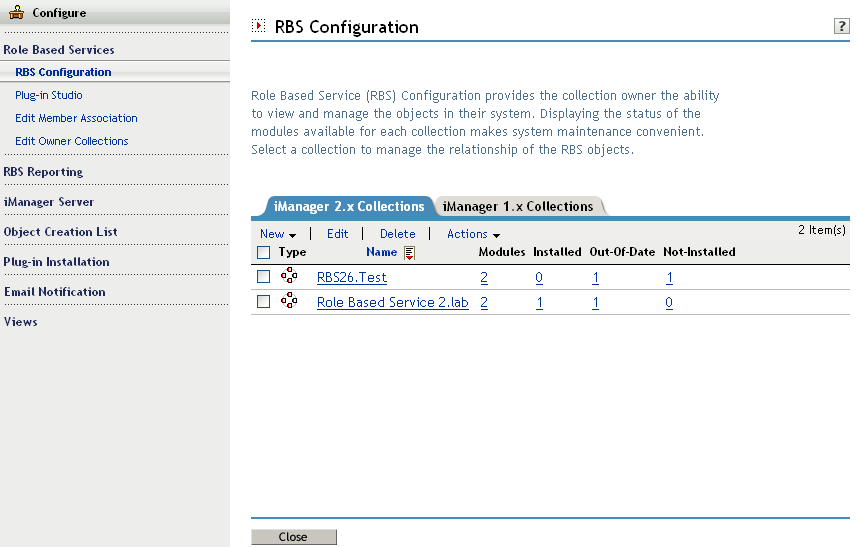
From the Configure view, select > to open the RBS Configuration page in the Content frame.
The page includes two tabs:
iManager 2.x Collection: Displays current RBS collections.
iManager 1.x Collextions: Displays older RBS collections that you can either delete or migrate to iManager 2.x. If you select Migrate, a wizard steps you through the migration process.
iManager displays only those collections you own, and includes the following information about each collection:
-
Module: Indicates the number of modules on the Web server that you are logged in to.
-
Installed: Indicates the number of modules that are currently installed.
-
Outdated: Indicates the number of outdated modules currently installed.
-
Not-Installed: Indicates the number of modules that are available but not installed.
To work with a particular collection, select it from the list. This opens a collection-specific view, as shown in Figure 6-2.
Figure 6-2 Working with RBS collections in iManager
The remainder of this section describes the various tabs in the RBS Collection page as well as the other RBS-related tasks in the Role Based Services category.
6.2.1 The Role Tab
The RBS Collection Role tab lets you manage the RBS roles in the collection. From this tab you can do the following:
NOTE:To select a role, select the checkbox to the left of the role name.
Create a New Role
To create a new role in the collection:
-
In the tab, select > .
-
Complete the steps in the iManager Role Wizard.
The wizard steps you through naming the role, assigning tasks and categories to the role, and assigning role members and scopes to the role.
Edit a Role
To edit an existing role in the collection:
-
In the tab, select the role, then click .
The role's task list appears.
-
Add or remove a task from this page as needed, then click .
Delete a Role
To delete a role in the collection:
-
In the tab select the role, then click .
A message appears: This operation will delete all of the selected roles. Do you want to continue?
-
Click to delete the role.
Set a Member Association
To add a member to an existing role:
-
In the tab select the role, then select > .
-
Provide the required member information, then click .
-
: Specify, or use the Object Selector to find, the desired object to be a role member.
-
: Specify, or use the Object Selector to find, the container that defines the scope within which this member can perform the role.
-
-
In the members list, specify how you want rights related to this role assigned to the member, then click .
-
: Instructs eDirectory to automatically grant the member rights necessary to perform the assigned role. When not selected, the member is assigned the role but might not have rights to perform all tasks associated with the role. The member’s rights assignments are handled separately.
-
: Select to indicate that the member’s scope includes all sub-containers in the specified context. Select to indicate that the member can perform the role only in the specified container.
-
NOTE:If a user is a collection owner, and has a member association set, then he/she can manage all the RBS objects within the defined scope. For a list of RBS objects in eDirectory and their description, see Section 6.1.1, RBS Objects in eDirectory.
Assign a Category
To add a category assignment to an existing role:
-
In the tab, select the role, then select > .
The Category Assignment page appears.
-
Select a category, then click the right-arrow to assign it to the role.
-
Click .
Add a Description to a Role
To add a description to an existing role:
-
In the tab, select the role and click > .
-
Specify the description in the text box, then click .
6.2.2 The Task Tab
A task is a plug-in that performs a distinct management function, such as creating a user or setting a password. iManager lists the tasks by group in the navigation area on the left side of the window.
The RBS Collection Task tab lets you do the following operations:
Creating a New Task
To create a new task:
-
In the tab, select > .
-
Complete the steps in the Create iManager Task Wizard.
The wizard steps you through providing the necessary detail about the new task you are creating.
For information on creating tasks in the Plug-in Studio, see Creating a New Task from Plug-In Studio.
Deleting a Task
To delete an existing task:
-
In the tab, select the task, then select .
A message appears: This operation will delete all of the selected tasks. Do you want to continue?
-
Click .
Editing the Role Assignment of a Task
To edit the list of roles to which a task is assigned:
-
In the tab, select the task, then select > .
-
On the Edit Role Assignment page, add or remove roles from the field, then click .
Adding a Description to a Task
To add a description to an existing task:
-
In the tab, select the task, then select > .
-
Specify the description in the text box, then click .
6.2.3 The Property Book Tab
A property book displays the attributes of a specific object type that you can modify. These properties are of an object or set of objects of the same type.
Property books can be assigned to roles and appear in the list of tasks for a role. For example, a property book that modifies the attributes of User objects might have a page that lets you to specify a user's login script. Another page could let you change a user's e-mail address and telephone number.
Property book pages are similar to tasks. However, they are for displaying and modifying attributes in a single view. For a more complex, wizard-like UI, you should create a task.
The RBS Collection Property Book tab lets you perform the following operations:
Creating a New Property Book
To create a new property book:
-
In the tab, select .
-
Complete the steps in the Create Property Book Wizard.
The wizard steps you through providing the necessary detail for the property book you are creating.
IMPORTANT:In iManager, some characters have special significance and must be escaped with the backslash (\) character. For more information, see Section 3.2, Special Characters.
Deleting a Property Book.
To delete a property book:
-
Under the tab, select the property book, then select .
A message appears: This operation will delete all of the selected property books. Do you want to continue?
-
Click .
Editing the Role Assignment in a Property Book
To modify the list of roles to which a property book is assigned:
-
Under the tab, select the property book, then select > .
-
On the Edit Role Assignment page, add or remove roles from the field, then click .
Modifying the Page List for a Property Book
To modify the attribute pages associated with a property book:
-
Under the tab, select the property book, then select > .
-
On the Edit Page List page, add or remove roles from the field. To change the order of the pages, select a page and click or > buttons.
Modifying the Object Type Assignment of a Property Book
To modify the list of object types associated with a property book:
-
Under the tab, select the property book, then select > .
-
On the Edit Object Type page, add or remove roles from the field, then click .
Adding/Modifying the Description of a Property Book
To add/modify a description to an existing task:
-
In the tab, select the property book, then select > .
-
Specify/modify the description in the text box, then click .
Defining/Modifying a Preferred Object Selection Method for a Task of a Property Book
To define/modify a preferred object selection method for an existing task:
-
Under the tab, select the property book, then select > .
-
From the Mode list, select the appropriate mode: , , , or and click .
A successful message is displayed. Click .
NOTE:For the changes to iManager Base Content module to take effect, restart Tomcat.
6.2.4 The Module Tab
The Module page lists the RBS modules currently installed on a selected collection. Each module contains RBS property books and tasks. From this page, you can add (if you want to create a custom property book) and delete modules, and also type a description for a selected plug-in module.
The RBS Collection Module tab lets you perform the following operations:
Adding a New Plug-in Module
To add a new plug-in module:
-
In the tab, select .
-
Specify the RBS module name and a destination context, then click .
iManager displays a message indicating the module has been added.
Deleting an RBS Module
To delete an existing plug-in module:
-
In the tab, select a module to delete, then select .
-
Click to confirm the module deletion.
Adding a Description
To add a description to an existing plug-in module:
-
In the tab, select a module, then select > .
-
Specify the module description, then click .
6.2.5 The Category Tab
Categories group related roles and tasks together. The RBS Collection Category tab lets you perform the following operations:
Adding a New Category
To add a description to an existing plug-in module:
-
In the tab, select .
This launches the Create Category Wizard.
-
Specify category name and description (optional), then click .
-
Select the roles to be associated with the new category, then click .
-
Review the new category summary, then click .
Deleting a Category
To delete an existing category:
-
In the tab, select a module to delete, then select .
-
Click to confirm the category deletion.
Adding a Description
To add or modify the description of an existing category:
-
In the tab, select a category, then select > .
-
Specify the category description, then click .
6.2.6 Plug-In Studio
Plug-In Studio offers a quick and easy way to streamline the tasks that you do several times a day. Use Plug-in Studio to dynamically create tasks for your most frequently used operations. You can also edit and delete tasks here.
For example, to modify a user, instead of selecting , you can create a dynamic UI to edit only the attributes you have selected, such as first name or title. Data is stored in the TOMCAT_HOME/webapps/nps/portal/modules/custom directory.
From the Plug-in Studio task, you can perform the following operations:
Creating a New Task from Plug-In Studio
To create a new task with Plug-In Studio:
-
In the Configure view, select > .
-
Select .
The Task Builder appears to help you build custom tasks and property pages.
-
Specify the object type and platform information, then click .
Available classes: Specify the object class associated with the new task.
Target device: Specify the platform on which the task is used. Typically, the default selection (Default) works fine.
Plug-in type: Specify the type of task you are creating.
Add Auxiliary Classes: Select this option to add aux class support to the task.
-
In the Plug-in Fields screen, provide the necessary information, then click .
When you click , iManager dynamically builds the task’s .xml file, .jsp file, and the Java files that execute the task, then it installs those files into the system.
Attributes: Select an attribute to associate with the task from the list of available attributes.
Double-click the attribute to move it to the field, using the default control.
Controls: Displays the available controls for the attribute selected in the field.
Double-click a control to move the current attribute to the field, using the selected control.
Plug-in Fields: Displays each attribute/control currently associated with the task. From this field, you can remove attributes from the task, change the control associated with an attribute, and modify the control properties for the attribute.
Plug-in Properties: Lets you specify a , assign the task to an , and assign the task to a . The role you assign determines where this task appears in the Roles and Tasks Navigation frame.
Editing a Task
To edit an existing plug-in with Plug-in Studio:
-
In the Configure view, select > .
-
Select the task, then select .
-
Modify the settings described in Creating a New Task, then click .
iManager displays a confirmation message indicating the plug-in was successfully created and installed.
Deleting a Task
To delete an existing plug-in with Plug-in Studio:
-
In the Configure view, select > .
-
Select the plug-in from the list of installed custom plug-ins, then click .
A message appears: Are you sure you want to delete this plug-in?
-
Click to delete the plug-in.
iManager displays a confirmation message indicating the plug-in was successfully deleted.
Copying Custom Tasks
To copy an existing plug-in with Plug-in Studio:
-
In the Configure view, select > .
-
Select the plug-in from the list of installed custom plug-ins, then click .
-
Specify a name for the copied plug-in, then click .
Exporting Custom Tasks
Use this task to export your custom tasks, making them deployable to other iManager servers.
-
In the Configure view, select > .
-
Select the custom plug-in to export, then click > .
Importing Custom Tasks
Use this task to deploy an exported custom tasks onto multiple iManager servers.
-
In the Configure view, select > .
-
Select > .
-
Specify, or use the Object Selector to find, the RBS collection into which you want to import the custom plug-ins.
-
Specify, or browse to, the NPM file that you previously exported.
-
Click .
6.2.7 Editing Member Associations
There are two ways to associate members with roles:
-
Select a member, then assign it to a role within a scope as described in Set a Member Association.
-
Select a role, then assign members and a scope to it as described below.
To assign an existing role to a selected member
-
In the Configure view, select > .
-
Specify, or use the Object Selector to find, a member, then click .
A list appears displaying the roles to which this member is assigned.
-
Specify a role and role scope to add to this member, then click .
This data is saved to eDirectory. After login, the newly assigned role appears in the left column of the member who owns it.
6.2.8 Editing Owner Collections
Use this task to change the owner assigned to a collection.
-
In the Configure view, select > .
-
Specify, or use the Object Selector to find, a collection owner, then click .
-
Add or remove collections this person can own, then click .