5.4 Manage Incidents
You can perform the following activities related to incidents:
-
Create an incident
-
Attach workflows to incidents
-
Add notes to incidents
-
Add attachments to incidents
-
Execute an incident action
-
E-mail an incident
-
Edit an incident
-
Delete an incident
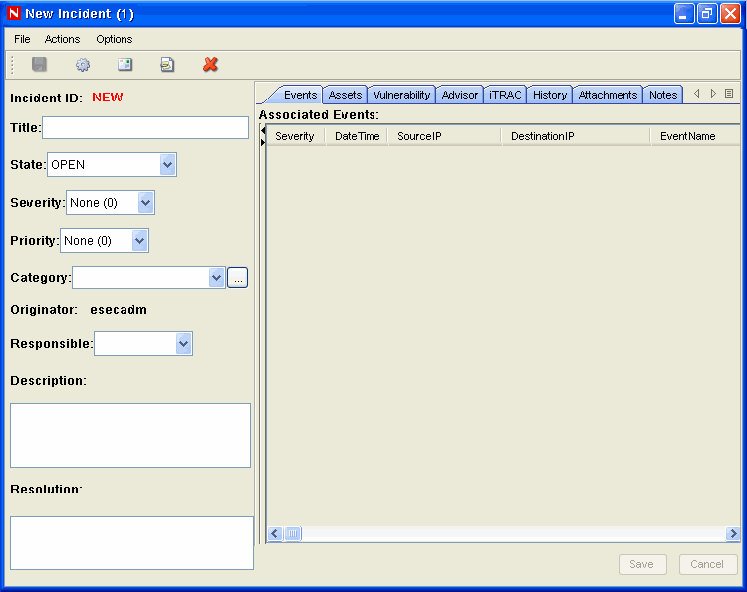
5.4.1 Creating Incidents
-
Click , or click the button on the toolbar. The New Incident window displays.
-
Specify the following information:
-
Title: Specify the title of the incident.
-
State: To set state of the incident, select from the drop-down list.
-
Severity: To indicate the severity of the incident, select from the drop-down list.
-
Priority: To indicate the priority of the incident, select from the drop-down list.
-
Category: Specify the category of the incident.
-
Responsible: To assign the responsibility to investigate and close the incident, select from the drop-down list.
-
Description: Specify the description of the incident in the text area.
-
Resolution: Specify the resolution description in the text area.
-
-
Click .The incident ID automatically generates after you click .
For more information on creating an incident and grouping events, see Section 3.7, Creating Incidents.
5.4.2 Viewing an Incident
-
Click or click the button on the toolbar.
-
Open an incident by doing one of the following:
-
Selecting a view from the button in the bottom right corner.
-
Double-click an incident in the Incident View Manager window.
-
5.4.3 Attaching Workflows to Incidents
-
Open an incident.
-
In the Incident window, click the tab.
-
Select an iTRAC process from the drop-down list.
-
Click .
NOTE:You can attach only one process to an incident.
5.4.4 Adding Notes to Incidents
-
In the Incident window, click the tab.
-
Click . The Add Notes to Incident window displays.
-
Provide your notes and click .
-
Click .
NOTE:To edit or delete the note, right-click a note in the tab of the Incident window and select or .
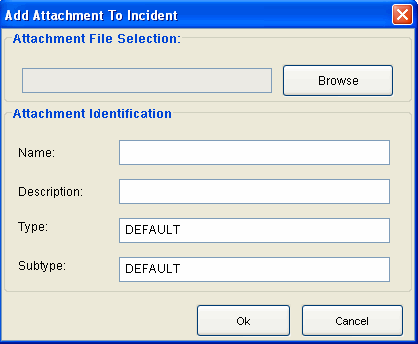
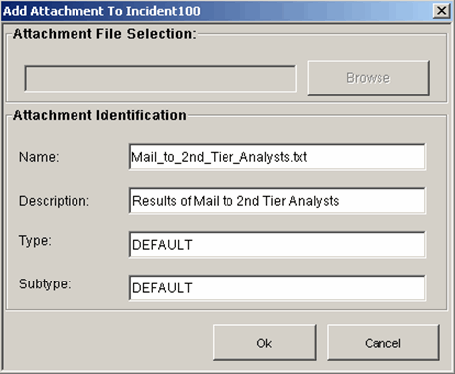
5.4.5 Adding Attachments to Incidents
-
In the Incident window, click the tab.
-
Click .The Add Attachment to Incident window displays.
-
Click , navigate to the attachment, and select it.
-
Provide the following information, or accept the default entries:
-
Name
-
Description
-
Type
-
Subtype
-
-
Click , then click Save.
Right-click the attachment to view or save.
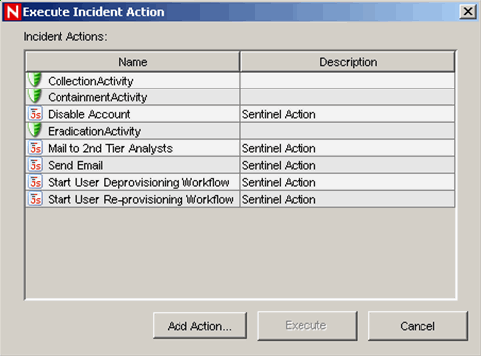
5.4.6 Executing Incident Actions
Any configured JavasScript action or iTRAC activity can be executed on an incident.
-
Open an incident.
-
Click Actions > Execute Incident Action or click Execute Incident Action
 icon.
icon.
The Execute Incident Action window displays.
-
Select an action or click to create a new one.
-
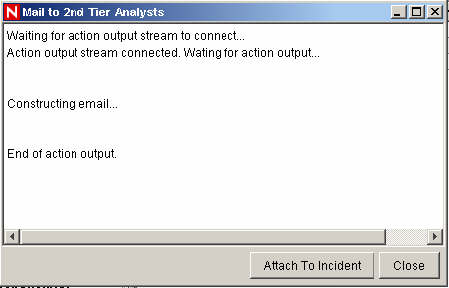
Click . If the action is a JavaScript action, a window opens to show the progress of the action.
-
To add the command output to the incident, click .
The action output is saved and can be viewed from the tab of the incident.
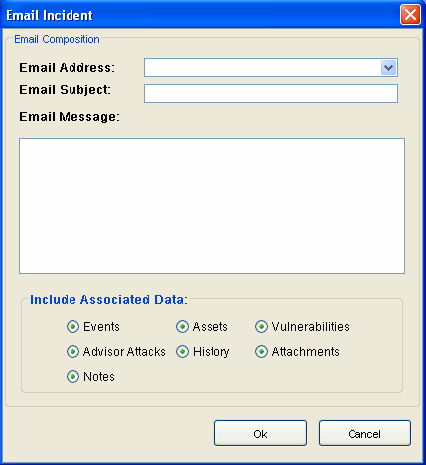
5.4.7 E-Mailing an Incident
To mail an incident by using the preinstalled Email Incident action, you must have an SMTP Integrator configured with valid connection information and with the SentinelDefaultEMailServer property set to “true”. For more information, see the SMTP Integrator documentation available at the Novell Sentinel Content Web site.
-
Open an incident.
-
Click the
 button to display the Email Incident window.
-
Provide the following:
-
Email Address
-
Email Subject
-
Email Message
-
-
Select which HTML attachments should be included in the mail message, such as the events included in the incident, assets, vulnerabilities, Advisor attacks, incident history, attachments, and notes.
-
Click .
5.4.8 Modifying Incidents
-
Click the tab, then click . Alternatively, click the button on the toolbar. The Incident View window displays with the list of incidents.
-
Right-click the incident you want to edit and select .
-
The Incident window displays. Edit the following information:
-
Title
-
State
-
Severity
-
Priority
-
Category
-
Responsible
-
Description
-
Resolution
-
-
Click .
Save button is active only if you modify any information in the Incidents window.
5.4.9 Deleting Incidents
-
Click the tab, then.click , or click the button on the toolbar. The Incident View window displays.
-
Right-click the incident you want to delete and select .
-
A confirmation Message displays. Select .