B.3 To Setup NT AUTHORITY\NetworkService as the Logon Account for Sentinel Service
To setup NT AUTHORITY\NetworkService as the logon account for Sentinel service, you need to perform the following:
-
Add the machine that runs Sentinel Service as a login account to ESEC and ESEC_WF database instances (performed on the database machine)
-
Change the logon account for Sentinel service to NT AUTHORITY\NetworkService (performed on your remote machine)
-
Setting the Sentinel startup (performed on your remote machine)
B.3.1 Adding Sentinel Service as a Login Account to ESEC and ESEC_WF DB Instances
To add a login of a remote machine to the database server:
NOTE:As an example, the following are steps to add secnet\case1 as a login to the database server.
-
On your database machine, open up SQL Server Management Studio. Specify the user credentials in the Login window.

Click Connect
-
In the Object Explorer pane, under SQL Server Group, expand Security folder and highlight Logins folder.
-
Right-click Logins > New login.

-
In the Login-New window, provide the Login name.
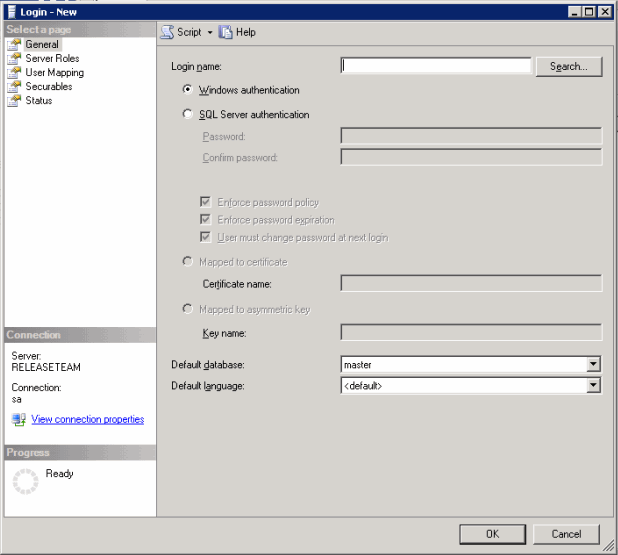
Alternatively, you can click the Search button next to the Login name field. The following screen displays:

-
In the Enter the object name to select field, provide a domain name and user name (secnet\case1$ is provided as an example). This is the machine <domain name>\<name of machine>$ you are adding as a login to the database server. Click OK.
-
Click Server Roles in the Select a page navigation pane. Select sysadmin and serveradmin as Server Roles as shown below:

-
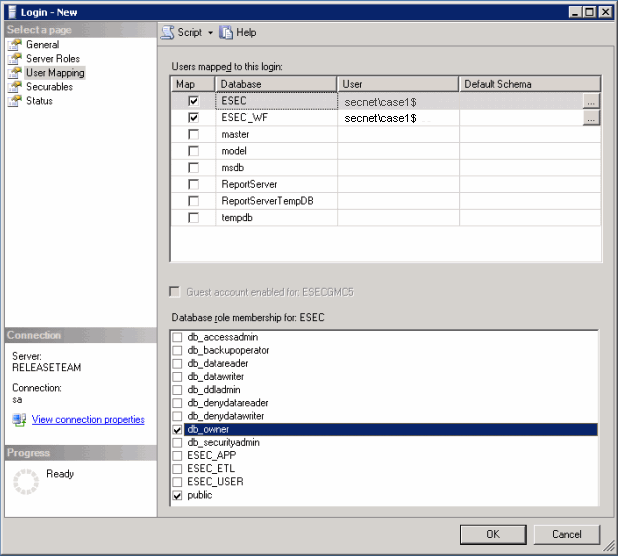
Click User Mapping in the Select a page navigation pane. Select access to ESEC and ESEC_WF as “public” and “db_owner” as shown below:
Click OK.
B.3.2 Changing logon account
To change the logon for Sentinel Service to NT AUTHORITY\NetworkService:
-
On your remote machine you are connecting to the database, click Start > Programs > Administrative Tools > Services.

-
Stop the Sentinel service, right-click > Properties > Log On tab.
-
Click This account and in the field provide NT AUTHORITY\NetworkService. Clear the Password and Confirm password fields.
-
Click OK. The Services window for the Sentinel Service should indicate Network Service under the Log On As column.


B.3.3 Setting the Sentinel Service to Start Successfully
In order for the Sentinel Service to start successfully, NT AUTHORITY\NetworkService account should have write permission to %ESEC_HOME%. According to Microsoft documentation, the NetworkService account has the following privileges:
-
SE_ASSIGNPRIMARYTOKEN_NAME (disabled)
-
SE_AUDIT_NAME (disabled)
-
SE_CHANGE_NOTIFY_NAME (enabled)
-
SE_CREATE_GLOBAL_NAME (enabled)
-
SE_IMPERSONATE_NAME (enabled)
-
SE_INCREASE_QUOTA_NAME (disabled)
-
SE_SHUTDOWN_NAME (disabled)
-
SE_UNDOCK_NAME (disabled)
-
Any privileges assigned to users and authenticated users
You must grant write access to %ESEC_HOME% to the Users group.
To set the Sentinel Service to start successfully:
-
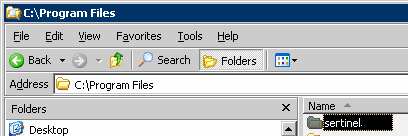
Open Window’s Explorer and navigate to %ESEC_HOME%.
-
Right-click the Sentinel parent folder (Typically named sentinel6) > Properties > Security tab.
-
Highlight Users group. Grant Read & Execute, List Folder Contents, Read, Write permissions.
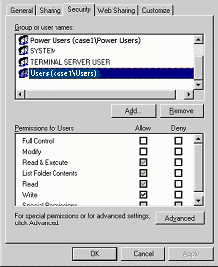
Click OK.
-
In the Services window, restart the Sentinel service.