5.2 Installing Additional Load Balancing Nodes
Occasionally, it might be necessary to add an additional Sentinel processing node to the Sentinel distributed environment in order to load balance across machines. For example, if the memory usage is high on a machine running a Correlation Engine, you might decide to add another machine running Correlation Engine. (This may require an additional license.) You can then redeploy your correlation rules across these two engines in order to decrease the load on a single machine if all the rules were deployed on it.
To do this, simply run the installer on the new machine as described in Section 3.0, Installing Sentinel 6.1 SP2. As you step through the installer, select only the components you want to add additional load balancing nodes for. The following components can be load balanced:
-
Correlation Engine
-
Collector Manager
-
DAS_Binary process
The DAS_Binary process is responsible for event database insertion. Because event database insertions can be an event flow bottleneck, load balancing the DAS_Binary process typically results in a significant performance gain, in terms on events per second throughput. Additionally, the Correlation Engine and Collector Manager components can be load balanced by installing instances of these components on additional machines
5.2.1 Multiple DAS_Binary Processes
Although not true load-balancing, it is possible to configure multiple DAS_Binary instances in a Sentinel system to improve performance of event insertion. This should only be considered after analyzing the system for bottlenecks and finding that DAS_Binary has fully utilized the CPU. DAS_Binary is the process that manages event insertion into the database, and the highest event rates Novell has achieved in internal testing were with multiple DAS_Binary processes.
For more information on the Sentinel 6.1 performance test results, see the Novell Documentation site.
Multiple DAS_binary processes can be installed on the same machine or distributed across multiple machines.
Distributing Multiple DAS_binary Instances Across Different Machines
IMPORTANT:Before you proceed, ensure that you have installed the Sentinel Server including the DAS. This installation is referred to as the Sentinel Server or the primary DAS_Binary.
-
Run the Sentinel installer to install the DAS component on the machines that you want to run a DAS_Binary process. All DAS_Binary should connect to the same database; therefore, during installation provide the same database connection information you provided for the initial DAS installation.
-
On all machines where you want to run the DAS_Binary, including the primary DAS_Binary, make the following modifications:
-
Log in as esecadm (UNIX) or an Administrator (Windows) to any one of the machines that run an instances of the DAS_Binary process and locate the configuration.xml file in the $ESEC_HOME/config (%ESEC_HOME%\config on Windows) directory.
-
Add the following information to services section of the configuration.xml file:
<service name="DAS_Binary_EventStore" plugins="" strategyid="sentinel_client" subscriptiongroup="dasbin" />
-
Save the configuration.xml file.
-
-
On the machines that are running secondary DAS_Binary processes, make the following modifications. A secondary DAS_Binary is the one that is not running on the main Sentinel Server.
-
Remove the file sentinelhost.id from the $ESEC_HOME/data (%ESEC_HOME%\data on Windows) directory. This will force the Collector Manager on this machine to generate a new ID rather than using the same one that Sentinel Server’s Collector Manager is using.
-
The other DAS processes should be disabled. To do this, in the process section of the configuration.xml file on the DAS_Binary-only machines, set the min_instances attribute as follows:
min_instances=”0”
for the following process entries:
-
DAS_RT
-
DAS_Aggregation
-
DAS_Query
-
DAS_ITRAC
-
-
The secondary Sentinel service should be used. Therefore, the sentinel.conf in the ESEC_HOME/config directory must be modified by uncommenting the following line by removing the # character from the beginning of the line:
wrapper.app.parameter.1=../config/sentinel.xml
and commenting out the following line by inserting the # character at the beginning of the line:
#wrapper.app.parameter.1=../config/sentinel_primary.xml
-
-
Make the following changes to the das_binary.xml file on one of the machines that run a DAS_Binary process:
NOTE:The das_binary.xml file will later be copied to other DAS_Binary installations.
-
Make a copy of the entire DispatchManager component and change the new component’s id from DispatchManager to EventStoreDispatchManager. After making this change, you should have one component with the id DispatchManager and another component with the id EventStoreDispatchManager. See the example below of what the new EventStoreDispatchManager component should look like.
-
Update the value of the property named esecurity.communication.service of the EventStoreDispatchManager component to DAS_Binary_EventStore.
-
Remove the property with name handler:esecurity.event.create from the DispatchManager component.
-
Remove all properties with a name that starts with “handler:*” except for handler:esecurity.event.create from the EventStoreDispatchManager component. The handler handler:esecurity.event.create should be the only handler defined in the EventStoreDispatchManager component.
-
Add the following XML element to the EventStoreService component:
<obj-component-ref>
<name>DispatchManager</name>
<ref-id>EventStoreDispatchManager</ref-id>
</obj-component-ref>
When the DAS_BINARY processes are installed on different remote machines, there is only one instance of the aggregation process that runs on the primary DAS server. Hence, all the remote (secondary) DAS_BINARY processes should write their event files to a common location that can be used by the EventAggregationService (running on the primary DAS server) to pick up the event files from the remote (secondary) DAS_BINARY processes.
-
The outputDirectory property in the EventFileRedirect component in each of the secondary das_binary.xml files should point to the common location where the EventAggregationService on the primary DAS_BINARY is writing to.
The value (directory location) of the directory property in the EventAggregationService component of the das_aggregation.xml file on the primary DAS server should be shared with all the machines that are running the secondary das_binary process.
Use the map drive option for Windows and the mount option for Unix to share the location of primary DAS_BINARY with the secondary DAS_BINARY.
NOTE:You must ensure that the user who owns the Sentinel service has permissions to access the shared folder. Use the UNC path to specify the outputdirectory for the EventFileRedirect service. For example, \\<ipaddress of the machine having the shared drive>\events\aggregation.
-
Save the das_binary.xml file.
-
-
Copy the modified das_binary.xml file to all machines that run a DAS_Binary process, including the primary DAS_Binary.
Following is a sample excerpt from the das_binary.xml file showing the EventStoreDispatchManager component.
<obj-component id="EventStoreDispatchManager">
<class>esecurity.ccs.comp.dispatcher.CommDispatcherManager</class>
<property name="esecurity.communication.service">DAS_Binary_EventStore</property>
<property name="dependencies">DAS_Query</property>
<property name="handler:esecurity.event.create">esecurity.ccs.cracker.EventCracker@ewizard_binary_event,correlation_binary_event,database_binary_event,database_tagged_event,correlation_binary_event_update</property>
<obj-component id="DispatcherStatsService">
<class>esecurity.ccs.comp.dispatcher.stats.DispatcherStatsManager</class>
<property name="ReportIntervals">900,3600,14400,86400</property>
<property name="MinLogReportInterval">900</property>
<property name="MinPublishReportInterval">86400</property>
<property name="ReportByServiceName">true</property>
<property name="ReportByMethodName">true</property>
<obj-component-ref>
<name>EventPublisher</name>
<ref-id>DispatchManager</ref-id>
</obj-component-ref>
<obj-component-ref>
<name>DispatchManager</name>
<ref-id>DispatchManager</ref-id>
</obj-component-ref>
</obj-component>
</obj-component>
Here is a sample excerpt from the das_binary.xml file showing the EventStoreService component:
<obj-component id="EventStoreService">
<class>esecurity.ccs.comp.event.EventStoreService</class>
<property name="handler">esecurity.event.create</property>
<property name="waitBlocked">true</property>
<property name="maxThreads">6</property>
<property name="minThreads">6</property>
<property name="maxThreadsQueued">10</property>
<property name="queueSize">1000000</property>
<obj-component-ref>
<name>ThreadPool</name>
<ref-id>EventStoreThreadPool</ref-id>
</obj-component-ref>
<obj-component-ref>
<name>DispatchManager</name>
<ref-id>EventStoreDispatchManager</ref-id>
</obj-component-ref>
<obj-component id="Persistor">
<class>esecurity.ccs.comp.event.jdbc.JDBCEventStore</class>
<property name="insert.batchsize">600</property>
<property name="insert.strategy">esecurity.ccs.comp.event.jdbc.JDBCLoadStrategy</property>
<property name="insert.oci.workerCount">5</property>
<property name="insert.oci.queueWaitTime">1</property>
<property name="insert.oci.highWatermark">10000000</property>
<property name="insert.oci.lowWatermark">9000000</property>
<property name="insert.oci.optimizationFlag">on</property>
<property name="insert.pmaxWarningTime">300</property>
<property name="insert.pminWarningTime">300</property>
</obj-component>
<obj-component-ref>
<name>EventRedirect</name>
<ref-id>EventFileRedirectService</ref-id>
</obj-component-ref>
</obj-component>
-
Delete the unneeded durable subscription.
After the system is restarted, the multiple DAS_Binary processes share a new, single, durable shared subscription to the Sentinel message bus event channels. In order to avoid the message bus cache from growing indefinitely and filling up the hard drive, the durable subscription that was initially created by the primary DAS_Binary must be deleted.
-
Open the Sonic Management Console.
-
Windows: Select
Unix: Open a terminal console and run the following command:
$ESEC_HOME/3rdparty/SonicMQ/MQ7.0/bin/startmc.sh -
Specify the following to log in to the management console:
-
In the management console, select.
-
Select the first empty row in the Users & Groups table on the right side of the GUI.
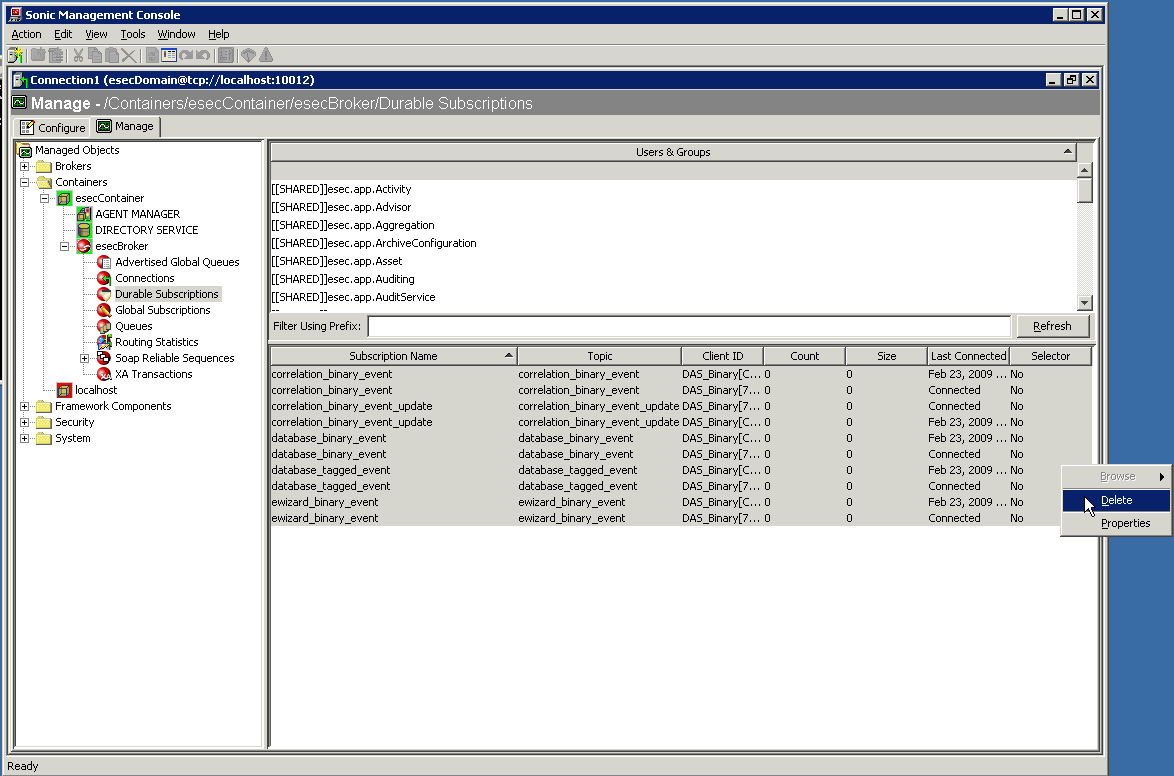
When you select the empty row at top of this table, view the details of the DAS_Binary durable subscriptions below the empty row.
-
Select all durable subscriptions, right click, and then select .
-
-
To activate your changes, restart the Sentinel service on all machines where you have made the modifications.
UNIX: Run the following command:
$ESEC_HOME/bin/sentinel.sh restart
Windows: Restart the "Sentinel" service using the Windows Service Manager.
Configuring Multiple DAS_binary Instances on the Same Machine
-
Log in as esecadm (UNIX) or an Administrator (Windows) to the machine that will run multiple instances of the DAS_Binary processes and locate the configuration.xml file in the $ESEC_HOME/config (%ESEC_HOME%\config on Windows) directory.
-
In the configuration.xml file, locate the section of the xml file that defines the services entries (see example below). Make a copy of the DAS_Binary service entry for every instance of DAS_Binary you want to run. For example, to run two DAS_Binary processes, make two copies of the DAS_Binary service entry. Delete the uuid attribute for each of the service entries (the uuid attribute will automatically be regenerated when Sentinel is started). The following is an example of one DAS_Binary service entry.
<service name="DAS_Binary" plugins="" strategyid="sentinel_client" uuid="4DA52BE0-E7A4-1029-BB2F-00132168CBDF"/>
-
In the configuration.xml file, create a copy of the following DAS_Binary_EventStore service entry xml for every instance of DAS_Binary you want to run. This service does not exist in the configuration.xml file, so you should copy it from the example below. For example, to run two DAS_Binary processes, make two copies of the following DAS_Binary_EventStore service entry:
<service name="DAS_Binary_EventStore" plugins="" strategyid="sentinel_client" subscriptiongroup="dasbin" />
-
Give each copy of the DAS_Binary and DAS_Binary_EventStore service entry a unique name. For example, the service names might be DAS_Binary1, DAS_Binary_EventStore1, DAS_Binary2, and DAS_Binary_EventStore2.
-
Locate the section of the configuration.xml file that defines the processes entries (see example below). Make a copy of the DAS_Binary process entry for every instance of DAS_Binary you want to run. For example, to run two DAS_Binary processes, make two copies of the DAS_Binary process entry. For each DAS_Binary process entry, modify sections of the entry as described below:
-
DAS_Binary Dsrv_name: Change to match the DAS_Binary service names defined in step 4, such as DAS_Binary2.
-
DAS_Binary communication service name: Insert the following text into the process entry’s image attribute at the location shown in bold in the process entry example below. For each DAS_Binary process entry, replace the DAS_Binary part of the text below with the associated service name, such as DAS_Binary2.
-Desecurity.communication.service=DAS_Binary
-
das_binary.xml file name: Use any unique name(s), such as das_binary_2.xml. These names are used in a later step.
-
das_binary_log_prop file name: Use any unique name(s), such as das_binary_log_2.prop. These names are used in a later step.
-
das_binary.cache directory name: Use any unique name(s), such as das_binary2.cache. Each instance of DAS_Binary must use a different das_binary.cache directory.
-
DAS_Binary process name: Change the value of the process entry’s name attribute to match the DAS_Binary service names defined in step 4, such as DAS_Binary2.
The following xml is an example of a process entry as discussed in the instructions above:
process component="DAS" depends="UNIX Communication Server,Windows Communication Server" image=""$(ESEC_JAVA_HOME)/java" -server -Dsrv_name=DAS_Binary -Xmx160m -Xms64m -XX:+UseParallelGC -XX:+HeapDumpOnOutOfMemoryError -XX:HeapDumpPath=../log/DAS_Binary.hprof -Xss136k -Xrs -Desecurity.communication.service=DAS_Binary -Duser.language=en -Djava.net.preferIPv4Stack=true -Dfile.encoding=UTF8 -Desecurity.cache.directory=../data/das_binary.cache -Desecurity.dataobjects.config.file=/xml/BaseMetaData.xml -Djava.util.logging.config.file=../config/das_binary_log.prop -Dcom.esecurity.configurationfile=../config/configuration.xml -Djava.security.auth.login.config=../config/auth.login -Djava.security.krb5.conf=../config/krb5.conf -jar ../lib/ccsbase.jar ..//config//das_binary.xml" min_instances="1" name="DAS_Binary" post_startup_delay="20" type="container" working_directory="$(ESEC_HOME)/data"/>
-
-
Save the configuration.xml file.
-
Locate the das_binary.xml file in the $ESEC_HOME/config (%ESEC_HOME%\config on Windows) directory.
-
Create a copy of the das_binary.xml file for each instance of DAS_Binary you want to run. For example, to run two instances of DAS_Binary, create two copies of das_binary.xml.
-
Rename the copied das_binary.xml files to match the names selected in step 5.
-
Make the following changes to each of the das_binary.xml files:
-
Make a copy of the entire DispatchManager component and change the new component’s id from DispatchManager to EventStoreDispatchManager. After making this change, you should have one component with the id DispatchManager and another component with the id EventStoreDispatchManager.
-
Update the value of the property named esecurity.communication.service of the DispatchManager component with the appropriate unique name for DAS_Binary, such as DAS_Binary2.
-
Update the value of the property named esecurity.communication.service of the EventStoreDispatchManager component with the appropriate unique name for DAS_Binary_EventStore, such as DAS_Binary_EventStore2.
-
Remove the property with name handler:esecurity.event.create from the DispatchManager component.
-
Remove all properties with a name that starts with “handler:*” except for handler:esecurity.event.create from the EventStoreDispatchManager component. The handler handler:esecurity.event.create should be the only handler defined in the EventStoreDispatchManager component.
-
Add the following XML element to the EventStoreService component.
<obj-component-ref>
   <name>DispatchManager</name>
   <ref-id>EventStoreDispatchManager</ref-id>
</obj-component-ref>
-
The outputDirectory property in the EventFileRedirect component of the das_binary.xml file must have the same value as the directory property in the EventAggregationService component of the das_aggregation.xml file. This allows the DAS_Aggregation to pick up the event files from a secondary DAS_Binary.
-
Save the das_binary.xml file.
-
-
Locate the das_binary_log.prop file in the $ESEC_HOME/config (%ESEC_HOME%\config on Windows) directory.
-
Create a copy of the das_binary_log.prop file for each instance of DAS_Binary you want to run. For example, to run two instances of DAS_Binary, create two copies of das_binary_log.prop.
-
Rename the das_binary_log.prop files to match the names selected in step 5.
-
Delete the unneeded durable subscription.
After the system is restarted, the multiple DAS_Binary processes share a new, single, durable shared subscription to the Sentinel message bus event channels. In order to avoid the message bus cache from growing indefinitely and filling up the hard drive, the durable subscription that was initially created by the primary DAS_Binary must be deleted.
-
Open the Sonic Management Console.
-
Windows: Select
Unix: Open a terminal console and run the following command:
$ESEC_HOME/3rdparty/SonicMQ/MQ7.0/bin/startmc.sh -
Specify the following to log in to the management console:
-
In the management console, select.
-
Select the first empty row in the Users & Groups table on the right side of the GUI.
When you select the empty row at top of this table, view the details of the DAS_Binary durable subscriptions below the empty row.
-
Select all durable subscriptions, right click, and then select .
-
-
Restart the Sentinel services to activate your changes.
UNIX:
$ESEC_HOME/bin/sentinel.sh restart
Windows: Restart the Sentinel service using the Windows Service Manager.