3.5 Simple Installation
The Simple Installation option is an all-in-one installation option that installs Sentinel Services, Collector Manager, and Sentinel Applications with the database on the same machine. This installation is only for demonstration or training purposes and should not be used in production environments.
After performing the database installation and meeting the prerequisites mentioned in Section 3.4, General Installation Prerequisites proceed with installing Sentinel. If you choose the Simple Installation, the following default settings are used:
-
On Windows, SQL authentication is allowed on the SQL Server database.
-
The same password is used for the Sentinel Database Administrator, the Sentinel Administrator, the Sentinel Application User, and the Sentinel Report User.
-
The size of the database is 10 GB.
-
Log in as root user on Solaris/Linux or administrator user on Windows.
-
Extract the <SENTINEL_6.1.2.zip> file to a location of your choice.
The files are extracted to disk1 folder.
-
From the disk1 folder, run the following script:
-
Windows: setup.bat
-
Solaris/Linux:
For GUI mode:
./setup.sh
For text-based (serial console) mode:
./setup.sh –console
You cannot run the installer on UNIX from a directory path that has special characters such as a space or non-ASCII characters.
-
-
Click the down-arrow and select one of the following language options:
-
Read the Welcome screen, then click .
-
Read and accept End User License Agreement, then click .
-
Accept the default installation directory or click to specify the installation location. Click .
IMPORTANT:You cannot install Sentinel into a directory with special characters or non-ASCII characters. For example, when installing Sentinel 6.1on Windows x86-64, the default path is C:\Program Files (x86). You must change the default path to avoid the special characters and continue installation.
-
Select , then click .
-
Provide the configuration information and click .
-
Serial Number
-
License Key
-
SMTP Server
Sentinel sends e-mail through this server.
-
E-mail
E-mail sent by Sentinel displays as sent from this e-mail address.
-
Global System Password
The password you enter here is valid for all default users. This includes both the Sentinel Administrator user and the database users. For more information on the list of default database users created during installation, see Section 3.8.2, Sentinel Database.
-
-
Select the target database platform for database configuration:
On Solaris/Linux, you are prompted to specify the Oracle username. Specify the username and click .

-
Specify the database name.
-
Linux/Solaris: Specify the path for the Oracle JDBC Driver file.
-
Windows: Specify the database user credentials and SQL Server instance name.
-
-
Click .
On Linux/Solaris, the installer backs up the existing tnsnames.ora and listener.ora files in the $ORACLE_HOME/network/admin directory. It overwrites the listener.ora file with Sentinel Database connection information, and appends the Sentinel Database connection information to the tnsnames.ora file.
NOTE:If you have other databases on the same server as the Sentinel Database, the administrator must manually merge the information from the backed-up listener.ora files into the new file and restart the Oracle listener for other applications to continue to connect to the database.
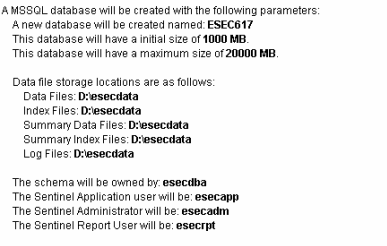
A summary of the selected database parameters is displayed.
-
Click .
A summary of the installation is displayed.
-
Click .
-
After the install is complete, click .
-
Restart the machine.