3.6 Using a New Application Definition to Enable Applications for Single Sign-on
-
Double-click the Novell SecureLogin icon
 in the notification area. This launches the Novell SecureLogin Client Utility with the menu selected.
-
Click
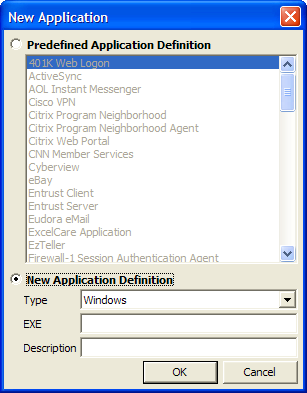
 Alternatively, select > > . The New Application dialog box appears.
-
Select .
-
From the drop-down list, select the type of application.
You can select:
-
Windows
-
Terminal Launcher
-
Startup
-
Java
-
Generic
-
Advanced Web
-
Web wizard Script
NOTE:For Flash application, select type as . Use Flash Window finder tool to read the title of the application and provide the same in the text box.
-
-
Specify other details such as the name, the URL, executable, and description as required.
-
Click .
You have successfully added an application. You now need to specify the credentials for the application.
-
From the navigation tree on the left pane, select the application you created.
-
Specify the username and password of the application.
-
(Optional) Specify the application definition of this application.
-
(Optional) Change the default settings to suit your requirements.
-
Click . Your applications details are added to Novell SecureLogin.
-
Click to save and exit.