5.4 Creating a Xen VM
Refer to the appropriate third-party documentation for how to create VMs for VMware ESX Server and Microsoft Windows Server 2008 with Hyper-V. To bring them into the virtualization grid, see Section 2.5, Discovering VMs of the Registered VM Hosts.
To create a new Xen VM for the virtualization grid that you are logged in to, run the Virtual Machine Properties Wizard:
-
In the VM Client, do one of the following to start the wizard:
-
Click the
 button in any view.
-
Click > in any view.
-
Press Ctrl+N in any view.
-
Right-click any listed item in any view, then select .
The following wizard page is displayed:

-
-
Fill in the fields to define the basic information for the VM:
VM Name: (Required) Name for the VM.
This name applies to all versions of the VM and must be unique. It cannot already exist in either the or lists.
The name cannot be longer than 100 characters and cannot start with the letters “xen.”
Description: Note the purpose and any other specifics you might require of the VM. These notes apply to all versions of this VM.
UUID: Displays the UUID for the VM. This field is view-only.
Guest Operating System: The operating system you want to install on your VM. The following are supported:
- SUSE Linux Enterprise Server 8
- SUSE Linux Enterprise Server 9
- SUSE Linux Enterprise Server 10
- SUSE Linux Enterprise Server 11
- SUSE Linux Enterprise Desktop 10
- SUSE Linux Enterprise Desktop 11
- openSUSE
- openSUSE 11
- Novell Open Enterprise Server 2 (Linux)
- Novell Open Enterprise Server 2 (NetWare)
- Novell NetWare 6.5 SP6 and earlier
- Red Hat Enterprise Linux 3
- Red Hat Enterprise Linux 4
- Red Hat Enterprise Linux 5
- Solaris 9 and older
- Solaris 10
- Microsoft Windows NT
- Microsoft Windows XP, 2000, 2003
- Microsoft Windows XP, 2003 (x64)
- Microsoft Windows Vista
- Microsoft Windows Vista (x64)
- Microsoft Windows Server 2008
- Microsoft Windows Server 2008 (x64)
There is also an “(other)” option for the following:
- SUSE
- Red Hat
- Microsoft Windows
Virtualization Mode: is hardware assisted virtualization, meaning the guest runs on an operating system that is aware it’s being virtualized. Microsoft Virtual Server with Hyper-V is an example of full virtualization. means that the operating system directly accesses elements of the hardware, including processor, display, memory, network interface card, and hard drive, and uses the hypervisor to emulate other hardware interactions. Xen is an example of a paravirtualization. However, Xen can also do full virtualization.
Paravirtualization performs much faster and with better hardware efficiency than full virtualization. However, full virtualization enables complete decoupling of the software from the hardware, which streamlines migration between servers.
NOTE:Refer to the SUSE Linux Enterprise Server (SLES) and Red Hat Enterprise Linux (RHEL) documentation to verify supported platforms in each virtualization mode.
Architecture: The type of processor you want to have as the virtual processor for the VM.
Install Source: (Required, if not PXE) The path to the installation media for your guest operating system. For a fully virtualized VM, the install source must be an ISO. For a paravirtualized VM, an ISO or network install source is required. For more information, see Section A.0, VM Installation Sources.
Use a PXE Install Source: This feature is only available when you select in the field, and it works only if the host server that is selected for building this VM is on a network where PXE is running.
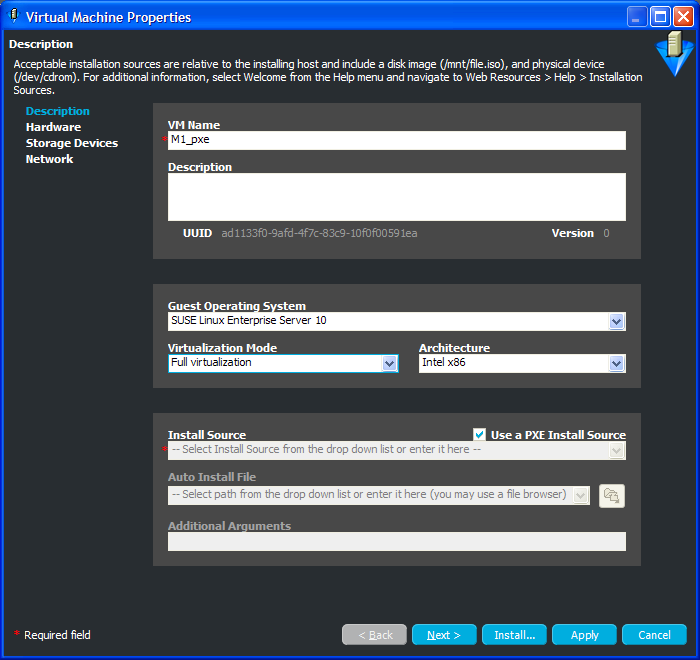
If you select this option, it disables the , , and fields. The installation is then done from a PXE menu that is displayed when you are automatically connected to the target VM via VNC after you click .
IMPORTANT:The default timeout for the PXE menu’s autoboot might be too short because of the time that it takes for VNC to connect with target VM. For example, if your PXE timeout is set to 10 seconds, most of that might be used up in getting the PXE menu to display via VNC. If you want to select the installation source from the PXE menu, we recommend that you change it to a timeout value that works for you, such as 15 or 20 seconds.
Auto Install File: This field applies only to paravirtual installations. The file listed here is used to populate the answers needed during the installation of the guest operating system. Some examples include time zone, language, firewall, and other settings given in response to the user interactive areas of the installation. An AutoYaST file listed here can contain network settings that are applied during the VM Builder job. For RHEL, the file is a kickstart file.
IMPORTANT:The auto install file must reside locally on the machine where you are running the VM Client. It cannot be used from a host machine or another machine in your network.
Additional Arguments: This field applies only to paravirtual installations. These are Linux install arguments, which are operating system parameters similar to the information entered in a GRUB boot loader when running on bare hardware in SUSE Linux Enterprise Server (SLES) and SUSE Linux Enterprise Desktop (SLED). Additional network installation information can be added here, which is used during the build process to find the installation source for the VM build process.
-
Click to display the following wizard page:

-
Fill in the fields to define the kind of hardware to be virtualized for the VM:
Processors: The number of virtual processors the VM has.
Memory Size: The amount of virtual RAM the VM has, or paravirtualized memory that can be used by the VM if it is paravirtualized.
Max: The amount of virtual RAM the VM has, or paravirtualized memory that can be used by the VM if it is paravirtualized.
Display Driver: The properties of the VM’s display. If you have chosen paravirtualization for this VM, your only option is . If you have chosen full virtualization, you can select between or the on-board VGA. If you do not need a display, you can turn off the display on a fully virtualized machine.
Remote Console Password: The password for remotely controlling the VM. Use the two fields to verify that it is typed correctly.
-
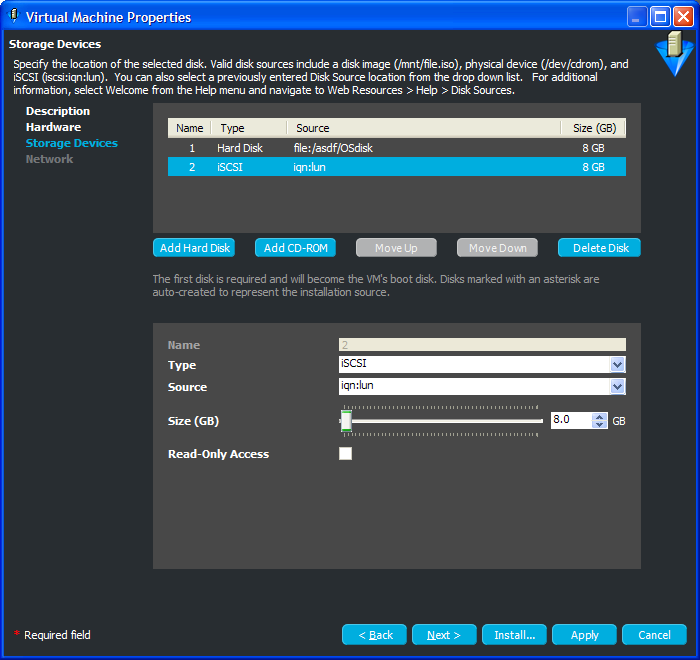
Click to display the following wizard page:

The default for the field is . The other possible types are:
-
iSCSI:
-
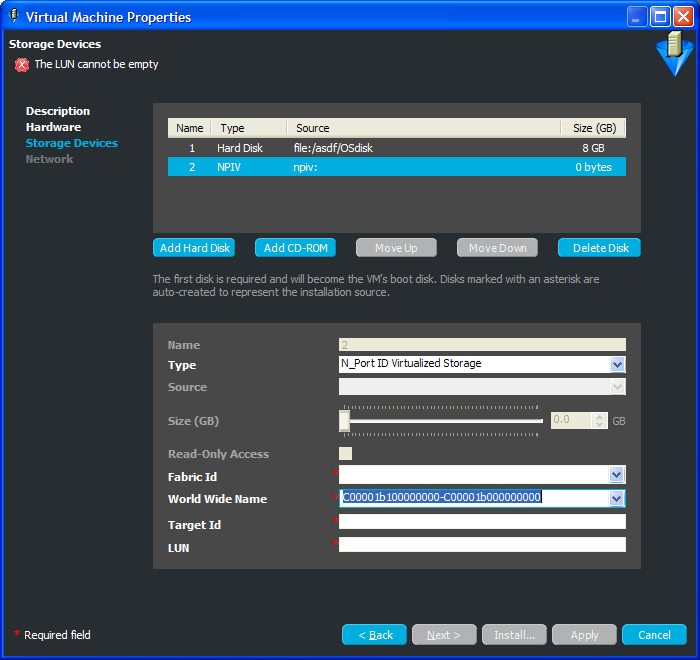
N_Port ID Virtualized Storage (NPIV):
-
Network Attached Storage (NAS):

The Storage Devices page is for defining the hard drives and CD or DVD drives that you want to include in the VM profile. The first device must always be a hard disk that cannot be removed unless another hard disk has been put into the first slot. This is the only disk (Disk 0) that is stored. All other disks are virtual and are created upon launching the VM. You can add any other storage devices you want to the VM and prioritize their use in the list.
-
-
To fill in the storage device information, select a task from the following table:
Tasks
Steps
Additional Details
Adding a hard disk to your VM
-
Click .
-
Fill in the following fields:
Name: The name is the number in the order the drive appears in its VM image list.
Type: Select the type of hard disk you want to create on the VM:
-
Hard Disk
-
iSCSI
Not supported as the first disk.
-
N_Port ID Virtualized Storage (NPIV)
Not supported as the first disk.
-
Network Attached Storage (NAS)
Source: The repository on the hard disk of the VM.
Size (GB): The VM’s hard drive size, ranging from 0.25 GB (250 MB) to 4 TB. This is the maximum allowable size of the VM.
Read Only Access: Select this option to give the hard drive Read-Only access. By default, hard drives are writable.
Fabric ID: (Available only for N_Port ID Virtualized Storage). Select or specify a fabric ID that uniquely identifies a SAN repository.
The drop-down list is populated with fabric IDs of the discovered SAN repositories.
World Wide Name: (Available only for N_Port ID Virtualized Storage). Select or specify a unique World Wide Name.
The World Wide Name value is automatically assigned for the NPIV disks. You can edit it, if required.
Target ID: (Available only for N_Port ID Virtualized Storage). Specify the target ID of the SAN repository.
LUN: (Available only for N_Port ID Virtualized Storage). Specify a LUN value between 0 and 254.
-
-
Click .
The following restrictions apply per VM:
-
Limit of 4 fully virtualized disks (hda-hdd).
-
Limit of 16 paravirtualized disks (xvda-xvdp).
While adding an additional NPIV disk to a VM, ensure that the disk values for Fabric ID, World Wide Name, Target ID, and LUN are unique for each NPIV disk of the VM.
Creation of a block-based VM is not supported for NPIV.
IMPORTANT:iSCSI and NPIV can be used for secondary disks. However, if you add iSCSI or NPIV as a secondary disk, you can change the order of the disks and make it to be the first disk. This is not supported.
If you define iSCSI or NPIV as a first disk, when the VM is stopped and restarted, the configuration file that is stored on the iSCSI or NPIV disk is looked for in a local repository, and when not found, a local repository is created for the VM, thus losing connection to the iSCSI or NPIV disk.
Adding a CD-ROM or DVD ROM to your VM
-
Click .
-
Fill in the following fields:
Name: The name is the number in the order the drive appears in its VM image list.
Type: Select the type of CD-ROM you want to create on the VM:
-
CD-ROM
-
DVD
Source: The repository on the hard disk of the VM.
Size (GB): The size is zero and cannot be changed.
Read Only Access: These drives can only have Read-Only access.
-
-
Click .
IMPORTANT:If you add a CD-ROM or DVD-ROM, the VM can only be moved, migrated, or used to create a template if the CD-ROM’s or DVD-ROM’s ISO or image is accessible through shared storage.
Rearranging the order in which each storage device is accessed
-
Select the storage device whose order you want to change.
-
Click or .
The first storage device in the list must be a hard disk, which is the only one actually stored in the VM image.
Deleting a storage device
-
Select the storage device you want to delete.
-
Click .
Removes the selected storage device from the table.
WARNING:If the storage device is based on a disk image, that could also be deleted. To preserve the disk image, manually copy it to another location before deleting the storage device.
-
-
Click to display the following wizard page:

The network devices are added, deleted, and defined on the Network page, where you add specific information about your network connections or intended network connections for your VM. You can define more detailed NIC settings in your auto-install files or when performing a guest installation.
-
To fill in the NIC information, select a task from the following table:
-
To complete the wizard, click one of the following buttons:
-
Install: Lists the VM in the view, then immediately installs the configured VM.
A VNC login dialog box is displayed so that you can view the progress of the installation from the VM’s console. There is a 30-second timeout while the VNC sets up the parameters of the VM.
You can cancel the use of VNC; however, if user interaction is necessary, you need to use the VNC to help complete the installation. You can start the VNC for a VM being installed by right-clicking the VM and clicking .
-
Apply: Applies the wizard configuration and saves the new VM in the view, but does not install the VM.
Focus is returned to the view after you exit the wizard, with the new VM selected in the list.
To install the VM at a later time, see Section 5.5, Installing a VM.
You can click to make changes before installing or applying the VM definition.
-