C.5 Looking at the Source Code with a Child Container Example
In this example, we want change the Layout view so that applies a filter and shows remaining elements by condition, using a custom node style. We’ll take a look at what happens as the source code and bind commands are built in the background. Generally, here is what we’ll do:
-
Set up a child container
-
Apply a filter that shows only ports and sort by condition
-
Apply a custom node style
To build a drawing using a child container and apply a custom node:
-
In the pane, navigate to the desired element under or , then open the Layout View.
In this example, we used a service model with an element matcher:

-
Right-click the background of the Layout View, then select .
All elements are removed leaving the Layout view empty and in Edit Mode.
-
Right-click the Layout View, then select > > > .
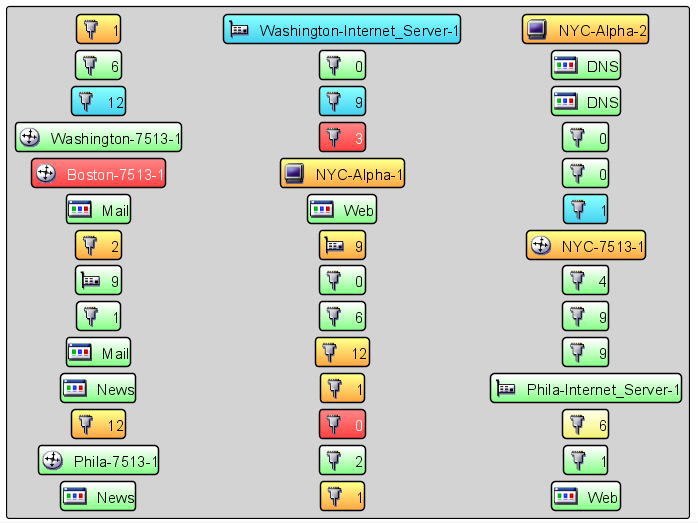
A child container displaying all elements displays:
The source code updates as shown here to add a container that uses a bind:layout tag inside the bind:chidren tag to layout all children. Notice that code for generated elements is removed from this code sample so that it is easier to see the basic structure of what is added.
<?xml version="1.0" encoding="ISO-8859-1" standalone="no"?><svg xmlns:xlink="http://www.w3.org/1999/xlink" xmlns="http://www.w3.org/2000/svg" xmlns:bind="http://www.managedobjects.com/bind" bind:setup="1252087240607" MOS_PanX="-217" contentScriptType="text/ecmascript" zoomAndPan="magnify" MOS_PanY="-155" contentStyleType="text/css" dname="org=Ports/org=demo/root=Organizations" version="1.0" preserveAspectRatio="xMidYMid meet" MOS_World="0" MOS_Scale="0.75" overflow="visible"> <g transform="translate(306.0,229.0)"> <bind:layout name="wrap" pad="10" id="12385dab0e9"/> <rect x="40.5589" y="-6" fill="lightgray" width="909.9905" rx="4" bind:container="true" height="684" ry="4" stroke="black" stroke-width="1.5"/> <bind:children self="false" id="12385dab0be"> <bind:layout gap="10" name="grid" columns="3" id="12385dab0e8" align="center"/> </bind:children> </g> <defs> <rect fill="none" width="32" height="32" id="emptyIcon" stroke="gray"/> </defs> </svg> -
Filter the elements shown.
In this step we’ll create a filter that shows only ports.
Do the following:
-
Right-click the container, then select > > > to open the Adjust Filtering dialog box.
-
In the field, enter port.* to find only those elements with a class beginning with port.
-
Click .
The view updates to only show port elements:
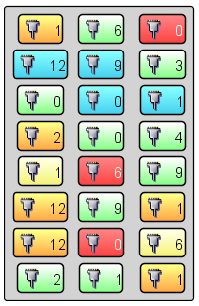
Filters in bind tags check the next level of elements only if the parent element passes the filter. Regular expressions can be used to define filtering matcher as in the above example.
The source code updates as shown here to add the class filter to the bind:children tag:
<bind:children classFilter="port.*" conditionFilter="OK,INFO,MINOR,MAJOR,CRITICAL,UNKNOWN" self="false" nameFilter="" scriptFilter="" dnameFilter="" id="12385dab0be">
      <bind:layout gap="10" name="grid" columns="3" id="12385dab0e8" align="center"/>
    </bind:children>
-
-
Adjust the display, as desired.
In this example, we’ll adjust the layout and sort by condition.
Do the following:
-
Right-click the container, then select > > > to open the Adjust Layout dialog box.
-
Select the radio button from .
-
Click to close the Adjust Layout dialog box.
-
Right-click the container, then select > > > to open the Adjust Sorting dialog box.
-
Select the radio button from .
-
Select the radio button from .
-
Click .
The Adjust Sorting dialog box closes:

The source code updates as shown here to adjust the bind:layout tag inside the bind:children tag:
    <bind:children classFilter="port.*" conditionFilter="OK,INFO,MINOR,MAJOR,CRITICAL,UNKNOWN" self="false" nameFilter="" scriptFilter="" dnameFilter="" id="12385dab0ea">
      <bind:layout id="12385dab114" columnWidth="" rowHeight="" gap="10" name="grid" align="center" columns="4" sortascend="condition"/>
    </bind:children>
  </g>
-
-
To update with the desired node style, do the following:
-
Right-click the container, then select .
-
From the pane, expand > > .
-
Navigate within the folder until you find the desired node style.
HINT:Be careful not to select any of the objects under , else the Layout view changes focus and leaves the Layout drawing you are working with.
-
Drag the selected node style over onto one of the elements inside the Layout view container.
-
Select from the pop‑up menu.
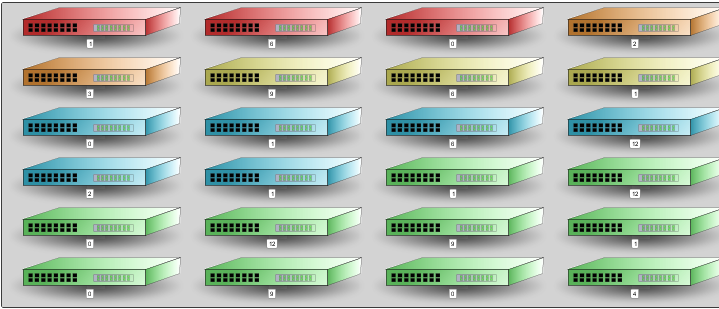
All element nodes update with the new node style:
-
Right-click the container, then select .
The source code updates as shown here to add the bind:ambient tag inside the main SVG tag:
<?xml version="1.0" encoding="ISO-8859-1" standalone="no"?><svg xmlns:xlink="http://www.w3.org/1999/xlink" xmlns="http://www.w3.org/2000/svg" xmlns:bind="http://www.managedobjects.com/bind" bind:setup="1252088279618" MOS_PanX="-65" contentScriptType="text/ecmascript" zoomAndPan="magnify" MOS_PanY="-14" contentStyleType="text/css" dname="org=Ports/org=demo/root=Organizations" version="1.0" width="1468.310546875" dname_relid="1" MOS_viewBox="120 136 1488 631" preserveAspectRatio="xMidYMid meet" bind:ambient="Nodes__Technology__Networking__Switch" height="611.6928100585938" MOS_World="0" MOS_Scale="0.5" overflow="visible">
-