3.5 Installing Additional Collector Managers
The collector managers for Sentinel Log Manager manage all of the data collection processes and data parsing. A collector manager is included in the Sentinel Log Manager server installation on SUSE® Linux Enterprise Server 11 (SLES 11), but you can also install multiple collector managers in a distributed setup.
NOTE:Collector Manager requires network connectivity to the message bus port (61616) on the Sentinel Log Manager server. Before the collector manager installation, all the firewall and other network settings must be allowed to communicate over this port.
Remote collector managers provide several benefits:
-
Distributed event parsing and processing to improve system performance.
-
Collocation with event sources, which allows filtering, encryption, and data compression at the source. This feature provides additional data security and decreases network bandwidth requirements.
-
Installation on additional operating systems. For example, installation on Microsoft Windows* to enable data collection using the WMI protocol.
-
File caching, which enables the remote collector manager to cache large amounts of data while the server is temporarily busy performing archiving events or processing a spike in events. This feature is an advantage for protocols, such as syslog, that do not natively support event caching.
Use the following procedure to download and install the Sentinel Collector Manager installer:
-
Log in to the Sentinel Log Manager as an administrator.
-
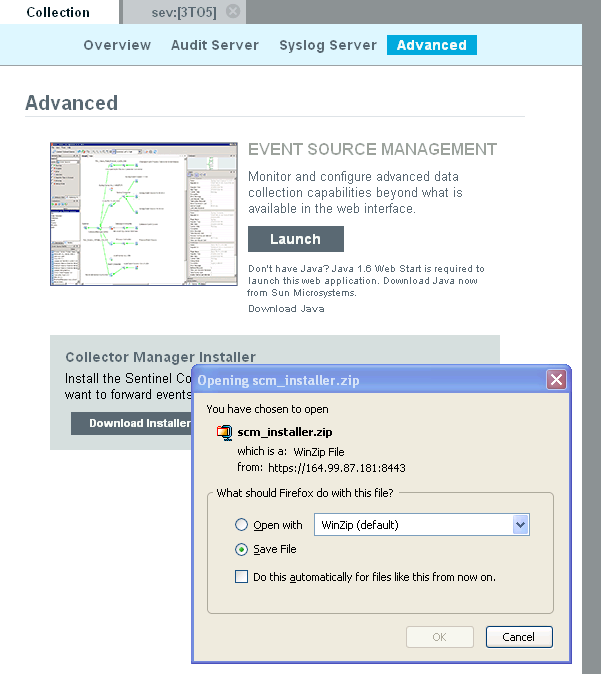
Click the link at the upper left corner of the page.
-
Click the tab.
-
On clicking on link, an Opening scm_installer.zip window is displayed with the option to save the scm_installer.zip file on your local machine.
-
Extract the install script from the scm_installer.zip file and install the Sentinel Collector Manager on the machine from which you want to forward the events:
-
Go to the install directory and start the installation:
-
Select a language of your choice for installation from the drop-down list.
-
Read the Welcome screen, then click to install the Sentinel 6.1 on your system.
-
The Novell Software License Agreement wizard is displayed. Read the End User License Agreement. Select the option, then click .
-
Accept the default installation directory or click to specify your installation location, then click .
NOTE:You cannot install onto a directory with special characters or non-ASCII characters. For example, when installing the collector manager on Windows x86-64, the default path is C:\\Program Files(x86). You must change the default path to avoid the special characters to continue installation.
-
Specify the Sentinel administrator username and path to the corresponding home directory.
-
OS Sentinel Administrator Username: The default is esecadm.
This is the username of the user who owns the installed Sentinel product. If the user does not already exist, a user is created with corresponding home directory in the specified directory.
-
OS Sentinel Administrator User Home Directory: The default is /export/home. If esecadm is the username, the corresponding home directory is /export/home/esecadm.
To log in as the esecadm user, you need to first set its password.
-
-
Specify the following, then click .
-
Message bus port: The port on which the communication server is listening. Components connecting directly to the communication server uses this port.
-
Communication Server host name: Specify the Communication Server port or host server name information.
NOTE:The port numbers must be identical on every machine in the Sentinel system to enable communications. Make a note of these ports for future installations on other machines.
-
-
Specify the following, then click .
-
Automatic Memory Configuration: Select the total amount of memory to allocate to the Sentinel server. The installer automatically determines the optimal distribution of memory across components taking into account estimated operating system and database overhead.
IMPORTANT:You can modify the-Xmx value in the configuration.xml file to change the RAM allocated to the Sentinel server processes. The configuration.xml file is placed at Install_Directory/config on Linux or Install_Directory\config on Windows.
-
Custom Memory Configuration: Click to fine-tune memory allocations. This option is only available if there is sufficient memory on the machine.
-
-
Summary screen with the features selected for installation is displayed. Click to install the Sentinel 6.1.
-
After the installation, you are prompted to enter the username and password that are used by ActiveMQ JMS strategy to connect to the broker.
You must use the collectormanager user and its corresponding password during the Collector Manager service installation. In this case, the collectormanager user will have access rights only to the required communication channels for the Collector Manager operations.
NOTE:To obtain the Collector Manager user’s password, navigate to /Install_Directory/config directory, open the activemqusers.properties file. For example, in the file you may see the collectormanager=60a25d4f67733f1074a1eafa22a50aba text, which is the combination of alphanumeric value (such as, 60a25d4f67733f1074a1eafa22a50aba) after the equal to (=) symbol is the password.
-
Click . You will be prompted to accept an untrusted certificate. Select Accept Permanently. (If you do not see this certificate acceptance step, there may be something wrong with your installation. You may need to manually copy the .activemqclientkeystore.jks from the Sentinel Log Manager server.)
-
After the installation, you are prompted to reboot or re-login, and start the Sentinel services manually. Click to reboot your system.
NOTE:If you forget the username that you have set, open a terminal console and type the command as a root user.
env | grep ESEC_USER
It lists down the username, if the user has already been created and the environment variable has already been set.
To start the Sentinel services manually, perform the following:
Platform
Command
On Linux
<Install_Directory>/bin/sentinel.sh startOn Windows
<Install_Directory>/bin/sentinel.bat startTo stop the Sentinel services manually, perform the following:
-
Launch the Event Source Management interface from the Sentinel Log Manager Web page. You will see a newly installed Collector Manager.