4.9 Sample Identity Injection Policy
One of the common uses of an Identity Injection policy is to differentiate between internal users and external users. Web servers that have been configured for this logic can then display one set of pages to internal users and another set of pages to external users. The following sample policy is based on an environment that has the following characteristics:
-
The Web server has been configured to look for a custom tag called IPAddress and to differentiate between internal IP addresses and external IP addresses.
-
The internal customers have NAT IP addresses.
-
The protected resource is a page called mycompany.html. This page is a public protected resource (no authentication required) because the IP address of the client is available before authentication.
To configure your site for this type of policy:
-
In the Administration Console, click > .
-
Select the policy container.
-
Click , specify a name for the policy, select for the type, then click .
-
In the section, click > .
-
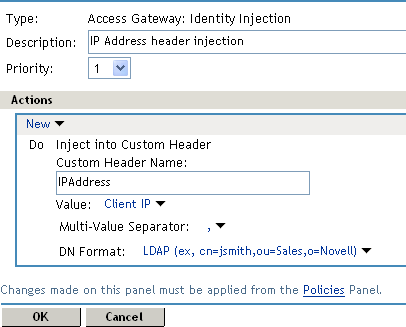
Fill in the following fields:
Custom Header Name: Specify IPAddress in the text box.
Value: Select .
The other fields do not need to be modified. Your policy should look similar to the following:
-
Click twice, then click .
-
Assign the policy to the mycompany.html page of the Web server. Click > > > > .
-
In the Protected Resource List, select the protected resource for the page or click to create one, then specify a name for it.
-
In the , ensure that the path ends with the name of the page. For example:
/mycompany.html
-
Click , select the name of the IP address policy, then click .
-
To save the changes, click > .
-
On the Configuration page, click , then click .
-
Configure the Web server to use the IPAddress values in the custom header to distinguish between external and internal customers.
In this sample scenario, the Web server is configured to recognize IP addresses starting with 10. as internal customers and all other addresses as external customers.