2.3 Configuring the Agent for Direct Access
-
In the Administration Console, click > > .

-
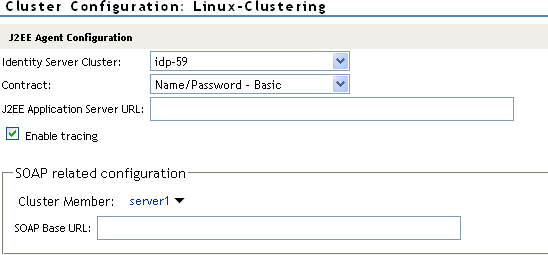
Fill in the fields:
Identity Server Cluster: Select the Identity Server you want the agent to trust for authentication by selecting the configuration you have assigned to the Identity Server.
The option is used as the default, before you configure the agent.
Contract: Select the type of contract, which determines the information a user must supply for authentication. By default, the Administration Console allows you to select from the following contracts and options when specifying an authentication contract.
-
Name/Password - Basic: Specifies basic authentication over HTTP, using a standard login pop-up provided by the Web browser.
-
Name/Password - Form: Specifies a form-based authentication over HTTP, using the Access Manager login form.
-
Secure Name/Password - Basic: Specifies basic authentication over HTTPS, using a standard login pop-up provided by the Web browser.
-
Secure Name/Password - Form: Specifies a form-based authentication over HTTPS, using the Access Manager login form.
-
Any Contract: If the user has authenticated, this option allows any contract defined for the Identity Server to be valid; or if the user has not authenticated, it prompts the user to authenticate by using the default contract assigned to the Identity Server configuration.
You can configure other contract types.
J2EE Application Server URL: Specify the URL to access the application server, including the port. For example, if the DNS name of your J2EE server is j2ee.mycompany.com, enter the following:
https://j2ee.mycompany.com:8443
SOAP Base URL: Specify the URL used to communicate between the agent components residing in an application server. If you have created a cluster, select each cluster node from the drop-down list and specify separate URLs for each node. The SOAP URL must end with nesp. For example:
https://j2ee.mycompany.com:8443/nesp
Both the J2EE application server and SOAP base URL have three parts:
-
Scheme: For the scheme, specify the scheme you have configured the application server to use for connections (HTTP or HTTPS). See your application server documentation for information on configuring SSL so you can use HTTPS.
For more information on SSL and the required certificates for the agent, see Section 5.3, Configuring SSL Certificate Trust.
-
Domain: Specify a DNS name in the URL if you want to configure the application server in such a way that it is accessible internally behind your firewall and externally outside the firewall.
-
Port: Port 8443 is the standard HTTPS port for an SSL connection to a JBoss server, port 7002 for an SSL connection to a WebLogic server, and port 9443 for an SSL connection to a WebSphere server. The HTTP port is 8080 for JBoss, 7001 for WebLogic, and 9080 for WebSphere. If you have configured a different port, use that port.
-
-
Click , then click > .
-
To update the Identity Server, click , then click .
Whenever you set up a new trusted identity configuration, you need to update the Identity Server configuration.
-
Continue with Preparing the Applications and the J2EE Servers.