3.5 Setting Up a Tunnel
The tunnel option lets you create one or more services for the specific purpose of tunneling non-HTTP traffic through the Access Gateway to a Web server. To do this, the non-HTTP traffic must use a different IP address and port combination than the HTTP traffic.
An Access Gateway usually processes HTTP requests in order to fill them. However, it is not unusual that some of the traffic coming through the gateway is not HTTP-based. Web servers sometimes handle Telnet, FTP, chat, or other kinds of traffic without attempting to process it. If your Web servers are handling this type of traffic, you should set up a tunnel for it.
Reverse proxies and tunnels cannot share the same IP address and port combination. You can either configure a reverse proxy for an IP address and port or a tunnel for that IP address and port.
To set up a tunnel:
-
In the Administration Console, click > > > .
-
Click , enter a display name for the tunnel, then click .

-
Fill in the following fields:
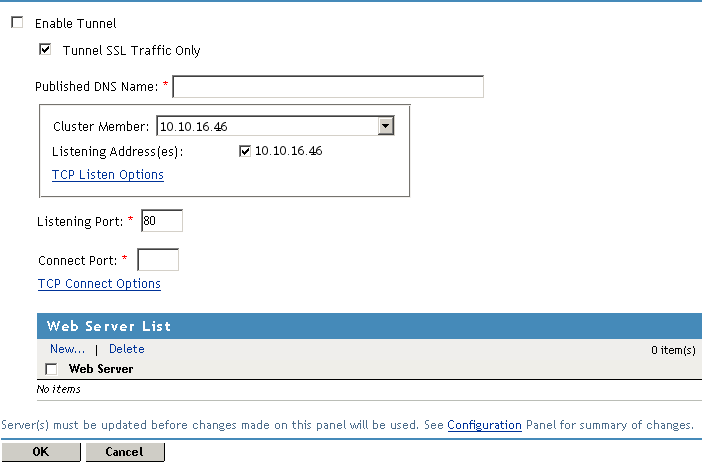
Enable Tunnel: Specifies that the Access Gateway should set up a tunnel for all incoming traffic. This option must be enabled to configure a tunnel.
Tunnel SSL Traffic Only: Allows you to configure the Access Gateway to tunnel only SSL traffic. If this option is selected, the Access Gateway verifies that the address and port being accessed are actually an SSL Web site. If verification fails, the service tears down the connection. The SSL port number for the SSL tunnel is specified via the and the .
Published DNS Name: Specify the DNS name you want the public to use to access your tunnel or the virtual IP address assigned to the Access Gateway cluster by the L4 switch. If you specify a DNS name, the DNS name must resolve to the IP address you set up as the listening address for the tunnel.
-
Configure the communication options between the browsers and the tunnel by configuring the following fields:
Cluster Member: (Available only if the Access Gateway is a member of a cluster.) Select the server you want to configure from the list of servers. The modifications apply to the selected server. Any other modifications apply to all servers in the cluster.
Listening Address(es): Displays a list of available IP addresses. If the Access Gateway has only one IP address, only one is displayed. If it has multiple addresses, you can select one or more addresses to enable. You must enable at least one address by selecting its check box.
TCP Listen Options: Provides additional options for configuring how requests are handled. See Section 2.7.1, Configuring TCP Listen Options for Clients. At least one Web server must be configured before you can modify these options.
Listening Port: Specifies the port on which to listen for requests from browsers. The listening address and port combination must not match any combination you have configured for a reverse proxy.
-
Configure the communication options between the tunnel and the Web servers by configuring the following fields:
Connect Port: Specifies the port that the Access Gateway uses to communicate with the Web server.
TCP Connect Options: Allows you to control how idle and unresponsive Web server connections are handled and to optimize these processes for your network. See Section 2.7.2, Configuring TCP Connect Options for Web Servers.
-
Specify a Web server to receive the traffic. In the Web Server List section, click , specify the IP address or DNS name of the Web server, then click .
At least one Web server must be specified in the list before you can save a tunnel configuration.
-
To save your changes to browser cache, click .
-
To apply your changes, click the link, then click > .