6.7 Metadata Repositories
Large scale federations have more than 100+ identity and or service providers and it is a tedious task to establish bi-lateral relationships with Access Manager. You as an identity provider can now configure several identity and or service providers using a multi-entity metadata file available in a central repository. The identity and/or service providers become partners of a community which maintains a single metadata file containing metadata of all the approved partners. The identity and or service providers submit their metadata which includes specifications of services offered (SAML 1.1 and SAML 2.0) and any other information. This feature is available only for SAML 1.1 and SAML 2.0.
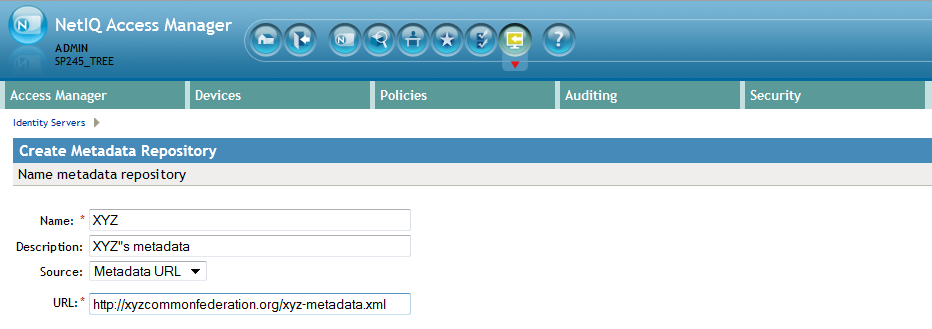
For example, XYZ is an e-book store and several e-book stores, which are either identity or service providers are partner with it. XYZ maintains a single metadata file containing metadata of all the other stores. ABC an e-book identity provider wants to establish a federation with many other e-book stores. Hence, ABC partners with XYZ by sharing its metadata and XYZ in turn shares the metadata XML file. ABC imports the XML file available publicly on the internet (for example, http://xyz.commonfederation.org/xyz-metadata.xml) and establishes trusts with others in the federation which includes XYZ’s trusted provider sites.
6.7.1 Creating Metadata Repositories
-
In the Administration Console, click Devices > Identity Servers > Shared Settings > Metadata Repositories.
-
Click New and fill in the following fields:
Name: Enter the name of the metadata repository.
Description: Enter the description of the metadata repository.
Source: From the drop-down menu, select the source from which you want to import the metadata file.
-
To specify the URL location of the XML file in the URL field, select Metadata URL.
-
To specify the path of the XML file in the File field, select Metadata File.
-
-
Click Finish.
The details of the metadata such as the number of identity servers and service providers present in the metadata, and expiry date of the metadata are displayed.
You can select the metadata repository and click Delete to delete the repository. If the metadata file is in use, you cannot delete it. Delete the trusted provider first and then delete the metadata file.
-
Select All to see a list of entities. If the entity is supporting it the respective protocol will be checked.
Once the metadata repositories are imported, the entities available in the metadata repository can be assigned as trusted provider to any of the Identity Provider clusters. To create the trusted providers, see Section 7.3, Managing Trusted Providers.