Configuring Single Sign-On For Office 365 Services
NetIQ Access Manager is compatible with Microsoft Office 365 and provides single sign-on access to Office 365 services. Single sign-on access is supported for Web-based clients such as Exchange Web Access and Sharepoint Online. This means that you can use your existing LDAP credentials to access any of the Office 365 services without having to remember multiple passwords or sign in multiple times to access different services. You just need to sign in once with an existing password and Access Manager grants you access to all the services.
This single sign-on access is achieved by implementing federated authentication through SAML 2.0 protocol. In this scenario, the Access Manager is configured as an identity provider and allows Office 365 to trust it for authentication. Office 365 is configured as a service provider that consumes authentication assertions from Access Manager. A trust model is set up for Access Manager and Office 365 to communicate with each other.
NOTE:Single sign-on is not supported for Microsoft Lync.
1.0 Configuring Access Manager
1.1 Prerequisite
Enable SAML 2.0 in Access Manager.
-
In the Administration Console, click .
-
In the section, verify whether SAML 2.0 is selected.
1.2 Adding Office 365 Metadata
-
In the Administration Console, go to and then select an Identity Server.
-
Select
-
Specify the as Metadata text. Enter a name to identify the identity provider configuration.
-
In , copy paste the following metadata.
<?xml version="1.0" encoding="utf-8"?> <EntityDescriptor xmlns="urn:oasis:names:tc:SAML:2.0:metadata" entityID="urn:federation:MicrosoftOnline"> <SPSSODescriptor protocolSupportEnumeration="urn:oasis:names:tc:SAML:2.0:protocol" WantAssertionsSigned="true"> <NameIDFormat> urn:oasis:names:tc:SAML:1.1:nameid-format:emailAddress </NameIDFormat> <NameIDFormat> urn:mace:shibboleth:1.0:nameIdentifier </NameIDFormat> <NameIDFormat> urn:oasis:names:tc:SAML:1.1:nameid-format:unspecified </NameIDFormat> <NameIDFormat> urn:oasis:names:tc:SAML:2.0:nameid-format:transient </NameIDFormat> <NameIDFormat> urn:oasis:names:tc:SAML:2.0:nameid-format:persistent </NameIDFormat> <AssertionConsumerService isDefault="true" index="0" Binding="urn:oasis:names:tc:SAML:2.0:bindings:HTTP-POST" Location="https://login.microsoftonline.com/login.srf"/> <AssertionConsumerService index="1" Binding="urn:oasis:names:tc:SAML:2.0:bindings:HTTP-POST-SimpleSign" Location="https://login.microsoftonline.com/login.srf"/> </SPSSODescriptor> </EntityDescriptor>IMPORTANT:You can also access the SAML 2.0 Office 365 metadata from .
Here, the AssertionConsumerService element appears at the start of the XML definition. If this metadata is pasted in the same format, it leads to an XML malformed error in the Identity Server.
To resolve this, move the AssertionConsumerService element (inclusive of opening and closing XML tags) before the </SPSSODescriptor> XML tag.
-
Click to confirm the certificates.
-
Click to save the metadata changes.
1.3 Configuring Federation Settings
-
In the Administration Console, go to and select an Identity Server.
-
Select and then select the service provider you created.
-
Select .
-
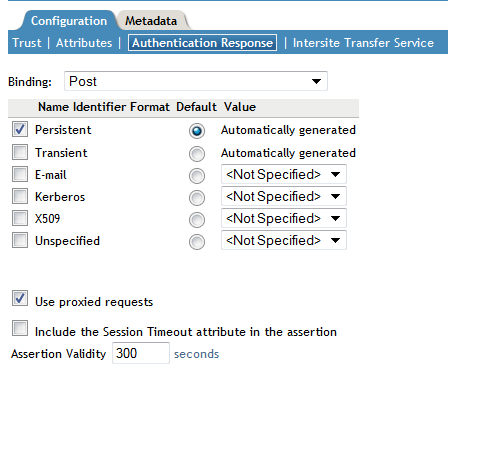
Change the default value of from Artifact to Post.
-
Ensure that is Persistent. Deselect Transient.
-
Ensure that is Not Specified. Do not select any value from the drop-down list.
This ensures that Access Manager does not automatically generate a random value for NameID. The NameID value is created based on the GUID value of the Access Manager user and is later used as the ImmutableID of the Office 365 user.
IMPORTANT:The GUID (global unique identifier) value differs depending on the user store of the user. For example, the GUID of an user on eDirectory will be different from the GUID of an user on Active Directory.
1.4 Configuring Attributes
The shadow account in Office 365 needs the following attributes:
-
ImmutableID: Office 365 requires a unique identifier for each user in the user store. This unique identifier attribute is sent for each federated login to Office 365 in the SAML2.0 NameID assertion. From 3.2 SP1 onwards, Access Manager includes this unique identifier in the assertion.
IMPORTANT:The unique identifier should not be changed until the user exists in the system.
-
Office 365 User ID: You must send the Office 365 User ID as an IDPEmail attribute. Complete the following steps to configure this attribute:
-
In the Administration Console, click and then select the Office 365 Service Provider you configured.
-
Select .
-
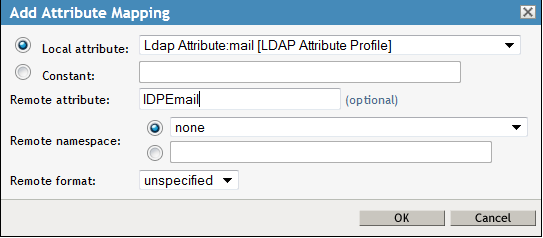
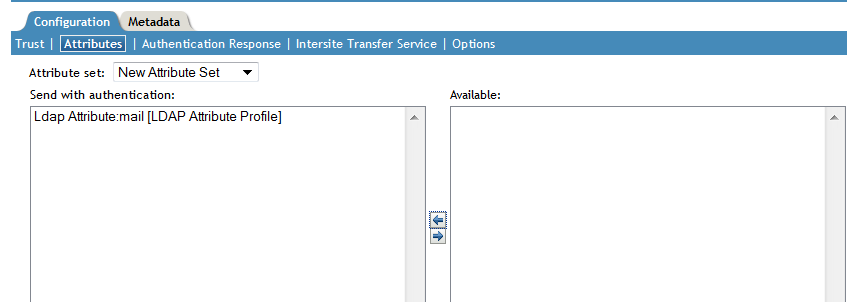
Select a new . Use None as the template.
-
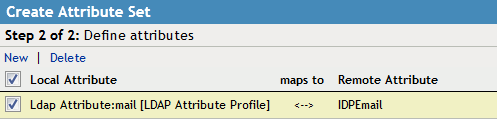
Add an Attribute mapping to establish a relation between the and . In , select Ldap Attribute:mail [LDAP Attribute Profile].
-
Specify the as IDPEmail.
-
Ensure that LDAP Attribute:mail [LDAP Attribute Profile] attribute is moved from the list to the list.
-
2.0 Configuring Office 365
2.1 Prerequisite
-
Install Windows Powershell on a Windows server. This tool helps you manage many Microsoft Office 365 administrative tasks such as user management and domain management. Ensure that this Windows server does not have the Active Directory Federation Service 2.0 snap-in installed.
You can download the tool from Install Windows Powershell.
-
At least one user must already exist in Office 365 with an ImmutableID matching the GUID of Access Manager. To verify if the GUID of Access Manager user matches the Immutable ID of an Office 365 user, see Existing Office 365 user:.
The users are not automatically provisioned during login.
2.2 Establishing Trust Between Identity Provider and the Service Provider
Office 365 domains are federated using the Microsoft Online Services Module. You can use the Microsoft Online Services Module to run a series of cmdlets in the Windows PowerShell command-line interface to add or convert domains for single sign-on.
Each Active Directory domain that you want to federate using Access Manager must either be added as a single sign-on domain or converted to be a single sign-on domain from a standard domain. Adding or converting a domain sets up a trust between Access Manager and Office 365.
To convert an existing standard domain to a federated domain, perform the following steps:
-
Open the Microsoft Online Services Module from the Start menu.
-
Run $cred=Get-Credential. Enter your cloud service administrator account credentials.
-
Run Connect-MsolService –Credential $cred.
This cmdlet connects you to the cloud service. Creating a context that connects you to the cloud service is required before running any of the additional cmdlets installed by the tool.
For example: If the name of the domain you are converting to a single sign-on domain is acme.com, and the Base URL of the Identity Server is execute the following commands at the powershell prompt:
$dom = “acme.com”

$url = "https://namtest.com:8443/nidp/saml2/sso"

$ecpUrl = "https://namtest.com:8443/nidp/saml2/sso"

$uri = "https://namtest.com:8443/nidp/saml2/metadata"

$logouturl = "https://namtest.com:8443/nidp/saml2/slo"

$cert = “MIIFLDCCBBSgAwIBAgIkA........ww19yUoDRIo="
NOTE:The value of $cert indicates the signing certificate of Identity Server. Ensure that all the new line characters are removed from the certificate.
-
Use the following cmdlet to update the settings of the single sign-on domain:
Set-MsolDomainAuthentication -FederationBrandName $dom -Authentication Federated -PassiveLogOnUri $url -SigningCertificate $cert -IssuerUri $uri -ActiveLogOnUri $ecpUrl -LogOffUri $logouturl -PreferredAuthenticationProtocol SAMLP
3.0 Verifying Single Sign-On Access
You need at least one user in Office 365 to verify that single sign-on is set up. If you have an existing user, ensure that the Immutable ID matches with the GUID of the Access Manager user.
Existing Office 365 user:
For instance if your user store is eDirectory and you want to retrieve the GUID of an existing Access Manager user, execute the following command on the eDirectory server terminal:
ldapsearch -D cn=<context> -w <password> -b <search base> cn=<name of the user> GUID | grep GUID
Create an Office 365 user with this GUID as the Immutable ID.
Creating a new Office 365 user:
Run the following command in Powershell to create an Office 365 user:
new-msolUser -userprincipalName user1@domain name -immutableID immutableID of user1 - lastname lastname of user 1 -firstname user1 -DisplayName "user1 users" -BlockCredential $false -LicenseAssignment testdomain:ENTERPRISEPACK -usageLocation two letter country code[example: US,IN,DE,BE,GB etc] -Password password of the user.
This command creates user1 in Office 365.
To verify that single sign-on is set up correctly, perform the following procedure in a machine that is not added to the domain.
-
Log in with your corporate credentials. (For example : user1@acme.com)
If single sign-on is enabled, the password field is dimmed. You will instead see the following message: You are now required to sign in at <your company>.
-
Select the link.
If you are able to sign in without errors, single sign-on is set up successfully.