4.2 Installing on Linux
-
Open a terminal window.
-
Log in as the root user.
-
Access the install script.
-
Make sure you have downloaded the software or that you have the CD available.
For software download instructions, see the “NetIQ Access Manager Readme”
-
Do one of the following:
-
If you are installing from CD or DVD, insert the disc into the drive, then navigate to the device. The location might be /media/cdrom, /media/cdrecorder, or /media/dvdrecorder, depending on your hardware.
-
If you downloaded the tar.gz file, unpack the file by using the following command:
tar -xzvf <filename>
-
-
Change to the novell-access-manager-3.2.0-xxx directory.
-
-
At the command prompt, run the following install script:
./install.sh
-
When you are prompted to install a product, type 2, , then press the Enter key.
This selection is also used for installing additional Identity Servers for clustering behind an L4 switch. You need to run this install for each Identity Server you add to the cluster.
NOTE: In Access Manager version 3.2 and later, the Administration Console is accessible on ports 2080 (HTTP) and 2443 (HTTPs) if the Identity Server or SSL VPN are installed on the same machine.
The following warning is displayed:
Warning: If NAT is present between this machine and Administration Console,
configure NAT in the Administration Console.
Exit this installation if NAT is not configured in the Administration Console.
Would you like to continue (y/n) ?
For more information about how to configure NAT, see Section C.1, Configuring the Administration Console Behind NAT.
-
Enter Y to proceed.
-
Review and accept the License Agreement.
Specify the following information:
Enter the Primary Admin Console IP Address: Specify the IP address of the primary Administration Console.
Enter the Access Manager Administration User ID: Specify the name of the administration user for the Administration Console.
Enter the Access Manager Administration Password: Specify the password and re-enter the password for the administration user account.
Confirm the password, then wait till the system installs the components. (This takes several minutes.)
If the installation program rejects the credentials and IP address, ensure that the correct ports are open on both the Administration Console and the Identity Server, as described in Section 4.1, Prerequisites.
Is Local NAT Available for Identity Server: Specify N if local NAT is not available for the Access Gateway.
Specify Y if the local NAT is available for the Access Gateway. If you specify Y then you need to enter the Local NAT IP address.
-
The following components are installed:
-
NetIQ Access Manager Server Communications: Enables network communications, including identifying devices, finding services, moving data packets, and maintaining data integrity.
-
NetIQ Identity Server: Provides authentication and identity services for the other Access Manager components and third-party service providers.
-
NetIQ Identity Server Configuration: Allows the Identity Server to be securely configured by the Administration Console.
If the installation process terminates at this step, the probable cause is a failure to communicate with the Administration Console. Ensure that you entered the correct IP address.
-
NetIQ Access Manager Server Communications Configuration: Enables the Identity Server to auto-import itself into the Administration Console.
This completes the NetIQ Identity Server installation. The install logs are located in /tmp/novell_access_manager/. These logs are all dated and time-stamped.
-
-
(Optional) To verify that the Identity Server installation was successful, log in to the Administration Console (see Section 3.3, Logging In to the Administration Console).
After you log in to the Administration Console, click > . The system displays the installed server, as shown in the following example:
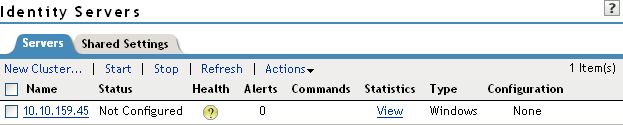
At this point the Identity Server is in an unconfigured state and is halted. It remains in this state and cannot function until you create an Identity Server configuration, which defines how an Identity Server or Identity Server cluster operates.
-
Continue with one of the following:
-
To install an Access Gateway, see Section 5.0, Installing the Access Gateway Appliance or Section 6.0, Installing the Access Gateway Service.
-
To configure the Identity Server, see
Setting Up a Basic Access Manager Configuration
in the NetIQ Access Manager 3.2 SP3 Setup Guide.
-