2.3 Configuring Web Servers of a Proxy Service
The Web server configuration determines how the Access Gateway handles connections and packets between itself and the Web servers.
IMPORTANT:For caching to work correctly, the Web servers must be configured to maintain a valid time. They should be configured to use an NTP server.
-
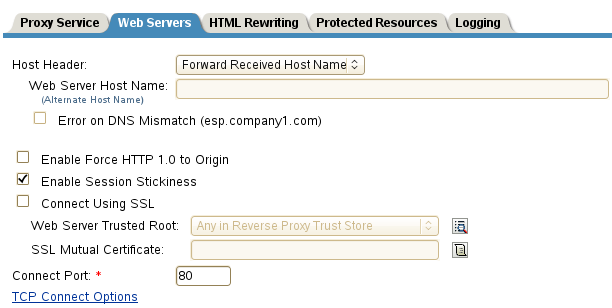
Click Access Gateways > Edit > [Name of Reverse Proxy] > [Name of Proxy Service] > Web Servers.
-
Specify the hostname that is placed in the HTTP header of the packets being sent to the Web servers. In the Host Header field, select one of the following:
-
Forward Received Host Name: Indicates that you want the HTTP header to contain the published DNS name that the user sent in the request.
-
Web Server Host Name: Indicates that you want the published DNS name that the user sent in the request to be replaced by the DNS name of the Web server. Use the Web Server Host Name field to specify this name. You can also append the port number to the Web Server Host Name field. For example, <web server hostname>:<web server port number>.
-
-
Select Error on DNS Mismatch to have the proxy determine whether the proxy service should compare the hostname in the DNS header that came from the browser with the DNS name specified in the Web Server Host Name option. The value in the parentheses is the value that comes in the header from the browser.
If you enable this option and the names don't match, the request is not forwarded to the Web server. Instead, the proxy service returns an error to the requesting browser. This option is only available when you select to send the Web Server Host Name in the HTTP header.
NOTE:The Error on DNS Mismatch option does not work in the following scenarios:
-
If the option is enabled in a protected resource.
-
If the option is enabled in a master host based service, and disabled in a path-based child services, then the Access Gateway does a strict check of DNS match for path-based child.
-
-
If your browsers are capable of sending HTTP 1.1 requests, configure the following fields to match your Web servers:
Enable Force HTTP 1.0 to Origin: Indicates whether HTTP 1.1 requests from browsers are translated to HTTP 1.0 requests before sending them to the Web server. If your browsers are sending HTTP 1.1 requests and your Web server can only handle HTTP 1.0 requests, you should enable this option.
When the option is enabled, the Access Gateway translates an HTTP 1.1 request to an HTTP 1.0 request.
Enable Session Stickiness: Selecting this option makes the proxy server to use the same web server for all fills during a session.
-
To enable SSL connections between the proxy service and its Web servers, select Connect Using SSL. For configuration information for this option, Web Server Trusted Root, and SSL Mutual Certificate, see Section 1.4, Configuring SSL between the Proxy Service and the Web Servers.
-
In the Connect Port field, specify the port that the Access Gateway should use to communicate with the Web servers. The following table lists some default port values for common types of Web servers.
Server Type
Non-Secure Port
Secure Port
Web server with HTML content
80
443
SSL VPN
8080
8443
WebSphere
9080
9443
JBoss
8080
8443
-
To control how idle and unresponsive Web server connections are handled and to optimize these processes for your network, select TCP Connect Options. For more information, see Section 2.7.2, Configuring TCP Connect Options for Web Servers.
-
To add a Web server, click New in the Web Server List and specify the IP address or the fully qualified DNS name of the Web server.
The Web servers added to this list must contain identical Web content. Configuring your system with multiple servers with the same content adds fault tolerance and increases the speed for processing requests. For more information about this process, see Section 2.7.4, Configuring Web Servers.
-
To delete a Web server, select the Web server, then click Delete.
This deletes the Web server from the list so that the Access Gateway no longer sends requests to the deleted Web server. At least one Web server must remain in the list. You must delete the proxy service to remove the last server in the list.
-
To save your changes to browser cache, click OK.
-
To apply your changes, click the Access Gateways link, then click Update > OK.