1.4 Migrating the Security Model
This section describes the process of migrating the security model from RBPM 3.6 and 3.6.1 to the Roles Based Provisioning Module 3.7.
1.4.1 Security Model Overview
The RBPM 3.7 security model supports three levels of administration:
-
Domain Administrators
-
Delegated Administrators (Domain Managers)
-
Business line managers (Team Managers)
The security model exposes several authorization domains (feature areas):
-
Roles
-
Resources
-
Provisioning
-
Compliance
-
RBPM Configuration
-
RBPM Security
Delegated administration is supported across three of these domains:
-
Roles
-
Resources
-
Provisioning
Permissions for delegated administrators and business line administrators are governed by eDirectory access control lists.
For more information on the new security model, see the Identity Manager User Application: Administration Guide.
1.4.2 Pre-Migration Steps
Before you migrate, you need to:
-
Record existing assignments for roles being deprecated in RBPM 3.7:
-
Provisioning Administrator
-
Attestation Manager
-
Role Manager
-
Security Officer
-
Auditor
-
-
Record all existing permissions for teams
The remainder of this section describes the steps for recording existing assignments for each of the system roles.
Provisioning Administrator
In previous versions of RBPM, the Provisioning Administrator was assigned using portal security. Now, it needs to be migrated to the new security model. RBPM 3.6.1 defines the Provisioning Module Administrator as a Portal Administrator assignment. The assignments are stored in the database. In 3.7, the Provisioning Administrator is defined by system role assignments. The initial assignment is specified during application installation and processed once for each User Application driver. The initialization is time stamped.
After initialization, additional assignments can be added or removed in the RBPM Administration section of the User Application.
You need to compile a list of identities that were assigned as Provisioning Administrator before proceeding with the upgrade by executing the following SQL statement:
select PRINCIPALNAME from securitypermissions where PERMISSIONIID like (select IID from securityaccessrights where FWELEMENTIID like 'ProvisioningLocksmithElementId');
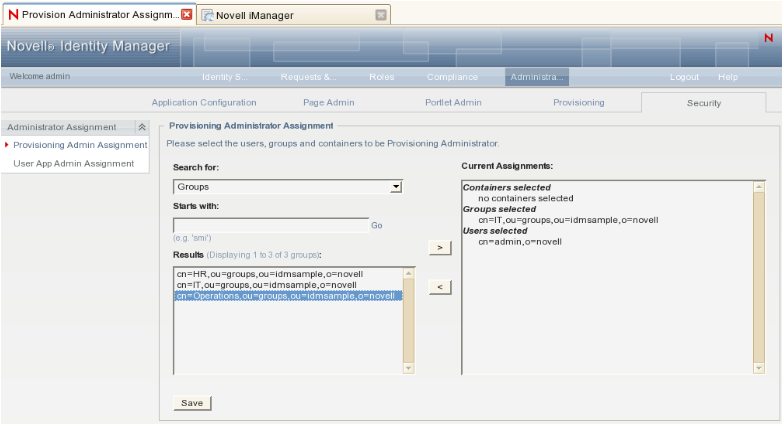
Alternatively, you can get the list from the Provisioning Administrator Configuration page in the User Application by performing the following steps:
-
Login to the User Application as administrator.
-
Navigate to .
-
Select in the left navigation menu and compile a list of all the identities (users, groups, and containers) currently assigned as Provisioning Administrator.
Attestation Manager
In RBPM 3.6.1, the Attestation Manager and Compliance Administrator system roles were available out of the box. Both of them gave assigned users an equal set of access rights within the Compliance domain. In RBPM 3.7, the Attestation Manager role is obsolete and assignments need to be migrated.
To determine the Attestation Manager assignments:
-
Compile a list of identities (users, groups, containers, and roles) that have Attestation Manager assigned by performing the following steps before migration:
-
Login to the User Application as a role administrator.
-
Navigate to the tab.
-
Select in the left navigation menu.
-
Lookup the Attestation Manager role and compile a list of all identities assigned as Attestation Manager (users, groups, containers). Let's call the list attestation manager assignment list.

-
Select in the left navigation menu.
-
Lookup Attestation Manager role and add all parent role assignments to attestation manager assignment list.
-
Note if the Attestation Manager role has any child role assignments. If it does, compile the list of child roles.

-
Role Manager
The RBPM 3.7 security model introduces the concept of delegated administration across the Provisioning, Roles, and Resources domains. In RBPM 3.6 and 3.6.1, delegated administration was supported for the Roles module only. As in RBPM 3.6 and RBPM 3.6.1, RBPM 3.7 delegated administrators are specified by system role assignments. The difference from previous versions is that delegated administrator permissions are not governed by browse rights access control lists. Instead, they are defined by a much more granular permission set based on the access attributes.
RBPM 3.6.1 defines three different roles: Role Manager, Security Officer, and Role Auditor. In RBPM 3.7, these three roles have been replaced with a single role called Role Manager. For this reason, role assignments and permissions need to be migrated to the RBPM 3.7 model.
To determine the Role Manager assignments:
-
Compile a list of identities (users, groups, containers, and roles) that have Role Manager assigned by performing the following steps before migration:
-
Login to the User Application as Role Administrator.
-
Navigate to the tab.
-
Select in the left navigation menu.
-
Lookup the Role Manager role and compile a list of all identities assigned as Role Manager (users, groups, containers). Let's call the list role manager assignment list.
-
Select in the left navigation menu.
-
Lookup Role Manager role and add all parent role assignments to role manager assignment list.
-
-
Compile a list of roles for each identity, assigned as Role Manager, having browse rights for a user, group, container. This can be done via iManager, Designer, or an LDAP browser. Alternatively, you can develop a Java routine (as shown in Section 1.4.4, Sample Code).
To determine the Role browse rights for an identity in iManager:
-
Go to .
-
Browse the eDirectory Tree to your identity.
-
Select the identity in the table in the right pane and select .
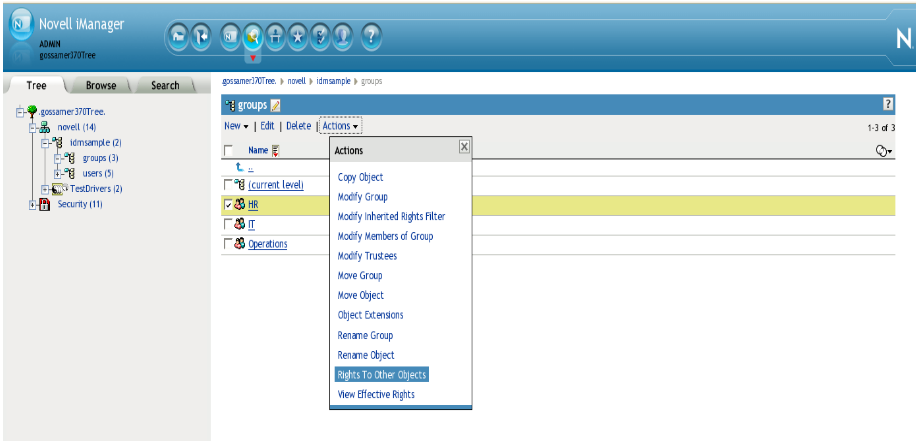
-
In the dialog that appears, check the check box and press .
-
Make a note of all of the roles and role containers for which the identity has Browse rights.
-
Security Officer
To determine the Security Officer assignments:
-
Compile a list of the identities (users, groups, containers and roles) that have Security Officer assigned. This can be done by logging in as security administrator, going to the Role Catalog and viewing the list of assignments for the Security Officer role. Alternately, you can develop a Java utility (as described in Section 1.4.4, Sample Code). Here are the steps to compile the Security Officer assignment list before migration:
-
Login to the User Application as Role Administrator.
-
Navigate to the tab.
-
Select in the left navigation menu.
-
Lookup the Security Officer role and compile a list of all identities assigned as Security Officer (users, groups, containers). Let's call the list security officer assignment list.
-
Select in the left navigation menu.
-
Lookup the Security Officer role and add all parent role assignments to the security officer assignment list.
-
If the Security Officer role has any child role assignments, compile the list of child roles.
-
-
Compile a list of SoDs for each identity, assigned as Security Officer, having browse rights to the user, group, or container. This can be done via iManager, Designer, or an LDAP browser. Alternatively, you can develop a Java routine (as described in Section 1.4.4, Sample Code).
To determine the SoD browse rights for an identity in iManager:
-
Go to .
-
Browse the eDirectory Tree to your identity.
-
Select the identity in the table in the right pane and select .
-
In the dialog that appears, check the check box and press .
-
Make note of all the SoDs for which the identity has Browse rights.
-
Auditor
To determine the Auditor assignments:
-
Compile a list of identities (users, groups, containers, and roles) that have Auditor assigned. This can be done by logging in as security administrator, going to the Role Catalog and viewing the list of assignments for the Auditor role. Alternately, you can develop a Java utility (as described in Section 1.4.4, Sample Code).
Here are the steps to compile the Auditor assignment list before migration:
-
Login to the User Application as Role Administrator.
-
Navigate to the tab.
-
Select in the left navigation menu.
-
Lookup the Auditor role and compile a list of all identities assigned as Auditor (users, groups, containers). Let's call the list auditor assignment list.
-
Select in the left navigation menu.
-
Lookup the Auditor role and add all parent role assignments to the auditor assignment list.
-
If the Auditor role has any child role assignments, compile the list of child roles.
-
Team Permissions
In RBPM 3.6.1 and before, Novell supported teams for provisioning (workflow) administration only. Teams were defined as instances of the srvprvTeam object class. Permissions on the teams were defined by attributes on srvprvTeam instance and srvprvTeamRequest object attributes. In RBPM 3.7, teams are supported for Provisioning, Roles, and Resources delegated administration. Teams are defined as instances of the srvprvRbpmTeam class. Permissions are controlled by permission set based on the access attributes. The team is set as trustee for all ACLs. If you use provisioning teams, you need to migrate these teams to the new team model.Migration is a two part process involving team definition migration and team permission migration, as described below:
-
Team definition migration is automatically done for you in Designer 3.5 during User Application driver migration. For more information, see the Designer documentation on User Application driver migration.
-
Team permission migration consists of pre and post migration steps. The pre-migration step is done by compiling list of team permissions before driver migration using Designer or iManager.
To find team permissions in Designer, you need to record the permissions for each team. Open the team in the Team Editor, and record the permission settings for the following properties:
-
Allow manager(s) to set proxy for team members
-
Allow manager to set the availability of team members
-
Allow managers to initiate a Provisioning Request on behalf of a team member
-
Allow managers to make a team member a delegatee for other team member’s Provisioning Requests
-
Allow managers to retract a Provisioning Request on behalf of a team member
-
Allow managers to reassign a task for team members who are a recipient based on the task scope
-
Allow managers to claim a task for team members who are an addressee based on the task scope
To find team permissions in iManager:
-
Go to View Objects.
-
Browse the eDirectory tree until you find the TeamDefs container.
-
For each team and team request, record the permission settings for the following attributes:
-
srvprvAllowMgrSetProxy
-
srvprvAllowMgrSetAvailability
-
srvprvAllowMgrInitiate
-
srvprvAllowMgrSetDelegate
-
srvprvAllowMgrRetract
-
srvprvAllowMgrTaskReassign
-
srvprvAllowMgrTaskClaim
-
srvprvTaskScopeAddressee
-
-
1.4.3 Steps for Migrating the System Roles and Team Permissions
This section reviews the steps for migrating the system role assignments and team permissions. Topics include:
Migrating the Provisioning Administrator Assignments
After the User Application driver migration has been completed, assign one of the users to be Provisioning Administrator during the User Application installation time, and add the rest of the user, group, and container assignments using the RBPM Administration interface within the User Application.
Follow these steps to migrate the Provisioning Administrator assignments:
-
Login to the User Application as Security Administrator.
-
Navigate to .
-
Select in the left navigation menu.
-
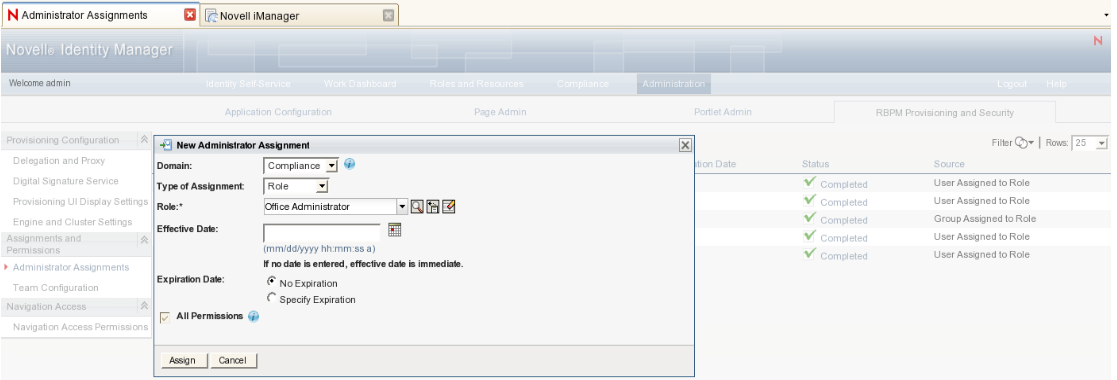
Migrate the assigned identities by repeating the following steps for each identity in the list you compiled before the migration:
-
Select to open the dialog.
-
Select the domain.
-
Select identity type (user, group container) and lookup the identity.
-
Check the check box.
-
Click on the button.
-
Migrating the Attestation Manager Assignments
After the User Application driver migration has been completed, add all identity (user, group, container, or role) assignments using the RBPM Administration interface within the User Application.
Follow these steps to migrate the Attestation Manager assignments:
-
Login to the User Application as Security Administrator.
-
Navigate to .
-
Select in the left navigation menu.
-
Migrate the assigned identities by repeating the following steps for each identity in the list you compiled before the migration:
-
Select to open the dialog.
-
Select the domain.
-
Select identity type (user, group container) and lookup the identity.
-
Check the check box.
-
Click on the button.
-
Process child roles list by creating a new non-system role, and assigning all roles from the child role list to this role. Assign all users, groups, containers and roles from the attestation manager list to the newly created role.
-
After the migration is done and verified, remove the obsolete system roles in the User Application:
-
Log in as a Security Administrator.
-
Go to .
-
Edit the assignment of the Security Administrator role to be Role Manager.
-
Add the permission for the obsolete roles: Security Officer, Attestation Manager, and Auditor. For more information on assigning role permissions, see the Identity Manager User Application: Administration Guide.
-
Click on the tab.
-
Select from the left navigation menu.
-
Select the obsolete role from the list and click the action. For more information on how to delete roles, see the Identity Manager User Application: User Guide.
Migrating the Role Manager Assignments
After the User Application driver migration has been completed, you need to configure permissions for each identity from the identity list. Browse rights in 3.6.1 are equivalent to the Modify, Update, Delete, Assign to User, Revoke from User, Assign To Group and Container, Revoke from Group and Container permissions. The Browse right to a Role container is equivalent to the Create, Modify, Update, Delete, Assign to User, Revoke from User, Assign To Group & Container, and Revoke from Group & Container permissions.
Follow these steps to migrate the Role Manager assignments:
-
Login to the User Application as Security Administrator.
-
Navigate to .
-
Select in the left navigation menu.
-
Migrate the assigned identities by repeating the following steps for each identity in the list you compiled before the migration:
-
Select to open the dialog.
-
Select the domain.
-
Select identity type (user, group container) and lookup the identity.
-
Uncheck the check box.
-
Click .
-
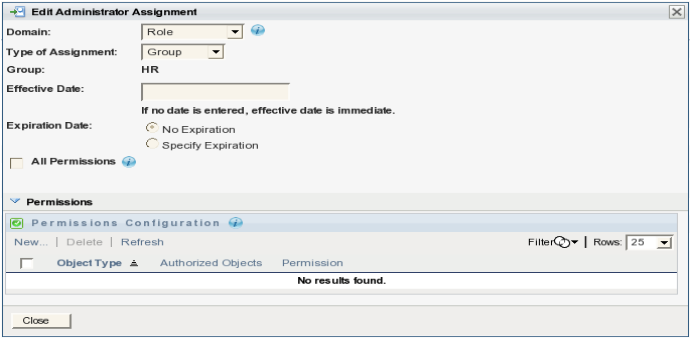
Do not close the dialog.
-
In the section, select to open the Permissions dialog.
-
In the section, select all the role permissions except the Report on Role permission.

-
In the section, lookup all the roles from the roles list compiled for the current identity.
-
Click .
-
Click .
-
Migrating the Security Officer Assignments
After the User Application driver migration has been completed, you need to assign each Security Officer identity from the list you compiled to be a Role Manager.
Follow these steps to migrate the Security Officer assignments:
-
Login to the User Application as a Security Administrator.
-
Navigate to .
-
Select in the left navigation menu.
-
Migrate assigned identities by repeating the following steps for each identity in the list you compiled before the migration:
-
Select to open the dialog.
-
Select the domain.
-
Select identity type (user, group container) and lookup the identity.
-
Uncheck the check box.
-
Click .
-
Do not close the dialog.
Next, you need to configure the permissions for each user. The Browse right in 3.6.1 is equivalent to the Modify, Update, and Delete SoD permission. The Browse right to an SoD container is equivalent to the Create, Modify, Update, and Delete SoD permission.
-
In the section, select to open the Permissions dialog.
-
In the section, select all SoD permissions except the Report On SoD permission.
-
Lookup all SoDs from the SoDs list compiled for current identity.
-
Click button.
-
Close the dialog, by clicking on button.
-
Process child roles list by creating a new non-system role, and assigning all roles from the child role list to this role. Assign all users, groups, containers, and roles from the attestation manager list to the newly created role.
-
-
After the migration is done and verified, remove the obsolete system roles.
Migrating the Auditor Assignments
After the User Application driver migration has been completed, you need to assign each Auditor identity from the list you compiled to be a Role Manager and configure the permissions for the identity. In order to setup the same permission set as in 3.6.1, each identity from the list has to get all of the reporting navigation permissions, as well as the Report On Role and Report On Sod permissions for the role configuration container.
Follow these steps to migrate the Auditor assignments:
-
Login to the User Application as a Security Administrator.
-
Navigate to .
-
Select Administrator Assignments in the left navigation menu.
-
Migrate assigned identities by repeating the following steps for each identity in the list you compiled before the migration:
-
Select to open the dialog.
-
Select the domain.
-
Select identity type (user, group, container or role) and lookup the identity.
-
Uncheck the check box.
-
Click .
-
Do not close the dialog.
Next, you need to configure the permissions for each user. There was no data security available for audit reporting in 3.6.1. The 3.7 release exposes the ability to secure data by specifying the Report on Role and Report on SoD permissions. In order to setup the same permission set as in 3.6.1, each identity from the list has to get all reporting navigation permissions and the Report On Role and Report On Sod permissions for all roles and SoDs. All report permissions and report items navigation permission are granted out of the box via the Role Manager assignment.
-
In the section, select to open the Permissions dialog.
-
In the section, select the Report On Role permission and select all role levels.
-
In the section, select the Report On SoD permission and select .
-
Click the button.
-
Close the dialog by clicking the button.
-
Process child roles list by creating a new non-system role, and assigning all roles from the child role list to this role. Assign all users, groups, containers and roles from the attestation manager list to the newly created role.
-
-
After the migration is done and verified, remove the obsolete system roles.
Migrating the Team Permissions
After the User Application driver migration has been completed, you need to migrate the team permissions. The process of migrating team permissions involves setting permissions for the newly created (migrated) teams in the User Application. Alternatively, you can create an LDIF generator utility and run it (as described in Section 1.4.4, Sample Code).
To migrate team permissions:
1.4.4 Sample Code
This section includes sample Java code that may facilitate the migration process. Topics include:
Sample Java Code to Construct a List of Role Members
Here is some sample Java code you might use to construct a list of identities that are assigned to a particular role:
List<String> getAllUsraAssigned(LdapContext ldCtx, String role, String rootDn) throws NamingException
    {
        List<String> identities = new ArrayList<String>();
        SearchControls ctls = new SearchControls();
        ctls.setSearchScope(SearchControls.SUBTREE_SCOPE);
        ctls.setReturningAttributes(new String[]{"nrfMemberOf"});
        String objectClass = "nrfIdentity";
        String attributeName = "nrfMemberOf";
        String searchRoot = rootDn;
        String filter = "(&(objectClass=" + objectClass + ")(nrfMemberOf=" + role + "))";
        //String driver = "cn=PicassoDriver,cn=TestDrivers,o=novell";
        NamingEnumeration<SearchResult> results = ldCtx.search(searchRoot,
                filter, ctls);
        while (results != null && results.hasMore()) {
            SearchResult nextEntry = results.next();
            Attributes attrs = nextEntry.getAttributes();
            //object dn
            String dn = nextEntry.getNameInNamespace();
            identities.add(dn);
        }
        return identities;
    }
Sample Java Code to Get a List of Objects for Which an Identity is Trustee
Here is some sample Java code you might use to get a list of objects for which a particular identity is set as trustee of the ACL for entry browse rights:
/**
     * @param ldCtx       - ldap context to use for IDVault connection
     * @param id          - identity id ( user dn)
     * @param objectType: type of the objects to cjheck ACLs on: 1 -role, 2 -sod, 3 - reports
     * @param driver      - user application drver dn.
     * @return list of object dns that identity dn is trustee
     */
    private List<String> getAllObjectsIdentityIsTrustee(final LdapContext ldCtx, final String id, final int objectType, final String driver) throws Exception
    {
        List<String> objects = new ArrayList<String>();
String objectClass = "nrfRole";
        String objectCntrClass = "nrfRoleDefs";
        if (objectType == 2) {
            objectClass = "nrfRole";
            objectCntrClass = "nrfRoleDefs";
        }
        objects = findAllAuthorizationsByObjectClassAndIdentity(ldCtx, objectClass, id, driver, objectCntrClass, ENTRY_RIGHTS);
        return objects;
    }

 /**
     * Return list of authorizaed objects
     *
     * @param lctx         lCtx       - LDAP context.
     * @param objectClass  - object class
     * @param identity     - identity DN.
     * @param contObjClass - object containet class
     * @return map of ACls keyed by authorized object DN for specified object class and identity.
     * @throws Exception in case of an error;
     */
    public List<String> findAllAuthorizationsByObjectClassAndIdentity(LdapContext lctx, String objectClass,
                                                                      String identity, final String searchRoot, final String contObjClass, String attr)
            throws Exception
    {
        List<String> authorizedObjects = new ArrayList<String>();
        List<String> containers = new ArrayList<String>();
        SearchControls ctls = new SearchControls();
        ctls.setSearchScope(SearchControls.SUBTREE_SCOPE);
        ctls.setReturningAttributes(new String[]{"ACL"});
        String currSearchRoot = searchRoot;

        NamingEnumeration<SearchResult> results = lctx.search(currSearchRoot,
                "(objectClass=" + objectClass + ")", ctls);
        //Search each group in each team
        while (results != null && results.hasMore()) {
            SearchResult nextEntry = results.next();
            Attributes attrs = nextEntry.getAttributes();
            //object DN
            String dn = nextEntry.getNameInNamespace();
            updateContainerList(dn, containers, true);
            Attribute acl = attrs.get("ACL");
            if (acl != null) {
                String attrValue;
                NamingEnumeration<?> attrValues = acl.getAll();
                while (attrValues.hasMore() &&
                        (attrValue = (String) attrValues.next()) != null) {
                    //trustee for current identity
                    if (attrValue.contains(identity) && (null == attr || attrValue.contains(attr))) {
                        authorizedObjects.add(dn);
                    }
                }

            }
        }


        //query for containers

        if (null != contObjClass) {
            results = lctx.search(currSearchRoot,
                    "(objectClass=" + contObjClass + ")", ctls);
            while (results != null && results.hasMore()) {
                SearchResult nextEntry = results.next();
                //object DN
                String dn = nextEntry.getNameInNamespace();
                updateContainerList(dn, containers, false);
            }
        }
        try {
            if (containers.size() > 0) {
                for (String cont : containers) {
                    //get all ACLs for containers and identity
                    List<String> authContainers = readEntryBrowseACLs(lctx, cont, identity);
                    if (null != authContainers && authContainers.size() > 0) {
                        authorizedObjects.addAll(authContainers);
                    }
                }
            }
        } catch (Throwable th) {
            th.printStackTrace();
        }

        return authorizedObjects;
    }

    private void updateContainerList(final String dn, List<String> containers, boolean stripFirst) throws InvalidNameException
    {
        LdapName ln = new LdapName(dn);
        int contNambers = ln.getRdns().size() - (stripFirst ? 1 : 0);
        for (int i = contNambers; i > 0; i--) {
            Name cont = ln.getPrefix(i);
            if (!containers.contains(cont.toString())) {
                containers.add(cont.toString());
            }
        }
    }


    /**
     * Read ACL and parse into list of ACL keyed by trustee DN.
     *
     * @param lCtx       - LDAP context.
     * @param objectdn   - authorized object DN.
     * @param identityDn - DN of identity
     * @return list of ACL keyed by trustee DN.
     * @throws IDMAuthorizationException in case of an error.
     */
    public List<String> readEntryBrowseACLs(LdapContext lCtx, String objectdn, final String identityDn) throws IDMAuthorizationException, NamingException
    {
        assert lCtx != null : "Ldap context is undefined";
        assert objectdn != null : "Authorized object dn is undefined.";
        List<String> authorized = new ArrayList<String>();
        // return entry DN's ACL attribute
        String returnAttrs[] = {ACL_ATTR};
        // get ENTRYDN's ACL attributes

        Attributes attrs = lCtx.getAttributes(objectdn, returnAttrs);
        // get Enumeration of returned attributes (only ACL)
        NamingEnumeration<? extends Attribute> ae = attrs.getAll();
        // parse out ACL attributes
        while (ae.hasMore()) {
            Attribute attr = ae.next();
            NamingEnumeration<?> attrValues = attr.getAll();
            String attrValue;
            while (attrValues.hasMore() &&
                    (attrValue = (String) attrValues.next()) != null) {
                if (null == identityDn || attrValue.contains(identityDn)) {
                    ACL curr = parseACLValue(attrValue, objectdn);
                    if (curr.getPropName() != null && curr.getPropName().equals(ENTRY_RIGHTS) &&
                            ((curr.getPriviliges() & LDAPDSConstants.LDAP_DS_ENTRY_BROWSE) != 0 ||
                                    (curr.getPriviliges() & LDAPDSConstants.LDAP_DS_ATTR_SUPERVISOR) != 0)) {

                    }
                    authorized.add(objectdn);
                }
            }
        }
        return authorized;
    }


    private ACL parseACLValue(final String aclValue, final String objDn)
    {
        ACL currACL = new ACL();
        String scope, trusteeName, propName, strPriviliges;
        int privileges;

        // ACL value format: "privileges#scope#subjectname#protectedattrname".
        strPriviliges = aclValue.substring(0, aclValue.indexOf('#'));
        privileges = Integer.parseInt(strPriviliges);
        propName = aclValue.substring(
                aclValue.lastIndexOf('#') + 1, aclValue.length());

        //create authorization
        // truncate ACL value to "scope#subjectname"
        String truncACLValue = aclValue.substring(
                aclValue.indexOf('#') + 1, aclValue.lastIndexOf('#'));
        scope = truncACLValue.substring(0, truncACLValue.indexOf('#'));
        trusteeName = truncACLValue.substring(
                truncACLValue.indexOf('#') + 1, truncACLValue.length());
        currACL.setObject(objDn);
        currACL.setTrustee(trusteeName);
        currACL.setScope(scope);
        currACL.setPropName(propName);
        currACL.setPriviliges(privileges);

        return currACL;

    }
Sample Java Code to Generate the ACL LDIF for a Specified Identity
Here is some sample Java code you might use to generate the ACL LDIF for a specified identity:
/**
     * @param id
     * @param objects
     * @param permissionType
     * @param objectType
     * @return current ACL string buffer
     */
    private StringBuffer generateACLLdif(final LdapContext ldCtx, final String id, final List<String> objects, String[] accessAttributes) throws NamingException
    {
        StringBuffer currACL = new StringBuffer();
        System.out.println("Generating ACL for: " + id);
        String scope = SCOPE;

        if (null != objects && null != id) {
            for (String object : objects) {
                if (CONTAINER == getObjectType(object, ldCtx) ||
                        CONTAINER == getObjectType(id, ldCtx)) {
                    //use inhireted
                    scope = SUBTREE_SCOPE;
                }

                if (null != accessAttributes && accessAttributes.length > 0) {
                    currACL.append("dn: ").append(object).append("\n");
                    currACL.append("changetype: modify").append("\n");
                    currACL.append("add: ACL").append("\n");
                    for (String accessAttr : accessAttributes) {
                        currACL.append("ACL: 4#").append(scope).append("#").append(id).append("#").append(accessAttr).append("\n");
                    }
                    currACL.append("\n");
                }
            }
        }
        return currACL;
    }


 /**
     * Determine object type.5
     *
     * @param dn   object instance key
     * @param lctx Bound LDAP context
     * @return int specifying the object type:  1- USER, 2- GROUP, 3- ROLE, 4 - SOD, 5- CONTAINER, 6-OTHER).
     * @throws NamingException Error reading DN
     */
    private int getObjectType(String dn, LdapContext lctx) throws NamingException
    {
        Attributes attributes = lctx.getAttributes(dn, ATTR_LIST_OBJ);
        Attribute strClass = attributes.get(ATTR_OBJECT_CLASS);

        if ( strClass != null && strClass.contains(USER_OBJECT_CLASS)) {
            return USER;
        } else if ( strClass != null && strClass.contains(GROUP_OBJECT_CLASS)) {
            return GROUP;
        } else if ( strClass != null && strClass.contains(ROLE_OBJECT_CLASS)) {
            return ROLE;
        } else if ( strClass != null && strClass.contains(SOD_OBJECT_CLASS)) {
            return SOD;
        } else {
            Attribute entryFlags = attributes.get(ATTR_ENTRY_FLAGS);
            if (entryFlags != null) {
                int flags = Integer.parseInt(entryFlags.get().toString());
                if ((flags & LDAPDSConstants.LDAP_DS_CONTAINER_ENTRY) != 0) {
                    return CONTAINER;
                }
            }
        }
        return OTHER;
    }
Constants Used in Sample Code
The following listing shows the constants used in the sample code presented above:
 public static final String ENTRY_RIGHTS = "[Entry Rights]";
    private static final String SUBTREE_SCOPE = "subtree";
    private static final String ACL_SEPARATOR = "#";
    private static final String SCOPE = "entry";
    private static final String ACL_ATTR = "acl";
    private static final String NRF_ACCESS_PREFIX = "nrfAccess";
    private static final String ALL_ATTRIBUTES = "[All Attributes Rights]";
    private static final String PUBLIC_USER = "[Public]";
    private static final String ATTR_OBJECT_CLASS = "structuralObjectClass";
    private static final String ATTR_ENTRY_FLAGS = "entryFlags";
    private static final String[] ATTR_LIST_OBJ = new String[]{ATTR_OBJECT_CLASS, ATTR_ENTRY_FLAGS};
    public static final String ROLE_OBJECT_CLASS = "nrfRole";
    public static final String SOD_OBJECT_CLASS = "nrfSod";
    public static final String USER_OBJECT_CLASS = "inetOrgPerson";
    public static final String GROUP_OBJECT_CLASS = "groupOfNames";
    public static final int USER = 1;
    public static final int GROUP = 2;
    public static final int ROLE = 3;
    public static final int SOD = 4;
    public static final int CONTAINER = 5;
    public static final int OTHER = 6;
    public static final String NRF_CREATE = "nrfAccessCreateRole";
    public static final String NRF_VIEW = "nrfAccessViewRole";
    public static final String NRF_UPDATE = "nrfAccessUpdateRole";
    public static final String NRF_DELETE = "nrfAccessDeleteRole";
    public static final String NRF_ASSIGN = "nrfAccessMgrAssignRole";
    public static final String NRF_REVOKE = "nrfAccessMgrRevokeRole";
    public static final String NRF_ASSIGN_IMPL = "nrfAccessMgrAssignRoleImpl";
    public static final String NRF_REVOKE_IMPL = "nrfAccessMgrRevokeRoleImpl";
    public static final String NRF_REPORT = "nrfAccessReportOnRole";

    public static final String[] ROLE_ACCESS_ATTRS = new String[]{NRF_VIEW, NRF_UPDATE,
            NRF_DELETE, NRF_ASSIGN, NRF_REVOKE, NRF_ASSIGN_IMPL, NRF_REVOKE_IMPL, NRF_REPORT};

    public static final String NRF_CREATE_SOD = "nrfAccessCreateSoD";
    public static final String NRF_VIEW_SOD = "nrfAccessViewSoD";
    public static final String NRF_UPDATE_SOD = "nrfAccessUpdateSoD";
    public static final String NRF_DELETE_SOD = "nrfAccessDeleteSoD";
    public static final String NRF_REPORT_SOD = "nrfAccessReportSoD";

    public static final String[] SOD_ACCESS_ATTRS =
            new String[]{NRF_VIEW_SOD, NRF_UPDATE_SOD, NRF_DELETE_SOD, NRF_REPORT_SOD};

    public static final String[] REPORT_ACCESS_ATTRS =
            new String[]{NRF_REPORT, NRF_REPORT_SOD};

    public static final String[] REPORT_SOD_ACCESS_ATTRS =
            new String[]{NRF_REPORT_SOD};