8.3 Administrator Assignments
The Administrator Assignments page allows you to assign users, groups, and containers to administrative roles. An administrator assignment specifies a domain type (Security, Provisioning, Role, Resource, Configuration, and Compliance), as well as a set of permissions for the assignment.
The Administrator Assignments page is accessible to the following users:
Table 8-1 User Access to the Administrator Assignments Page
|
User |
Capabilities |
|---|---|
|
Security Administrator |
Can perform all operations on the Administrator Assignments page. |
|
Other Domain Administrators |
Can view administrator assignments and request assignments (or revoke assignments) for the domain over which this user has authority. He/she cannot view assignments or request assignments within another domain. |
Delegated administrators of a domain have no access to this page.
The permissions for an administrator assignment define the actions that administrators can take on a particular scope of object instances within the domain type selected. For example, if you select the Role domain as the domain type for an assignment, the permissions determine what actions the administrators can take on the set of role instances selected as the scope for the assignment. These permissions might specify, for the selected scope of roles, that administrators can perform actions such as assigning roles to users, viewing role assignments, and reporting on role assignments.
Changing the Default Administrator Assignments
The default administrator assignment settings are established at the time the User Application driver is initialized. After the driver has been initialized, you can change the default settings on the Administrator Assignments page, as long as your admin
user account still exists. If the account has been deleted, deactivated, or moved to a different location, you will not be able to login to make the new assignments. In this case, you need to reset the values in the configupdate utility and delete the initialization property in the User Application Driver. Here are the basic steps you need to follow to do this:
-
Change the administrator assignment values in the configupdate utility.
-
Delete the initialization parameter in the User Application Driver.
-
Restart the User Application Driver and the Roles and Resources Driver.
-
Restart the User Application.
For complete details, see Section 2.14, Changing the Default Administrator Assignments After Installation.
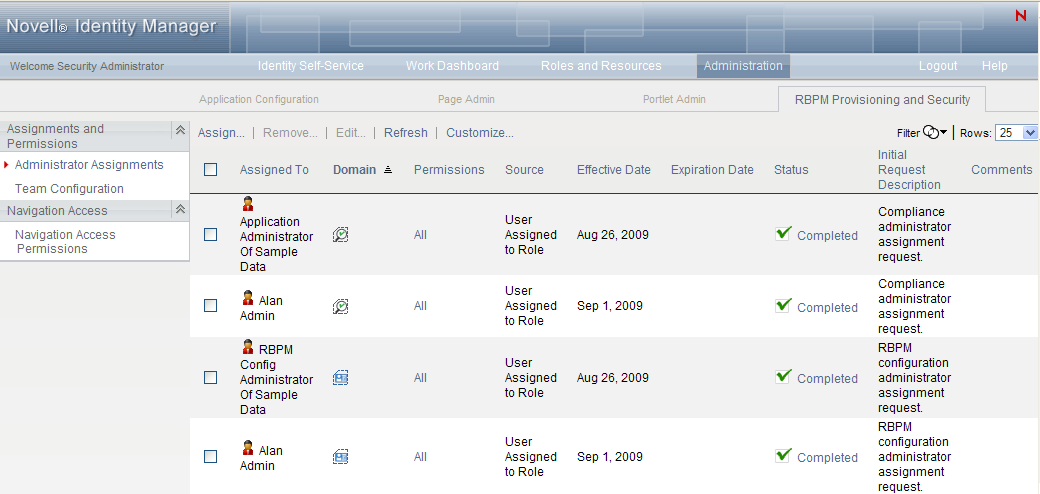
8.3.1 Viewing Administrator Assignments
To view existing administrator assignments:
-
Select on the tab.
The Administrator Assignments page displays the list of administrator assignments currently defined.
8.3.2 Creating New Assignments
To define a new administrator assignment:
-
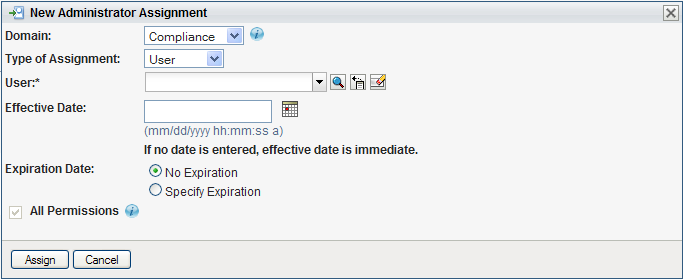
Click the button at the top of the Administrator Assignments display.

The dialog displays:
-
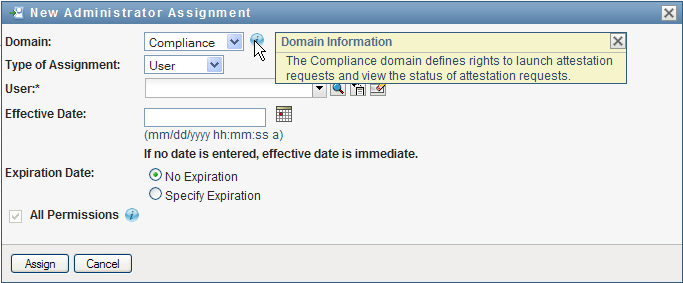
Select one of the following domains:
-
The domain defines rights to launch attestation requests and view the status of attestation requests.
-
The domain defines rights to configure access to User Application header tabs and navigation items.
-
The domain defines rights to launch and retract process requests, manage addressee tasks, and configure delegate, proxy, and availability settings.
-
The domain defines rights to manage resources, assign, revoke, and report on resources, as well as rights to configure resource settings and bind entitlements.
-
The domain defines rights to manage roles and SoDs, assign, revoke, and report on roles, as well as rights to configure role settings.
-
The domain defines rights to manage User Application security, such as assign and revoke domain administrators, domain managers, and teams.
The domain determines what types of objects the administrator can act on. An administrator assignment can only be associated with a single domain.
NOTE:If a particular user has been designated as a manager of a team, Novell recommends that this user should not also be designated as a domain administrator for the domain associated with the team.
To see a description of a particular domain, click the Info icon to the right of the list:
-
-
Specify one of the following choices for the :
-
-
Select the users (or groups, containers, or roles) in the field.
The label for the control, and the objects available for selection, vary according to the type of assignment you’ve specified.
-
Select an for the assignment. This date (and time) determines when the permissions are enabled for the assignment.
-
Select an for the assignment. This date (and time) determines when the permissions are disabled for the assignment.
-
To give the administrator full permissions for the selected domain, click the checkbox.
When the checkbox is checked, the assignment creates a Domain Administrator. When it is unchecked, the assignment creates a Delegated Administrator.
When the domain selected is , , or , the assignment automatically gives full permissions for the selected domain, and the checkbox is not displayed.
NOTE:When a user is assigned a Compliance Administrator role, the user interface shows two rows in the Administrator Assignments page, one for the Compliance Administrator role, and one for a Provisioning Manager role with no permissions visible. Note that this latter row should not be removed. If the row is removed, the user assigned to be Compliance Administrator will not be able to launch attestation requests successfully. The Compliance Administrator role is automatically given rights to initiate and retract attestation provisioning requests. For this reason, the Provisioning Manager role is required.
-
Click to preserve your administrator assignment settings.
If the domain for the assignment is , , or domain, and you’ve unchecked the checkbox, the section is added to the page.
-
To define the permissions, click .
This interface shows controls that apply to the domain selected for the assignment. These controls allow you to specify which objects are within the scope of the assignment and which permissions administrators have with respect to these objects.
-
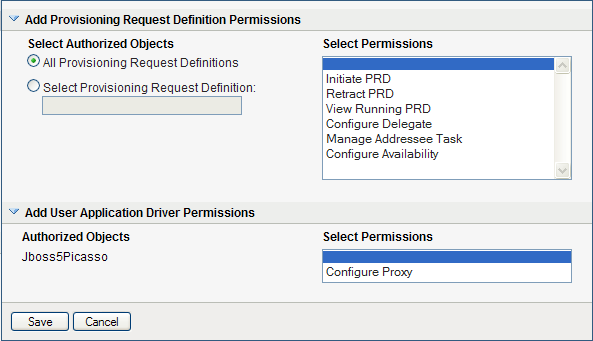
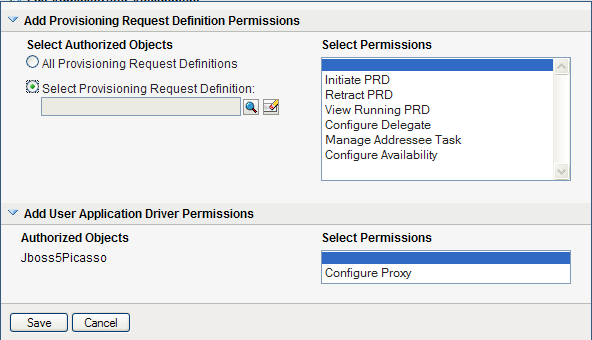
Follow these steps to define permissions for an assignment that uses the domain:
-
To include all provisioning request definitions, click the button.
-
To select provisioning request definitions individually, choose the radio button, and use the Object Selector to pick one provisioning request definition at a time:
NOTE:If you select All Provisioning Request Definitions, and define a permission at this level, and then try to define the same permission for a particular provisioning request definition, the Administration Assignment page will not create the permission for the provisioning request definition, since it has already been defined at a higher level. In general, a permission will not be set on a lower level object if it has been already defined for a higher level object. However, if it is defined on a lower level object first, the same permission can be set on a higher level set of objects as well.
-
Once you’ve defined the scope, choose the permissions you want to allow for each object by selecting the object and picking the desired permissions in the list on the right side of the dialog.
Permission
Description
Initiate PRD
Allows the user to initiate the selected provisioning requests.
NOTE:The Initiate PRD permission has no effect on the behavior of the Novell-installed PRDs for resources, roles, and attestation within the User Application, since these PRDs cannot be initiated directly from the User Application. However, this permission does control whether these PRDs can be initiated from a SOAP call.
Retract PRD
Allows the user to retract the selected provisioning requests when they are in progress.
View Running PRD
Allows the user to view the selected provisioning requests when they are in progress.
Configure Delegate
Allows the user to configure delegate assignments for the selected provisioning requests.
Manage Addressee Task
Allows the user to manage tasks associated with the selected provisiong requests that have been addressed to other users.
When this permission is enabled, Domain and Delegated Administrators can manage tasks for all users, including addressess and recipients. Team Managers are able to manage tasks for addressees, but not for recipients.
Configure Availability
Allows the user to configure availability for tasks associated with the selected provisioning requests.
-
In the section of the page, optionally select the permission to allow the selected user(s) to configure proxy assignments. This setting applies to the driver as a whole.
-
Click to save the permissions for the selected objects or containers.
To delete a permission, select the permission and click .
To refresh the list of permissions, click .
-
-
Follow these steps to define permissions for an assignment that uses the domain:
-
To include all roles in all levels in the roles hierarchy, choose in the control.
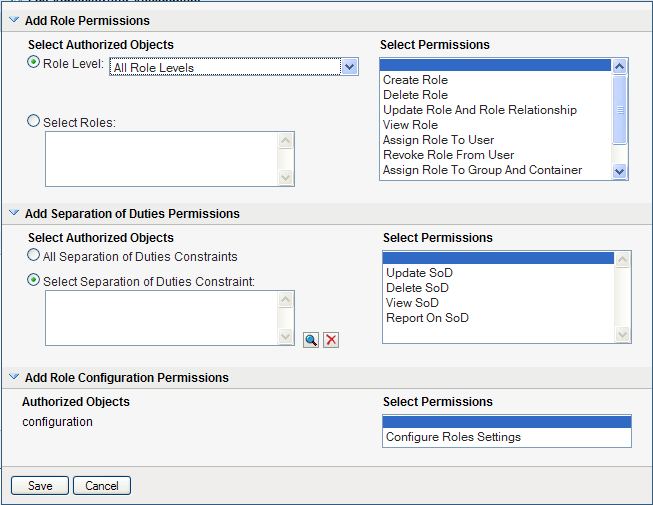
To include all roles at a particular level in the role hierarchy, choose one of the following levels:
To include all roles in a particular sub container under the selected role level, use the Object Selector to select the sub container.
-
-
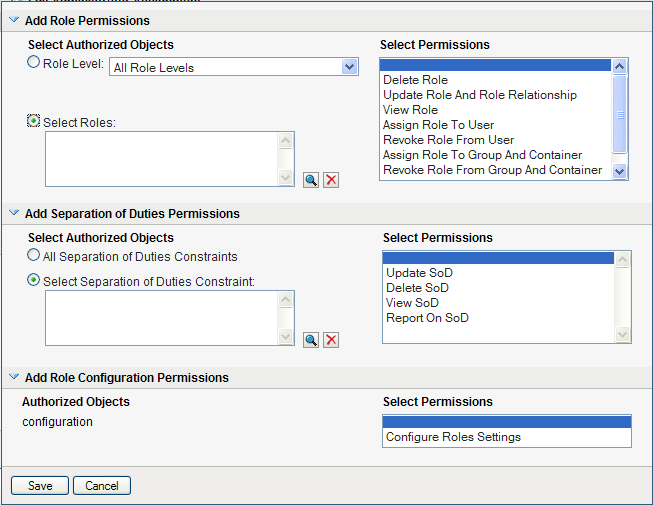
To select roles individually, choose radio button, and use the Object Selector to pick one or more roles:
-
Once you’ve defined the role scope, choose the permissions you want to allow for each object by selecting the object and picking the desired permissions in the list on the right side of the dialog.
Permission
Description
Create Role
Allows the user to create roles.
This permission is hidden when a particular role is selected.
Delete Role
Allows the user to delete the selected roles.
This setting applies only at the container level.
At installation time, no user has the ability to delete system roles. However, the administrator may grant user access to the system roles. The permission to delete roles should not be given for the RoleConfig, Level20, and System roles containers. Also, in general, you should not set permissions on those containers, because permissions on these containers will be propagated to the system roles. Instead, you should create role subcontainers under the role level container and set permissions on each subcontainer.
Update Role and Role Relationship
Allows the user to update the selected roles and modify role relationships.
This setting applies only at the container level.
View Role
Allows the user to view the selected roles.
This setting applies only at the container level.
Assign Role To User
Allows the user to assign users to the selected roles.
IMPORTANT:Only the Security Administrator can assign system roles on the Work Dashboard tab and the Roles and Resources tab.
Revoke Role From User
Allows the user to revoke user assignments for the selected roles.
Assign Role To Group And Container
Allows user to assign groups and containers to the selected roles.
Revoke Role From Group And Container
Allows the user to revoke group and container assignments for the selected roles.
Report On Role
Allows the user to generate reports that provide information about the selected roles.
-
To include all separation of duties constraints, choose radio button.
-
To select separation of duties constraints individually, choose radio button, and use the Object Selector to pick one or more constraints.
-
Once you’ve defined the separation of duties scope, choose the permissions you want to allow for each object by selecting the object and picking the desired permissions in the list on the right side of the dialog.
Permission
Description
Create SoD
Allows the user to create separation of duties constraints.
This permission is hidden when a particular SoD constraint is selected.
Update SoD
Allows the user to update the selected separation of duties constraints.
Delete SoD
Allows the user to delete the selected separation of duties constraints.
View SoD
Allows the user to look at the selected separation of duties constraints.
Report On SoD
Allows the user to generate reports that provide information about the selected separation of duties constraints.
-
In the section of the page, optionally select the permission for the configuration object.
This setting controls access to the page on the tab. To access this page, the user must have the permission as well as the permission, which is given through a Resource Manager (or Resource Administrator) assignment. If a user does not have both of these permissions, the page displays read-only information, and cannot be edited.
-
Click to save the permissions for the selected objects or containers.
To delete a permission, select the permission and click .
To refresh the list of permissions, click .
-
-
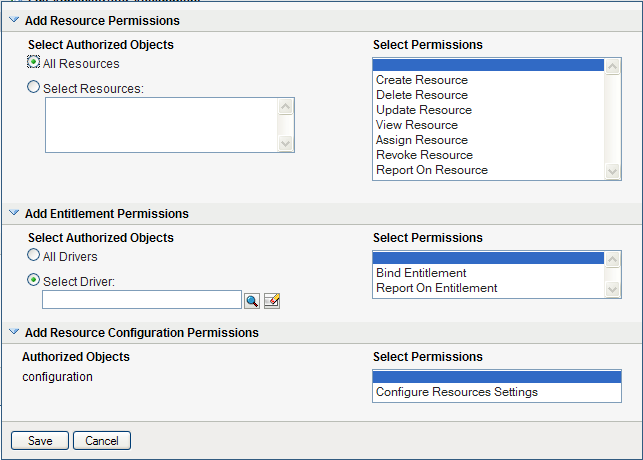
Follow these steps to define permissions for an assignment that uses the domain:
-
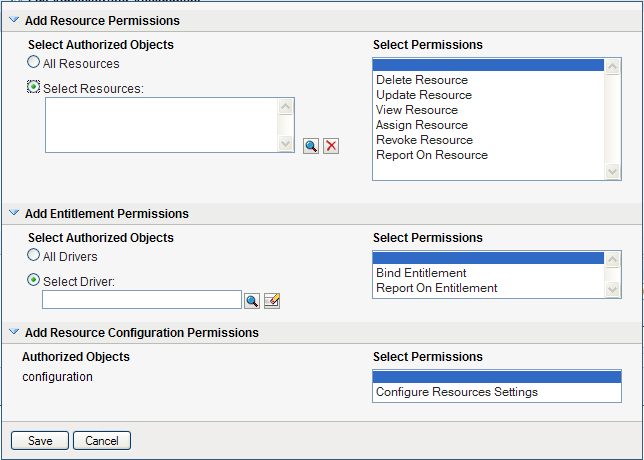
To include all resources, click the button.
-
To select resources individually, choose the radio button, and use the Object Selector to pick one or more resources:
-
Once you’ve defined the resource scope, choose the permissions you want to allow for each object by selecting the object and picking the desired permissions in the list on the right side of the dialog.
Permission
Description
Create Resource
Allows the user to create resources.
This permission is hidden when a particular resource is selected.
Delete Resource
Allows the user to delete the selected resources.
Update Resource
Allows the user to update the selected resources.
View Resource
Allows the user to view the selected resources.
Assign Resource
Allows the user to assign users to the selected resources.
Revoke Resource
Allows the user to revoke user assignments for the selected resources.
Report On Resource
Allows the user to generate reports that provide information about the selected resources.
-
To include all drivers for entitlements, click the radio button.
-
To select drivers individually, choose the radio button, and use the Object Selector to pick a resource.
-
Once you’ve defined the driver scope, optionally select the permission to allow the selected user(s) to bind resources to entitlements. To allow the user to generate reports on entitlements, optionally select the permission.
-
In the section of the page, optionally select the permission for the configuration object.
This setting controls access to the page on the tab. To access this page, the user must have the permission as well as the permission, which is given through a Role Manager (or Role Administrator) assignment. If a user does not have both of these permissions, the page displays read-only information, and cannot be edited.
-
Click to save the permissions for the assignment.
To delete a permission, select the permission and click .
To refresh the list of permissions for the assignment, click .
-
-
Click to save the assignment and permissions.
8.3.3 Editing an Existing Assignment
To edit an existing administrator assignment:
-
Select a previously defined assignment and click .
-
Make your changes to the administrator settings and click .
8.3.4 Deleting Assignments
To delete an assignment:
-
Select a previously defined assignment and click .
8.3.5 Refreshing the Assignment List
To refresh the list of administrator assignments:
-
Click .