9.3 Working with Roles

The Role Assignments action allows you to see what role assignments you have, and also make requests for additional role assignments.

The Role Administrator and Role Manager have the ability to view role assignments for other users, as described below:

  • When nothing is selected in the Manage control, the role assignment list shows the current user’s assignments. These role assignments include those for which he is either recipient or addressee, as well as roles for which the recipient or addressee is a group, container, or role to which the current user belongs. The user can do anything with his own role assignments, since no rights are required to work with one’s own roles.

  • When a user is selected in the Manage control, the list shows direct and indirect role assignments that have the selected user as recipient. Before selecting a user, the Team Manager must select a team.

  • When a group is selected, the list shows roles assigned directly to the selected group. The list of role assignments does not contain roles assigned to a user within the selected group or container. In addition, it does not include roles that are related to those roles assigned directly to the group.

  • When a role is selected, the Role Assignments section displays a message indicating that role assignments are not shown. To see the role relationships for a particular role, you need to look at the Roles tab.

  • When a container is chosen, the list shows roles assigned directly to the selected container. The list of role assignments does not contain roles assigned to a user within the selected container. In addition, it does not include roles that are related to those roles assigned directly to the container.

A Team Manager for the Role domain has the ability to manage role assignments for team members. Before selecting a team member, the Team Manager must select a team.

Role relationships are not shown in the Role Assignments section. To see the role relationships for a particular role, you need to look at the Role Relationships tab, which is available from the Roles Catalog action on the Roles tab.

Proxy Mode The Role Assignments action is not available in proxy mode.

9.3.1 Viewing Your Role Assignments

To see the role assignments for yourself, or for a user, group, or container selected in the Manage control:

  1. Click Role Assignments in the group of actions on the Work Dashboard.

    The list of roles is displayed. If you are not in managed mode, the role assignments shown are those for which you are the recipient.

    If you are in manage mode, the role assignments shown are those for which the selected user, group, or container is the recipient.

    A role can be assigned to a group or container, in which case the role will be assigned indirectly to all users within the group or container. The Role Assignments list on the dashboard shows direct assignments for users, as well as indirect assignments for groups and containers. In addition, if a user is assigned directly to a parent role, the list includes this assignment, as well as assignments to any child roles related to this parent role. For example, if a level 30 role (parent) has a role relationship added to a level 20 role (child), and a user is directly assigned to the parent role, the Role Assignments display shows both assignments (parent and child). If you look at the child role in the Role Catalog, you will see the relationship between the roles on the Role Relationships tab, but not on the Role Assignments tab.

Filtering the Role Assignment List

  1. Click the Define Filter button in the upper right corner of the Role Assignments display.

  2. Specify a filter string for the initial request description or for the role name, or narrow the search by selecting a type of assignment (User, Group, Container, or Role) and a set of identities that are of the selected assignment type. Alternatively, you can narrow the search by selecting a source type for the role assignment (User Assigned to Role, Group Assigned to Role, Container Assigned to Role, or Role Associated with Role).

    NOTE:When selecting Group as the type of assignment to use for filtering, the filter title will display a CN, while the results display another related field.

  3. Click Filter to apply your selection criteria.

  4. To remove the current filter, click Clear.

Setting the Maximum Number of Rows on a Page

Click on the Rows dropdown list and select the number of rows you want to be displayed on each page.

Scrolling within the Role Assignment List

To scroll to another page in the role assignment list, click on the Next, Previous, First or Last button at the bottom of the list.

Sorting the Role Assignment List

To sort the role assignment list:

  1. Click the header for the column you want to sort on.

    The pyramid-shaped sort indicator shows you which column is the new primary sort column. When the sort is ascending, the sort indicator is shown in its normal, upright position.

    When the sort is descending, the sort indicator is upside down.

    The initial sort column is determined by the RBPM Configuration Administrator.

If you override the initial sort column, your sort column is added to the list of required columns. Required columns are indicated with an asterisk (*).

When you modify the sort order for the role assignment list, your preference is saved in the Identity Vault along with your other user preferences.

9.3.2 Requesting a Role

To make a role assignment request:

  1. Click the Assign button at the top of the Role Assignments section of the page.

    NOTE:You need to have the Roles Assign navigation permission to see the Assign button.

    The Work Dashboard displays the Assign Role dialog, which allows you to specify which role you want to request.

  2. Fill in the fields on the Add Role Assignment dialog:

    1. Provide text describing the reason for the request in the Initial Request Description field.

    2. In the Object Selector, enter a search string and click Search.Select the role you want to assign.

      Click the Object Selector to search for a role to assign.

    3. Specify the start date for the role assignment in the Effective Date field.

    4. Specify the expiration date for the role assignment in the Expiration Date field.

  3. Click Assign to submit your request.

9.3.3 Refreshing the Role Assignment List

To refresh the role assignment list, click Refresh.

9.3.4 Removing a Role Assignment

To remove a role assignment, select a previously defined role assignment, and click Remove.

NOTE:You need to have the Roles Remove navigation permission to see the Remove button.

9.3.5 Customizing the Role Assignment List Display

The Role Assignments section of the dashboard allows you to select and deselect columns, and also reorder columns within the task list display. The column selection and order are controlled by settings within the Customize Role Assignment Display dialog. When you modify the column list or reorder the columns, your customizations are saved in the Identity Vault along with your other user preferences.

To customize the display of columns:

  1. Click Customize in the Role Assignments section of the dashboard.

    The User Application displays the list of columns currently selected for the display, and a list of additional columns that are available for selection.

  2. To include an additional column in the display, select the column in the Available Columns list box, and drag it to the Selected Columns list box.

    To select multiple columns in the list, hold down the Ctrl key and select the columns. To select a range of columns that appear together in the list, hold down the Shift key and select the columns.

    You can reorder the columns in the display by moving them up or down in the Selected Columns list box.

  3. To remove a column from the display, select the column in the Selected Columns list box, and drag it to the Available Columns list box.

    The Role column is a mandatory column and cannot be removed from the task list display.

  4. To save your changes, click Save Changes.

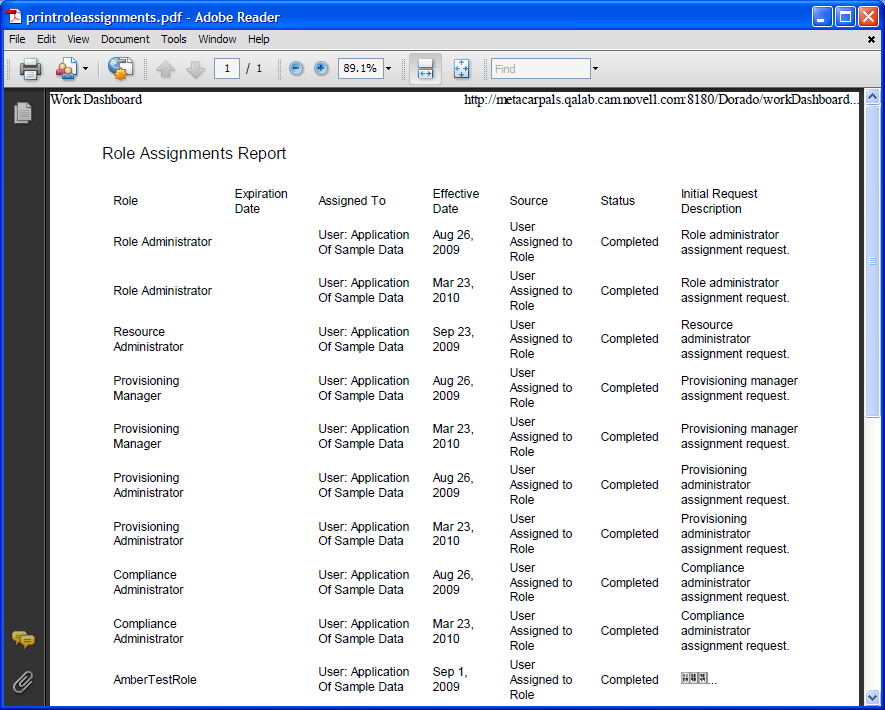
9.3.6 Printing the List of Role Assignments

The Role Assignments section of the dashboard allows you to print the list of role assignments displayed on the page. What you see on the screen is essentially the same as what you see when you print a role assignments list, except that the printout includes only the text on the screen. Any images shown in the Assigned To column or the Status column will not appear on the printout.

To print role assignments, you need to have the Role Assignments Print navigation permission within the Work Dashboard navigation area.

To print the list of role assignments:

  1. Click Print View in the Role Assignments section of the dashboard.

    The User Application displays a printable version of the role assignment list in a separate window:

  2. Select the text in the text box at the top of the print view.

    Type a title or add notes to the text box:

  3. Click Print.

    You can print directly to a printer, or print to a PDF file.

    Here is a sample PDF showing what the printout looks like:

    All rows shown on the screen will be printed, unless the number of rows displayed reaches the limit defined in the Maximum number of results returned from a query setting, which is specified by a Configuration Administrator on the Administration tab. If you reach this limit, you should see a confirmation dialog that allows you to specify whether you want to continue. Click OK if you want to include all of the rows shown on the screen in the printout. This message is displayed only once for each user session.