3.1 Creating the Driver Object in Designer
You create the Office 365 driver by importing the driver’s packages and then modifying the configuration to suit your environment. After you have created and configured the driver, you need to start it.
3.1.1 Importing the Driver Packages in Designer
The driver packages contain the items required to create a driver, such as policies, entitlements, filters, and Schema Mapping policies. These packages are only available in Designer and can be updated after they are initially installed. You must have the most current version of the packages in the Package Catalog before you can create a new driver object.
To verify that you have the most recent version of the driver packages in the Package Catalog:
-
Open Designer.
-
In the toolbar, click > .
-
Click to update the packages or click if the packages are up-to-date.
-
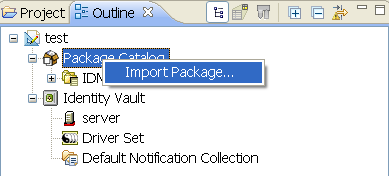
In the Outline view, right-click .
-
Click .
-
Select any Office 365 driver packages.
or
Click to import all of the packages displayed.
By default, only the base packages are displayed. Deselect to display all packages.
-
Click to import the selected packages, then click in the successfully imported packages message.
-
After the current packages are imported, continue with Section 3.1.2, Installing the Driver Packages.
3.1.2 Installing the Driver Packages
-
In Designer, open your project.
-
In the Modeler, right-click the driver set where you want to create the driver, then click .
-
Select , then click .
-
Select the optional features to install for the Office 365 driver, then click . The options are:
Office 365 Configuration: This package contains the default policies required to enable the driver to create user and group accounts. Leave this option selected.
Office 365 Driver Entitlements: This package contains configuration information and policies for synchronizing user accounts, group membership, roles and licenses. If you want account creation and auditing enabled through entitlements, verify that this option is selected. For more information, see the Identity Manager 4.0.2 Entitlements Guide.
Office 365 Password Synchronization: This packages contains the policies that enable the Office 365 driver to synchronize passwords. If you want to synchronize passwords, verify that this option is selected. For more information, see the Identity Manager 4.0.2 Password Management Guide.
Office 365 Managed System Information: This package contains the policies that enable the driver to collect data for reports. If you are using the Identity Reporting Module, verify that this option is selected. For more information, see the Identity Reporting Module Guide.
Office 365 Account Tracking: This package contains the policies that enable you to track accounts for reports. If you are using the Identity Reporting Module, verify that this option is selected. For more information, see the Identity Reporting Module Guide.
Office 365 Audit Entitlements: This package contains the policies that enable account creation and auditing for the Office 365 driver. If you want account creation and auditing enabled, verify that this option is selected. If you are using the Identity Reporting Module, verify that this option is selected. For more information, see the Identity Manager 4.0.2 Entitlements Guide.
Office 365 Optional Policies: This package contains the policies that enable the driver to handle multivalued CN (Common Name) attribute conversions between the Identity Vault and Office 365.
By default, the option is selected.
-
(Conditional) If there are package dependencies for the packages you selected to install, you must install these dependencies to install the selected package. Click to install the package dependencies listed.
-
(Conditional) The Common Settings page is only displayed if the Common Settings package is installed as a dependency. On the Install Common Settings page, fill in the following fields, then click :
User Container: Select the Identity Vault container where Office 365 users will be added if they don’t already exist in the vault. This value becomes the default for all drivers in the driver set.
Group Container: Select the Identity Vault container where Office 365 groups will be added if they don’t already exist in the vault. This value becomes the default for all drivers in the driver set.
-
On the Install Office 365 Base page, specify a name for the driver that is unique within the driver set, and then click .
-
On the new Install Office 365 Base page, fill in the following fields, then click :
Subscriber Options: Fill in the following fields to define Office 365:
-
Driver Name: Specify the name for the driver.
-
User Name: Specify the name of the Office 365 administrator user. The driver shim requires this name to access Office 365. For example, username@domain.onmicrosoft.com.
-
User Password: Specify the password of the site administrator user. The driver shim requires this password to access Office 365.
-
Office 365 Custom Licenses: Click the
 icon to create custom Office 365 licenses by disabling specific services. You must use License Entitlements to assign licenses to the Office 365 users.
-
Custom License Name: Specify the name with which a custom license should be created. This will appear as [domainname]:[license name (service to be disabled)] in the License Entitlements. If the name you entered contains spaces or a hyphen “-”, the driver cannot create a custom license.
-
Service Name to be Disabled: Specify the service names to be disabled. To disable more than one service, use a comma to separate the service names. For example, to disable Microsoft Exchange and Microsoft Sharepoint services from your enterprise plan, use this string: EXCHANGE_S_ENTERPRISE,SHAREPOINTENTERPRISE.
-
Publisher Options: Select to enable the Publisher connection. The following options are displayed to configure the Publisher channel:
-
Working Directory: Specify the full path of a directory on the local file system where publisher state information for the driver can be stored. The driver process must have write access to the directory.
-
Office 365 Polling Interval: Specify the number of seconds the Publisher channel waits after polling the Office 365 system for new changes before polling again.
-
Database Password: Specify the database password. This password is used to encrypt and connect to the Publisher cache. Ensure that the same password is used to reconnect to the cache at the later time.
-
Confirm Publisher Deletes: This means that the Publisher channel reconfirms the delete operations by polling Office 365. If the value of this option is set to , the channel does not reconfirm the operations.
-
Clear Current Cached Events: Set this option to if you want to clear the current events stored in the Publisher cache.
Heart Beat Interval: Specify the number of seconds that the Publisher channel waits after running the polling script and sending Office 365 events from the change cache to the Identity Manager engine.
-
-
Fill in the following fields to configure the .NET Remote Loader, then click :
Host Name: Specify the hostname or IP address of the server where the .NET Remote Loader Service is installed and running for this driver.
Port: Specify the port number where the .NET Remote Loader Service is installed and is running for this driver. The default port is 8090.
KMO: Specify the Key Name of the Key Material Object (KMO) containing the keys and certificate to be used for SSL. For example, kmo=remotecert.
If you use spaces in the certificate name, you need to enclose the KMO object nickname in single quotation marks.
Remote Password: Specify the Remote Loader’ password, as defined on the Remote Loader service. The Identity Manager engine (or Remote Loader shim) requires this password to authenticate to the Remote Loader.
Driver Password: Specify the driver object password that is defined on the Remote Loader service. The Remote Loader requires this password to authenticate to the Identity Manager server.
-
On the Office 365 Base page, fill in the following fields, then click :
-
Office 365 Domain Name: Specify your Office 365 domain name, using the Domain-name.onmicrosoft.com format.
-
Usage Location: Specify a two-letter country code that needs to be set in Office 365. For example, if the Office 365 service is hosted in different location and you select your country, the servers hosted in your country are used to make the service available to you.
-
-
(Conditional) On the Install Office 365 Account Tracking page, fill in the following fields, then click :
Realm: Specify the name of the realm, security domain, or namespace in which the account name is unique. You must set the to the Office 365 Domain Name.
-
(Conditional) On the Install Office 365 Password Synchronization page, fill in the following fields, then click :
-
Set Password Never Expires: If you set this option to on the newly created users, the password does not expire for them.
-
Disable Force Change Password at First Login: If , disables forced password change when a user logs into Office 365 for first time.
-
-
(Conditional) On the Install Office 365 Managed System Information page, fill in the following fields to define the ownership of the Office 365 system, then click :
General Information
-
Name: Specify a descriptive name for the managed system.
-
Description: Specify a brief description of the managed system.
-
Location: Specify the physical location of the managed system.
-
Version: Specify the version of the managed system.
System Ownership
-
Business Owner - Select a user object in the Identity Vault that is the business owner of the Office 365 system. This can only be a user object, not a role, group, or container.
-
Application Owner: Select a user object in the Identity Vault that is the application owner of the Office 365 system. This can only be a user object, not a role, group, or container.
This page is only displayed if you selected to install the Data Collection packages and the Account Tracking packages.
System Classification
-
Classification: Select the classification of the Office 365 system. This information is displayed in the reports. The options are as follows:
-
Mission-Critical
-
Vital
-
Not-Critical
-
Other
If you select Other, you must specify a custom classification for the Office 365 system
-
-
Environment: Select the type of environment the Office 365 system provides. The options are as follows:
-
Development
-
Test
-
Staging
-
Production
-
Other
If you select , you must specify a custom environment for the Office 365 system.
-
-
-
Review the summary of tasks that will be completed to create the driver, then click .
The driver is now created. You can modify the configuration settings, by continuing with the next section, Configuring the Driver Object. If you don’t need to configure the driver, continue with Deploying the Driver Object.
3.1.3 Configuring the Driver Object
Configuring the Driver Parameters: There are many settings that can help you customize and optimize the driver. The settings are divided into categories such as Driver Configuration, Engine Control Values, and Global Configuration Values (GCVs). Although it is important for you to understand all of the settings, your first priority should be to review the Driver Properties located on the Driver Configuration page. The Driver Parameters and the Global Configuration Values let you configure the Office 365 login information and other parameters associated with the Publisher channel. These settings must be configured properly for the driver to start and function correctly. The driver requires an account with Office 365 that is an administrator for your Office 365 subscription. You should create a new account in your Office 365 specifically for this purpose. Make sure that this new account is set to administer your Office 365. These values are set during the default import of the driver
Customizing the Driver Policies and Filter: The driver policies and filter control data flow between the Identity Vault and the application. You should ensure that the policies and filters reflect your business needs.
Specifying Authentication Information: The Authentication information contains the Remote Loader configuration information.
If you do not have the Driver Properties page displayed in Designer, configure the driver properties:
-
Open your project.
-
In the Modeler, right-click the driver icon or the driver connection, then select Properties.
-
Make any desired changes, then click to save the changes.
-
After the driver is created in Designer, it must be deployed to the Identity Vault. Proceed to Section 3.1.4, Deploying the Driver Object.
After completing the configuration tasks, continue with Section 3.1.4, Deploying the Driver Object.
3.1.4 Deploying the Driver Object
After the driver is created in Designer, it must be deployed into the Identity Vault.
-
In Designer, open your project.
-
In the Modeler, right-click the driver icon or the driver connection, then select .
-
Read through the deployment summary, then click .
-
Read the success message, and then click .
-
Click to assign rights to the driver.
The driver requires rights to objects within the Identity Vault. The Admin user object is most often used to supply these rights.
-
Click , then browse to and select the object with the correct rights.
-
Click twice.
-
-
Click to exclude users that should not be synchronized.
-
Click , then browse to and select the user object you want to exclude, then click .
-
Repeat Step 6.a for each object you want to exclude, then click .
-
-
Click .
3.1.5 Starting the Driver
When a driver is created, it is stopped by default. To make the driver work, you must start the driver and cause events to occur. Identity Manager is an event-driven system, so after the driver is started, it won’t do anything until an event occurs.
To start the driver by using Designer:
-
In Designer, open your project.
-
In the Modeler, right-click the driver icon
 or the driver line, then select .
NOTE:The driver cannot initialize completely unless it successfully connects to the .NET Remote Loader and loads the Office 365 driver shim.
To start the driver using iManager:
-
In iManager, click
 to display the Identity Manager Administration page.
-
Click .
-
Browse to and select the driver set object that contains the driver you want to start.
-
Click the driver set name to access the Driver Set Overview page.
-
Click the upper right corner of the driver, then click .
For information about performing management tasks with the driver, see Section 5.0, Managing the Driver.
IMPORTANT:When you start the driver for the first time, don't add new users to the Publisher channel until the first polling interval completes because the driver treats all users as existing users and stores them in the change cache without sending them to the Identity Manager engine. It sends the new users to the Identity Manager engine from the next polling interval. Therefore, ensure that new users are added to the Publisher channel after the first polling cycle completes.