8.2 Adding an Integration Activity
-
Create a provisioning request definition (see Section 4.0, Configuring Provisioning Request Definitions).
-
Create a workflow for the provisioning request definition (see Section 6.0, Creating the Workflow for a Provisioning Request Definition).
-
Click the tab.
-
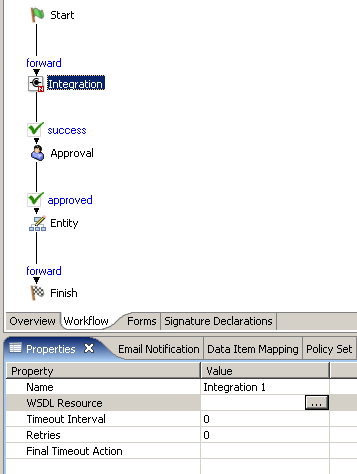
Drag an Integration activity from the palette and place it in the desired location in the workflow.
-
Click the tab.
-
Type a name for the activity in the field.
-
Click the field for the property, then click the browse button to display a dialog box that you use to locate the WSDL file for the Web service that you want to access with the Integration activity.
-
Use the dialog box to browse your file system to locate the WSDL file for the Web service that you want to use. Click the name of the WSDL file, then click .
A dialog box that you use to select a port type and operation for the Web service is displayed.
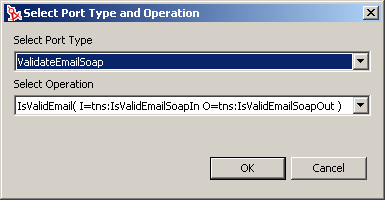
The list includes a set of port types supported by the Web service. Each port type supports operations that include the input and output messages of the operation.
This window allows you to specify the SOAP endpoint, the user ID used to access the SOAP endpoint, and the password used to access the SOAP endpoint. These options are all ECMAScript expressions and can be GCV values. Use the ECMA Expression Builder to configure the expressions you want to use.
-
Select a port type from the list.
-
Select an operation from the list.
-
If you want to specify a SOAP endpoint, specify a SOAP endpoint URL, either by selecting the URL from the list or by clicking the “E” icon and using the ECMA Expression Builder to configure an expression that resolves to the SOAP endpoint URL.
-
If you want to use basic authentication for a SOAP endpoint, complete the following steps:
-
Select .
-
In the field, click the “E” icon and use the ECMA Expression Builder to specify an expression that resolves to the user ID used to access the SOAP endpoint.
-
In the field, click the “E” icon and use the ECMA Expression Builder to specify an expression that resolves to the password used to access the SOAP endpoint.
-
-
Click .
The Integration activity creates an action model based on the WSDL document.You use the action model at design time to test the input to the Web service, test the response from the Web service, and map and transform data, if necessary, before returning the data to the workflow.
For many Web services, you don’t need to concern yourself with the action model. You simply create data item mappings for the Integration activity. After the action model is created, a new tab, , is added to the provisioning request definition editor. You use this tab to access the action model.
-
Specify the , , and properties (see Section 7.17, Integration Activity).
-
If you want to view or edit the action model, click the tab.
