12.1 How the Driver Works
In a multi-threaded driver environment, a Role and Resource Service driver uses a unique data set to achieve parallel processing of requests. The driver makes use of worker threads to process requests to unique identity data (disjoint set), where data is different based on certain attributes. This requires each driver thread to have a unique identity data, where data is different based on certain attributes. For example, Container 1 and Container 2 have different users, group, or subcontainers.
While processing the requests, the driver executes policies to implement a set of predefined rules and conditions for multi-threading. Prior to Identity Manager version 4.8.3, all the rules set for the driver were defined within the NOVLRSERVB-sub-etp policy in the Role and Resource Service Driver package. From the 4.8.3 release onward, the Role and Resource Service driver package is divided into three different policy modules. The rules are set individually on these policy modules and a weight is assigned to each policy module to determine the order during policy execution. The following list describes the policy modules in detail:
-
NOVLSERVB-sub-etp-Scoping: The weight assigned to this policy module is 100. It contains the following set of rules:
-
Trace Operation
-
Ignore everything except add, modify, rename, and synchronization operations for all classes
-
-
NOVLRSERVB-sub-etp-DisjointSets: The weight assigned to this policy module is 400. It contains the following set of rules:
-
Skip if multi-threading is not enabled or disjoint set is already determined by a previous policy
IMPORTANT:This rule simultaneously checks for the following conditions:
-
whether multi-threading is disabled on the driver
-
whether a disjoint set is already created by a custom multi-threading policy
If either or both the conditions matches the value, the driver does not execute the default NOVLRSERVB-sub-etp-DisjointSets policy. This prevents the driver from overwriting the disjoint set value in case you are using a custom multi-threading policy over the default policy provided in the Role and Resource Service Driver package.
-
-
Resolve the disjoint set for which the role request or resource request belongs to
-
Resolve the disjoint set for which the user resynchronization request belongs to
-
Set disjoint set value for resource association and role processing Event
-
Set disjoint-set operation property
-
-
NOVLRSERVB-sub-etp: The weight assigned to this policy module is 500. It contains the following set of rules:
-
Clean up the entitlement results for entitlements granted by NRF
-
Convert the event into a custom command to send to the driver
-
Get rid for any association that might be there and veto the original event
-
NOTE:Based on the weight assigned to each policy, the Role and Resource Service Driver will execute the default policies in the following sequence:
-
NOVLSERVB-sub-etp-Scoping
-
NOVLRSERVB-sub-etp-DisjointSets
-
NOVLRSERVB-sub-etp
Identity Manager provides a default mapping table with two columns to support defining a unique data set based on the Organizational Unit (OU) criteria. The first column lists the criteria to search in the data set and the second column contains the name of the unique data set to search for (should be unique).
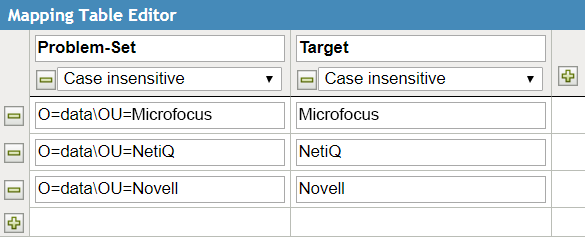
In this example, the first column contains the container DNs and the second column contains the user-defined key for a unique data set, where container DN is the criteria for identifying the data set.
By default, this mapping table is internally linked to the following rules which are defined under the Identity Manager policies:
-
Resolve the disjoint set for which the role request or resource request belongs to
-
Resolve the disjoint set for which the user resynchronization request belongs to
When the driver starts processing the requests, it creates a worker thread with the same name that you specified for the unique data set.
To use a different criterion for differentiating data, you must define a unique data set in the Mapping Table editor. For example, specify the container DN as a criterion for identifying a data set. After defining the data set, add the mapping table to an existing policy or create a new policy.
When the driver receives a request from the engine, it processes the associated policies and determines the unique set of the request and stores the request in the driver storage. If a worker thread is already created for the unique data set, then the driver's main thread hands over the request to that worker thread for processing. Otherwise, it dynamically creates a worker thread for that data set and hands over the request to that thread. As request processing is actually done by the worker threads, the main thread is free to receive new requests from the engine
When the driver completes processing a request, it removes that request from the driver storage. If the driver stops abruptly while processing a request, the request is processed when the driver starts again. You can instruct the driver start or stop processes to process the unprocessed events if an exception occurred when it was processing the unprocessed events by using the parameter. If you want to remove an unprocessed request, check the request in the DriverStorage attribute and then manually remove the request. By default, the driver storage can accommodate 500 requests. NetIQ recommends you to use a value less than the default value. Using a higher value causes memory build up issue. You can control this behavior by using the parameter.
Perform the following activities to set up a Role and Resource Service driver for multi-threaded services:
-
Define a unique data set in Mapping Table. For more information, see Modifying the Default Mapping Table Object.
-
Enable the driver for multi-threaded services using the driver configuration parameters. For more information, see Configuring the Driver.
-
Deploy the driver to the Identity Vault. For more information, see Deploying the Driver.