3.3 Add a Widget
To add new widget to your Dashboard, go to and click  and select .
Widgets are categorized as and based on their features:
3.3.1 Add General Widgets
category allows you to add widgets to your dashboard outside of Identity Manager standard widgets. You can specify the REST API URL of the required widget and display the required information in the form of line, pie, or table charts.
-
Select any of the following widget type from the list:
-
Line Chart: Displays the requested information for the selected element in the form of line chart.
-
Links: Allows you to bookmark frequently used links that helps you to access them quickly.
-
Pie Chart: Displays the requested information for the selected element in the form of pie chart.
-
Table: Lists the requested information for the selected element in a table form.
-
-
Click
 to configure the widget added to your dashboard.
 -
(Conditional) For , , and widgets, specify the following details:
-
Title: Specifies the widget name that will be displayed on your Dashboard.
-
URL: Specifies the REST API URL of the required widget that you want to show on your Dashboard.
-
Root Element: Specifies the element from the REST API code for which you want to display a chart. This field is case sensitive. You must enter the exact same name which is mentioned in the REST API code.
-
Columns: Specifies the columns that you want to display on your widget. You can add multiple columns. specifies the display name for a column. specifies the column name as mentioned in the REST API. field is case sensitive. You must enter the exact same string from the REST API code.
The following is a sample REST API code for the page:
{
    "total": 12,
    "nextIndex": 0,
    "token": "60045d6be10f4419a2da9fa728683b06",
    "assignments": [
        {
            "id": "cn=aaacccc,cn=level30,cn=roledefs,cn=roleconfig,cn=appconfig,cn=user application driver,cn=driverset1,o=system",
            "name": "AAAcccc",
            "description": "afasfdsf",
            "entityType": "role",
            "link": "/IDMProv/rest/access/assignments/item",
            "bulkRemovable": "true",
            "categories": [
                {
                    "categoryId": "default",
                    "categoryName": "Default"
                }
In this sample, assignments is the Root element and name is the selected column to display that will be displayed on the widget. You can also bookmark any URL that you wish to access from your Dashboard
-
-
(Conditional) For Links widgets, specify the for the links and add links that you wish to access from the Dashboard.
-
Click to apply your changes.
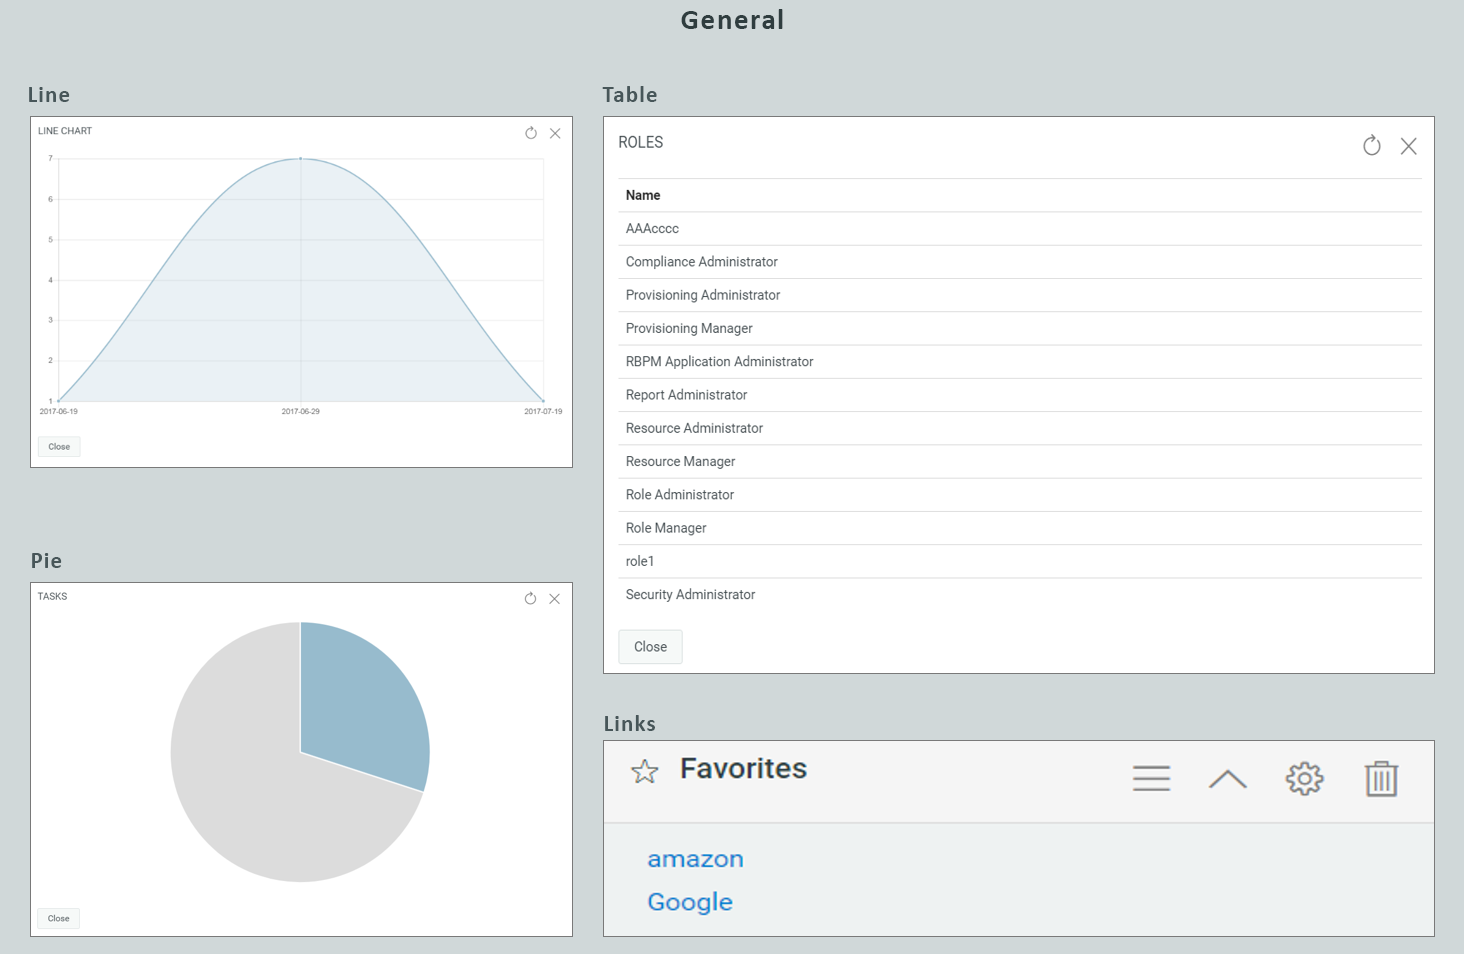
The following are sample chart and link widgets that can be added to your Dashboard:
Figure 3-2 Example for General Widgets
3.3.3 Widget Options
You can perform the following operations on widgets:
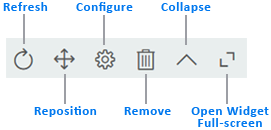
- Refresh
-
Updates the widget content with the latest information.
- Reposition
-
Allows you to move the widget across dashboard.
- Configure
-
Allows you to configure the widget properties. For more information, see Configure a Widget.
- Remove
-
Deletes the widget from the dashboard.
- Collapse
-
Hides the widget information and shows only the widget title.
- Open Widget Full-screen
-
Displays the widget information in full-screen mode.
NOTE:
-
and options are displayed only for General category widgets.
-
To apply your changes, click .