Identity Manager 4.7 Driver for Linux and UNIX Settings Implementation Guide
This guide describes implementation of the Identity Manager 4.7 driver for Linux and UNIX Settings, which automates the process of setting and configuring Linux and UNIX attributes in the Identity Vault of the NetIQ® Identity Manager driver for Linux and UNIX.
Identity Manager is the comprehensive identity management suite that allows organizations to manage the full user life cycle, from initial hire, through ongoing changes, to ultimate retirement of the user relationship.
About NetIQ Corporation
We are a global, enterprise software company, with a focus on the three persistent challenges in your environment: Change, complexity and risk—and how we can help you control them.
1.0 Overview
The Identity Manager driver for Linux and UNIX Settings automates the management of Linux and UNIX operational attributes, such as login shell, UID, GID, and home directory, in the Identity Vault.
This enables you to provision systems using other drivers, such as the Linux and UNIX driver or the Fan-Out driver. This also enables you to use account redirection via LDAP, Name Service Switch, or PAM modules.
You can also use the driver to automate enabling users for Linux User Management (LUM) and NetIQ® Samba. LUM simplifies user management in a networked environment with many Linux workstations and servers by storing all necessary properties in the Identity Vault rather than locally on each machine. NetIQ Samba provides Windows* access (CIFS and HTTP-WebDAV) to files stored on the OES server.
Without the Linux and UNIX Settings driver, you must use iManager to set up each user individually. The driver uses Identity Manager events and performs the same functions as the LUM and NetIQ Samba iManager plug-ins, but without the manual activity. For the detailed steps taken by the driver to set up users, see Section B.1, LUM Automation and Section B.2, Samba Automation.
You must modify the Linux Workstation objects, selecting the LUM-enabled groups for the workstations to be members of, in order for users to be able to log in to OES or NetIQ Samba.
1.1 Basic Information Flow
-
A user is created or granted an entitlement in the Identity Vault.
-
The Linux and UNIX Settings driver receives the Create or Entitlement event and sets RFC 2307 attributes on the User objects.
-
Platform drivers, like the Linux and UNIX driver, can use the attributes set on User objects to populate users on the platforms.
1.2 RFC 2307 Attributes
The Linux and UNIX Settings driver sets the following RFC 2307 attributes:
-
uidNumber
-
gidNumber
-
homeDirectory
-
loginShell
-
uid (represented as uniqueID in the Identity Vault)
You can customize the driver to set additional attributes. For details, see Section 5.1, Customizing RFC 2307 Attributes Set by the Driver.
The uidNumber and gidNumber attributes can be assigned using an Identity Manager Stylesheet object, or they can be assigned from a LUM Linux/UNIX Config object. The style sheet allows configuration of multiple ranges of UIDs and GIDs. The driver can skip over ranges of numbers that you do not want UIDs and GIDs allocated from. For details about configuring the UID and GID ranges in the style sheet, see Section 5.2, Customizing UID/GID Ranges.
2.0 Planning for the Linux and UNIX Settings Driver
When you install the Identity Manager driver for Linux and UNIX Settings you are prompted to supply certain information. The prompts are self-explanatory, but you should consider the following questions before installing the driver:
-
What range of numbers do you want the driver to use when assigning UID numbers?
-
What range of numbers do you want the driver to use when assigning GID numbers?
-
Will you be using LUM?
-
Will you be using NetIQ® Samba?
-
Do you want the driver to assign UID and GID numbers based on the driver’s Identity Manager Stylesheet object or based on the LUM Linux/UNIX Config object?
IMPORTANT:If you use the LUM Linux/UNIX Config object, do not use iManager to enable users for LUM. That could result in duplicate UID assignments.
-
Do you need to import some UIDs and GIDs from platforms before running the driver? If so, how will you do the import?
3.0 Installing the Linux and UNIX Settings Driver
This section includes information for installing the Identity Manager driver for Linux and UNIX Settings.
Topics include
3.1 Installation Procedure
To install the Linux and UNIX Settings driver to a Metadirectory server, do the following:
-
Ensure that you have the required knowledge and skills, and that the prerequisites are met.
For details, see Section 3.2, Required Knowledge and Skills and Section 3.3, Prerequisites.
-
Extend the schema to add the classes and attributes defined in RFC 2307.
For details, see the NetIQ eDirectory Administration Guide.
-
Create the driver.
For details, see Section 3.4, Creating the Driver in Designer.
-
Use iManager to create indexes for uidNumber and gidNumber.
For details, see the NetIQ eDirectory Administration Guide.
3.2 Required Knowledge and Skills
Successful installation of the Linux and UNIX Settings driver requires knowledge and expertise with Identity Manager and iManager. If you will be using LUM or NetIQ Samba, you also need knowledge and expertise with OES.
3.3 Prerequisites
-
NetIQ Identity Manager 4.7
-
The server that the driver runs on must hold read/write replicas of the objects the driver manages.
-
To use LUM or NetIQ Samba integration, you must be using OES.
-
For information about required systems and software, as well as supported platforms and operating environments, see the Identity Manager 4.7 Drivers Documentation Web site. From this index page, you can select a readme file associated with the platform(s) for which you need support.
3.4 Creating the Driver in Designer
The Linux and Unix Settings Driver supports Designer 4 Package features, which allows you to create a driver by selecting which packages to install. After you create and configure the driver, you need to deploy it to the Identity Vault and start it.
Topics in this section include
3.4.1 Importing the Current Driver Packages
Driver packages can be updated at any time and are stored in the Package Catalog. Packages are initially imported into the Package Catalog when you create a project, import a project, or convert a project. It is important to verify you have the latest packages imported into the Package Catalog before you install the driver.
To verify you have the latest packages imported into the Package Catalog:
-
Open Designer.
-
In the toolbar, click > .
-
Click if there are no package updates
or
Click to import the package updates.
-
In the Outline view, right-click the .
-
Click .
Figure 3-1
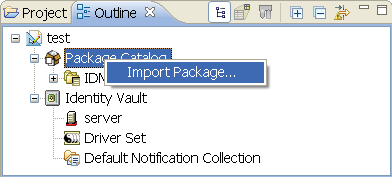
-
Select the Linux and Unix Settings Packages
or
Click to import all of the packages displayed, then click .
NOTE:By default, only the base packages are displayed. Deselect to display all packages.
-
Click to import the selected packages, then click in the successfully imported packages message.
-
After the current packages are imported, continue to the next section, Section 3.4.2, Installing the Driver Packages.
3.4.2 Installing the Driver Packages
After you have imported the current driver packages into the Package Catalog, you can install the driver packages to create a new driver.
-
In Designer, open your project.
-
In the Modeler, right-click the driver set where you want to create the driver, then select > .
-
Select from the list of base packages, then click .
-
Select the optional features to install for the Linux and Unix Settings driver. The options are:
Linux and Unix Settings Posix: This option contains the policies needed for Posix Account and Group attributes. This option is mandatory.
Optional Configuration: Linux and Unix Settings Posix: This option provides policies necessary for OES, LUM and Samba auto-assigned attributes.
Entitlements: This package contains the policies needed for implementing Entitlements.
-
After selecting the optional packages, click .
-
(Conditional) If the packages you selected to install have package dependencies, you must also install them to install the selected package. Click to install the listed package dependencies.
-
(Conditional) If more than one type of package dependency must be installed, you are presented with these packages separately. Continue to click to install any additional package dependencies.
-
(Conditional) The Common Settings page is displayed only if the Common Settings package is installed as a dependency. On the Install Common Settings page, fill in the following fields:
User Container: Select the Identity Vault container where Linux and Unix Settings users will be added if they don’t already exist in the vault. This value becomes the default for all drivers in the driver set.
If you want a unique location for this driver, set the value for all drivers on this page. After the driver is created, change the value on the driver’s Global Configuration Values page.
Group Container: Since the Linux and Unix Settings driver does not synchronize Group objects, this setting can be ignored.
-
(Conditional) If not already configured, fill in the following fields on the Common Settings Advanced Edition page, then click :
User Application Provisioning Services URL: specify the User Application Identity Manager Provisioning URL.
User Application Provisioning Services Administrator: Specify the DN of the User Application Administrator user. This user should have the rights for creating and assigning resources. For more information, see “Setting Up Administrative Accounts” in the NetIQ Identity Manager 4.7 Common Driver Administration Guide.
-
On the Install Linux and Unix Settings page, fill in the following field:
Driver Name: Specify a name for the driver that is unique within the driver set.
-
(Conditional) On the Driver Parameters page, review the default Subscriber and Publisher Options. Edit, if necessary, and click :
-
(Conditional) On the Entitlements Name to CSV File Mappings page, click the icon to populate the page with the entitlement configuration options. Identity Manager uses the CSV file to map Linux and Unix Settings entitlements into corresponding resources in the Identity Manager catalog.
NOTE:This page is displayed only if you installed the Entitlements package.
The information that you specify in this page is used for creating the permission catalog. Fill in the following fields, then click :
Entitlement Name: Specify a descriptive name for the entitlement to map it to the CSV file that contains the Linux and Unix Settings entitlement details.
Entitlement Name is the name of the entitlement. This parameter corresponds to the Entitlement Assignment Attribute in Linux and Unix Settings. For example, you could define an entitlement called ParkingPass.
Entitlement Assignment Attribute: Specify a descriptive name for the assignment attribute for an entitlement.
Entitlement Assignment Attribute holds the entitlement values in Linux and Unix Settings. For example, you could have an attribute called Parking.
You must add this parameter to in the Driver Parameters page or modify it in driver settings after creating the driver.
CSV File: Specify the location of the CSV file. This file must be located on the same server as the driver. This file contains the values for the application entitlements.
Multi-valued?: Set the value of this parameter to if you want to assign resources and entitlements multiple times with different values to the same user. Otherwise, set it to .
-
Review the summary of tasks that will be completed to create the driver, then click .
The driver is created. You can modify the configuration settings by continuing with the next section, Section 3.4.3, Configuring the Driver. If you don’t need to configure the driver, skip ahead to Section 3.4.4, Deploying the Driver.
3.4.3 Configuring the Driver
There are many settings that can help you customize and optimize the driver. The settings are divided into categories such as Driver Configuration, Engine Control Values, and Global Configuration Values (GCVs). Although it is important for you to understand all of the settings, your first priority should be to review the Driver Parameters located on the Driver Configuration page and the Global Configuration Values. These settings must be configured properly for the driver to start and function correctly.
To access the Driver Properties page:
-
Open your project.
-
In the Modeler, right-click the driver icon
 or the driver line, then select .
-
Modify the driver settings as necessary.
-
Continue with the next section, Section 3.4.4, Deploying the Driver.
3.4.4 Deploying the Driver
After a driver is created in Designer, it must be deployed into the Identity Vault:
-
In Designer, open your project.
-
In the Modeler, right-click the driver icon
or the driver line, then select > .
-
If you are authenticated to the Identity Vault, skip to Step 5; otherwise, specify the following information:
Host: Specify the IP address or DNS name of the server hosting the Identity Vault.
Username: Specify the DN of the user object used to authenticate to the Identity Vault.
Password: Specify the user’s password.
-
Click .
-
Read through the deployment summary, then click .
-
Read the successful message, then click .
-
Click to assign rights to the driver.
The driver requires rights to objects within the Identity Vault. The Admin user object is most often used to supply these rights. However, you might want to create a DriversUser (for example) and assign security equivalence to that user. Whatever rights that the driver needs to have on the server, the DriversUser object must have the same security rights:
-
Click , then browse to and select the object with the correct rights.
-
Click twice.
-
-
Click to exclude users that should not be synchronized.
You should exclude any administrative User objects (for example, Admin and DriversUser) from synchronization:
-
Click .
3.4.5 Starting the Driver
When a driver is created, it is stopped by default. To make the driver work, you must start the driver and cause events to occur. Identity Manager is an event-driven system, so after the driver is started, it won’t do anything until an event occurs.
To start the driver:
-
In Designer, open your project.
-
In the Modeler, right-click the driver icon
or the driver line, then select > .
3.4.6 Creating the Driver in iManager
Drivers are created with packages, and iManager does not support packages. In order to create or modify drivers, you must use Designer. See Section 3.4, Creating the Driver in Designer.
4.0 Configuring the Linux and UNIX Settings Driver
You can change the configuration of the Identity Manager driver for Linux and UNIX Settings by editing its Global Configuration Variables (GCVs).
To edit GCVs:
-
Use iManager to navigate to the Driver Overview page.
-
Click the driver image to display the Driver Settings window.
-
Select .
With Internet Explorer, is located under the tab.
With other browsers, is located in the drop-down menu at the top.
-
Alter the values as desired.
-
Click .
5.0 Customizing the Linux and UNIX Settings Driver
This section provides information on customizing the operation of the Identity Manager driver for Linux and UNIX Settings. Topics include
5.1 Customizing RFC 2307 Attributes Set by the Driver
The Linux and UNIX Settings driver sets the following RFC 2307 attributes:
-
uidNumber
-
gidNumber
-
homeDirectory
-
loginShell
-
uid (represented as uniqueID in the Identity Vault)
You can add other attributes for the driver to set.
To add more attributes for the driver to set, use iManager to modify the creation policy.
-
If you are using the driver style sheet to assign UID and GID numbers, modify the creation policy, NOVLNXSPOS-sub-cp-setRequiredPosixAttrbutes.
-
If you are using the LUM Linux/UNIX Config object to assign UID and GID numbers, modify the creation policy, NOVLNXSLUM-sub-cp-setRequiredPosixAttributes.
5.2 Customizing UID/GID Ranges
You can assign UID and GID numbers from a style sheet in the driver. Alternatively, you can use the LUM Linux/UNIX Config object to assign UID and GID numbers. For details about using the LUM Linux/UNIX Config object, see the Linux User Management Technology Guide, which is available from the NetIQ® OES documentation Web site.
UID and GID ranges are defined in the NxSettings style sheet. You can edit this style sheet to modify the ranges that UIDs and GIDs are allocated from.
5.2.1 Editing UID/GID Ranges
IMPORTANT:The NxSettings style sheet holds the last assigned UID and GID number. Stop the driver before you edit this document. Failure to stop the driver before editing this document could result in the same UID or GID being assigned to multiple users or groups.
To edit the NxSettings style sheet:
-
Open iManager and navigate to the Driver Overview page for the Linux and UNIX Settings driver.
-
Click the icon
 to display the View All Policies dialog box.
-
Click the link to the NxSettings Stylesheet object under the heading to display the NxSettings style sheet, then click .
-
Make changes as desired. For details, see Section 5.2.2, NxSettings Style Sheet Details.
-
Click .
5.2.2 NxSettings Style Sheet Details
The initial NxSettings style sheet is similar to the following example:
<?xml version="1.0" encoding="UTF-8"?><nxSettings>
  <settings name="DefaultSet">
    <setting name="uid" type="range">
      <ranges last-used="0">
        <range end="1000" start="400"/>
      </ranges>
    </setting>
    <setting name="gid" type="range">
      <ranges last-used="0">
        <range end="1000" start="400"/>
      </ranges>
    </setting>
  </settings>
</nxSettings>
You can change the start and end attributes of a range tag and the last-used attribute for the ranges tag. (Because the attributes are stored in alphabetical order, the end attribute of a range element is listed before the start attribute.)
You can add ranges by adding more range tags as shown in the following example:
<ranges last-used="0">
  <range end="1000" start="400"/>
  <range end="2000" start="1001"/>
  <range end="5000" start="3000"/>
</ranges>
Ranges do not need to be contiguous. If there are gaps, the driver skips over them. If the value of the last-used attribute falls outside of all ranges, then the next number is assigned from the range with the next start value. In the preceding example, the next number assigned is 400. The value assigned after 2000 is 3000.
You can also add more settings and setting tags to the style sheet for your own purposes. Do not reuse the setting name DefaultSet.
For details about retrieving values with a policy, see Section B.3, Retrieving Values with a Policy.
5.3 Accommodating Multiple Sets of RFC 2307 Attributes
It might be desirable to have more than one set of Linux/UNIX settings attributes on a User object so the user can have different settings on different systems. For example, a user with accounts on a Linux system and a Solaris system might need a different login shell on each system.
You can extend the schema with iManager to accommodate additional attributes. Then you can modify driver policies to set the desired attribute values. Text settings can be added to the GCVs for the driver, and range attributes can be added to the NxSettings style sheet.
A.0 Troubleshooting
To troubleshoot the Identity Manager driver for Linux and UNIX Settings, see the following topics:
A.1 Attributes Not Added for New Users
If a user is added to the Identity Vault, but the driver does not add the attributes specified in the creation policy to the User object, ensure that the user meets the appropriate selection criteria.
-
Use iManager to examine the driver’s GCVs under the heading, and ensure that the user meets the driver’s event selection criteria.
-
If the driver is configured to use Role-Based Entitlements, make sure that the user has the required entitlement.
For details about using entitlements, see the Identity Manager 4.7 Administration Guide on the Identity Manager 4.7 Documentation Web site.
You can obtain diagnostic information from a trace.
To obtain a driver trace of events related to adding a user:
-
Use iManager to navigate to the Driver Overview page.
-
Click the driver image to display the Driver Settings window.
-
Select .
With Internet Explorer, is located under the tab.
With other browsers, is located in the drop-down menu at the top.
-
Set to 10.
-
Run ndstrace to capture the trace information for the driver.
Because a large volume of debug information is produced by the driver, we recommend that you record the trace to a file.
-
Add a user.
Trace messages pertaining to the NxSettings driver are preceded by a number and DVRS: NxSettings ST:. Search the trace, case insensitively, for the word error. If you find no errors, examine the Identity Vault to see if the driver set the attributes specified in the creation policy on the User object you added.
A null pointer exception from the Metadirectory engine can be caused by a problem with the NxSettings Stylesheet object’s contents or by a lack of free UIDs or GIDs available to be allocated. If you find a null pointer exception in the trace, search the trace for related status messages from the driver. For more information about status messages from the driver, see Section C.0, Messages.
A.2 Performance
Ensure that indexes for the uidNumber and gidNumber attributes exist and are online.
To avoid assigning duplicate UID and GID numbers, the driver searches the respective subtrees specified during installation, or later by GCVs. For good performance, you must create indexes for uidNumber and gidNumber. For details, see Step 4.
For details about managing indexes, see the NetIQ eDirectory Administration Guide.
B.0 Technical Details
This section describes some technical details about operatng the Identity Manager driver for Linux and UNIX Settings. Topics include
B.1 LUM Automation
The Linux and UNIX Settings driver can automate enabling OES users for NetIQ® Linux User Management (LUM). The driver performs the following steps:
-
Assigns uidNumber from the NxSettings style sheet or the Linux/UNIX Config object.
-
Adds Public rights to the following RFC 2307 attributes:
Attribute
Rights
uidNumber
Read
gidNumber
Read
loginShell
Read
homeDirectory
Read
gecos
Read
Group Membership
Read
cn
Compare
-
Adds the user to a group enabled for LUM. (The group is chosen during driver import.)
-
Sets the user’s gidNumber equal to the gidNumber of the LUM-enabled group.
-
Adds the object class uamPosixUser to the user.
If you have a very large number of users, you might not want all users to be in a single static group. You can define a dynamic group as your LUM-enabled group.
To use a dynamic group as your LUM-enabled group:
-
Define the dynamic group according to your needs.
-
Set the global configuration value (GCV) named to .
(The GCV named LUM-Enabled Group DN is not used in this case.)
GCV values can be edited on the Driver Properties page. For more information about editing GCVs, see Section 4.0, Configuring the Linux and UNIX Settings Driver
For details about LUM, see the Linux User Management Technology Guide, which is available from the NetIQ® OES documentation Web site.
B.2 Samba Automation
The Linux and UNIX Settings driver can automate enabling OES users for NetIQ Samba. The driver performs the following steps:
-
Obtains the sambaSID and sambaPrimaryGroupSID attributes.
To get the SID attributes, the driver searches the user’s container for a sambaDomain object. If one is not found there, the driver searches each higher container until a sambaDomain object is found.
-
Sets the sambaSID attribute on the user object with the value from the sambaDomain object, a dash, and the value of the user’s UID.
For example, if the value of the sambaSID attribute from the sambaDomain object is S-1-5-21-948752240-2140611863-4084635154 and the user’s GID is 1007, the value of the user’s sambaSID attribute is set to S-1-5-21-948752240-2140611863-4084635154-1007.
-
Sets the sambaPrimaryGroupSID attribute on the user object with the value from the sambaDomain object, a dash, and the value of the user’s UID.
This works the same way as for the sambaSID attribute in the preceding example.
-
Adds the object class sambaSAMAccount to the user.
-
Adds the object class sambaAccount to the user.
B.3 Retrieving Values with a Policy
You can retrieve values with a policy by calling methods from the driver shim. The following example demonstrates retrieving values with XPath expressions:
<do-set-local-variable name="DriverDN">
  <arg-string>
    <token-text xml:space="preserve">\MYD1\mydriver\drivers\NxSettings</token-text>
  </arg-string>
</do-set-local-variable>
<do-set-local-variable name="driverShimInstance">
  <arg-object>
    <token-xpath expression="NxSettingsInstance:getInstance($DriverDN)"/>
  </arg-object>
</do-set-local-variable>
<do-set-local-variable name="uid">
  <arg-string>
    <token-xpath expression='driverShim:getNextRangeValue($driverShimInstance,"DefaultSet", "uid")'/>
  </arg-string>
</do-set-local-variable>
This works as follows:
-
Local variable “DriverDN” is set to the DN of the driver. This value is used to retrieve the correct instance of the driver shim from the Java* virtual machine.
-
The static getInstance method is called on the driver shim to retrieve a handle to the shim object.
-
The getNextRangeValue method is called on the driver shim with the following arguments:
Argument
Description
driverShimInstance
The handle to the shim
setName
The name of the settings set to retrieve the range value from (defined by the value of the settings tag name attribute)
SettingName
The name of the setting containing the range information to be used to assign an ID
C.0 Messages
The Identity Manager driver for Linux and UNIX Settings appends status elements containing message text to XDS commands as necessary to report unexpected conditions. You can view these in a trace. The driver produces the following status messages:
Error finding sambaSID object for context userDN Error finding sambaSID object searchDN
The sambaDomain object is created when NetIQ® Samba is configured on OES using YaST.
Error searching for uidInUse searchDN Error searching for gidInUse searchDN
-
Subtree to Search for Existing UIDs to Avoid Duplicate UID Assignment
-
Subtree to Search for Existing GIDs to Avoid Duplicate GID Assignment
Could not retrieve LUM object UnixConfigDN
The Linux/UNIX Config object is created when LUM is configured on OES using YaST.
Error finding NxSettings document
Setting set settingSetName not found
In the following code snippet, DefaultSet is the settings name:
<token-xpath expression='driverShim:getNextGIDFromXMLDoc($driverShimInstance,"DefaultSet", "gid", $searchBase)'/>
The settings name DefaultSet is defined in the following NxSettings Stylesheet object:
<?xml version="1.0" encoding="UTF-8"?>
<nxSettings>
  <settings name="DefaultSet">
    <setting name="uid" type="range">
      <ranges last-used="601">
        <range end="56500" start="600"/>
      </ranges>
    </setting>
    <setting name="gid" type="range">
      <ranges last-used="601">
        <range end="56500" start="600"/>
      </ranges>
    </setting>
  </settings>
</nxSettings>
Setting settingName not defined in setting set settingSetName
In the following code snippet, gid is the setting name:
<token-xpath expression='driverShim:getNextGIDFromXMLDoc($driverShimInstance,"DefaultSet", "gid", $searchBase)'/>
The setting name gid is defined in the following NxSettings Stylesheet object:
<?xml version="1.0" encoding="UTF-8"?>
<nxSettings>
  <settings name="DefaultSet">
    <setting name="uid" type="range">
      <ranges last-used="601">
        <range end="56500" start="600"/>
      </ranges>
    </setting>
    <setting name="gid" type="range">
      <ranges last-used="601">
        <range end="56500" start="600"/>
      </ranges>
    </setting>
  </settings>
</nxSettings>
D.0 Legal Notice
THIS DOCUMENT AND THE SOFTWARE DESCRIBED IN THIS DOCUMENT ARE FURNISHED UNDER AND ARE SUBJECT TO THE TERMS OF A LICENSE AGREEMENT OR A NON-DISCLOSURE AGREEMENT. EXCEPT AS EXPRESSLY SET FORTH IN SUCH LICENSE AGREEMENT OR NON-DISCLOSURE AGREEMENT, NETIQ CORPORATION PROVIDES THIS DOCUMENT AND THE SOFTWARE DESCRIBED IN THIS DOCUMENT "AS IS" WITHOUT WARRANTY OF ANY KIND, EITHER EXPRESS OR IMPLIED, INCLUDING, BUT NOT LIMITED TO, THE IMPLIED WARRANTIES OF MERCHANTABILITY OR FITNESS FOR A PARTICULAR PURPOSE. SOME STATES DO NOT ALLOW DISCLAIMERS OF EXPRESS OR IMPLIED WARRANTIES IN CERTAIN TRANSACTIONS; THEREFORE, THIS STATEMENT MAY NOT APPLY TO YOU.
For purposes of clarity, any module, adapter or other similar material ("Module") is licensed under the terms and conditions of the End User License Agreement for the applicable version of the NetIQ product or software to which it relates or interoperates with, and by accessing, copying or using a Module you agree to be bound by such terms. If you do not agree to the terms of the End User License Agreement you are not authorized to use, access or copy a Module and you must destroy all copies of the Module and contact NetIQ for further instructions.
This document and the software described in this document may not be lent, sold, or given away without the prior written permission of NetIQ Corporation and Omnibond Systems, LLC., except as otherwise permitted by law. Except as expressly set forth in such license agreement or non-disclosure agreement, no part of this document or the software described in this document may be reproduced, stored in a retrieval system, or transmitted in any form or by any means, electronic, mechanical, or otherwise, without the prior written consent of NetIQ Corporation and Omnibond Systems, LLC.. Some companies, names, and data in this document are used for illustration purposes and may not represent real companies, individuals, or data.
This document could include technical inaccuracies or typographical errors. Changes are periodically made to the information herein. These changes may be incorporated in new editions of this document. NetIQ Corporation and Omnibond Systems, LLC. may make improvements in or changes to the software described in this document at any time.
U.S. Government Restricted Rights: If the software and documentation are being acquired by or on behalf of the U.S. Government or by a U.S. Government prime contractor or subcontractor (at any tier), in accordance with 48 C.F.R. 227.7202-4 (for Department of Defense (DOD) acquisitions) and 48 C.F.R. 2.101 and 12.212 (for non-DOD acquisitions), the government’s rights in the software and documentation, including its rights to use, modify, reproduce, release, perform, display or disclose the software or documentation, will be subject in all respects to the commercial license rights and restrictions provided in the license agreement.
© 2018 Omnibond Systems, LLC. All Rights Reserved. Licensed to NetIQ Corporation. Portions copyright © 2018 NetIQ Corporation. All Rights Reserved.
For information about NetIQ trademarks, see https://www.netiq.com/company/legal/.
NetIQ Trademarks
For NetIQ trademarks, see the NetIQ Trademark and Service Mark list.
Third-Party Materials
- All third-party trademarks are the property of their respective owners.