35.4 How OSP Works with Identity Manager

The identity applications provide authentication and single sign-on (SSO) through the One SSO Provider service (OSP). OSP authenticates a user or a service on behalf of identity applications. For OSP to function, you must install OSP included in the Identity Manager installation package. The identity applications set up a trust relationship with an OSP instance via shared secrets and a public or private key pair through TLS protocol.

After authenticating an entity, OSP sends an access token to the identity applications based on OAuth 2.0 protocol. The identity applications use the token to obtain the identity information about the authenticated entity. The identity applications then use the identity information to perform authorization to resources controlled by the identity applications.

The identity applications components interact with OSP through OAuth 2.0, where OSP acts as the OAuth 2.0 provider. Although OSP supports a variety of authentication mechanisms such as username/password, Kerberos and SAML, this chapter explains OSP configuration through OAuth 2.0.

OSP supported with OAuth 2.0 specification requires an LDAP authentication server. By default, Identity Manager uses Identity Vault as an authentication server. OSP can communicate with other types of authentication sources, or identity vaults, to handle the authentication requests. You can configure the type of authentication that you want OSP to use, such as user ID and password, Kerberos, or SAML. If you use Kerberos or SAML, OSP accepts authentication from the Kerberos ticket server or SAML Identity Provider (IDP) and then issues an OAuth 2.0 access token to the component where the user logged in. However, OSP does not support MIT-style Kerberos or SAP login tickets.

OSP APIs expose all OAuth functionalities as endpoints for obtaining access tokens. The identity applications expose these APIs. For example, OSP provides an HTTP endpoint that an application uses to validate a token and obtain the identity information associated with the token. OSP also provides an HTTP endpoint that allows an identity application to inform OSP that a user has requested to log out of the application.

35.4.1 OSP Concepts

This section describes the basic concepts of OSP.

OSP Configuration

The configuration template for OSP resides in the osp-conf.jar file. The template includes information from the following resources:

  • ism-configuration.properties file

  • User Application configuration locations including Identity Vault and the file system

Most of the OSP properties are configured by using the Configuration Update utility (configupdate.sh or configupdate.bat).

Access Tokens and Refresh Tokens

OAuth-defined authentication provides two types of tokens: access token and refresh token.

Access token is a bearer token. Any entity that obtains an access token may use the token. To keep away the chances of unauthorized access, the lifetime of an access token is typically very short.

Refresh token is used when possibility of token leakage is low. For example, when the token is held on a server than in a browser. A refresh token can be used to obtain an access token without requiring the user to re-enter the credentials. The lifetime of a refresh token is typically quite long.

Authentication Timeouts

The authentication process involves a number of different and related timeout values. The two most important timeout values are:

  • OAuth access token lifetime (default value is 60 seconds)

  • OSP session timeout (session time-to-live; default value is 45 minutes)

Each time an access token expires, the application requests a new access token from OSP. Each time a browser request is made to OSP, the session time-to-live token is reset. Therefore, as long as a user is using an application and the application is getting new access tokens, the user is not logged out.

A refresh token allows an application to obtain a new access token without user interaction. Refresh tokens are used by applications that can keep them secure. Therefore, refresh tokens have long lifetimes (default 30 days although effective lifetime is 48 hours due to revocation timeout). The identity applications use refresh tokens in the backend.

OSP automatically revokes a refresh token that was obtained through a browser-based request when an OSP session is logged out.

Applications that obtain refresh token through a backend request use the http[s]://<host>[:port]/osp/a/idm/auth/oauth2/revoke endpoint as described in RFC 7009. A refresh token obtained through OAuth 2.0 Resource Owner Password Grant (backend name/password method) must be manually revoked. If a refresh token is not revoked through session logout or through a backend request, then the token revocation information remains in the oidpInstanceData (osp.sch) attribute on the LDAP user object. When a user does not log out of the identity applications, OSP does not remove the login entry from the oidpInstanceData. If the user continues to log in without logging out, the size of the entry grows large and prevents OSP from updating the attribute and may cause a login failure for the user. For troubleshooting this issue, see Managing the Size of oidPInstancedata Attribute.

OSP Cookies

OSP uses the following types of cookies in the authentication process:

  • OSP Session Cookie: Records user information, such as user identifier and time-to-live. It is stored in temporary memory and not retained after the browser is closed. This type of cookie is removed when a user closes the web browser. Absence or expiry of this cookie means that the user is not authenticated. An OSP session cookie is represented as x-oidp-session<group of hex chars>.

  • OAuth2 Cookie: Records OAuth 2.0 state between redirects. The default settings of Microsoft browsers sometimes prevent the submission of OSP cookies to the OSP server that can be determined by using browser developer tools or the OSP log. An OAuth2 cookie is represented as x-oidp-oauth2-<group of hex chars>.

Browser Code for the OAuth 2.0 Interaction

The identity applications require JavaScript to implement interactions with OSP.

The open source project, Spiffy UI, provides an easy way to interact with OSP when using Google Web Toolkit (GWT). For detailed information, see the following resources:

  • http://www.spiffyui.org

  • https://github.com/spiffyui?tab=repositories

If using AngularJS, the following project may be helpful: https://github.com/Gromit-Soft

OSP URLs

OSP uses the following URLs in authentication:

  • grant

  • getattributes

  • logout

Examples used in the following sections assume a secured connection (HTTPS), where OSP is hosted on a server named authentication host with the default port 8443, and the tenant is named idm.

grant URL

Invoke this URL in a browser: https://authenticationhost:8443/osp/a/idm/auth/oauth2/grant

This is the OAuth 2.0 Authorization endpoint defined by Section 3.1 of RFC 6749.

An implicit grant request can look similar to this:

https://authenticationhost:8443/osp/a/idm/auth/oauth2/grant?response_type=token&redirect_uri=http://applicationhost:8180/landing/com.netiq.ualanding.index/oauth.html&client_id=ualanding&state=spiffystate0.5457210745662451

The allowable HTTP methods and parameters are as defined in Section 4 of RFC 6749.

getattributes URL

Invoke this URL in a browser: https:// authenticationhost:8443/osp/a/idm/auth/oauth2/getattributes

This is the OAuth 2.0 Token endpoint defined by Section 3.2 of RFC 6749. The identity applications issue this token to obtain identity information about the entity for which an access token was created. The identity information is presented in the form of attributes (name-value pairs).

A token validation request from a web page can look similar to this:

https://authenticationhost:8443/osp/a/idm/auth/oauth2/getattributes?attributes=name+expiration&access_token=eHwA[...etc.]&callback=jQuery20305550091890618205_1463435676921&_=1463435676922

The desired attributes are specified by a space-separated list of attribute names using the “attributes” query item. The available attributes and their names are primarily defined by the tenant's authentication configuration in authcfg.xml. There are also several pre-defined attributes related to token management.

logout URL

Invoke this URL in a browser: https://authenticationhost:8443/osp/a/idm/auth/app/logout

This is an OSP-specific endpoint that identity applications use to inform OSP that a user has requested a logout and that OSP must invalidate the OSP session information from the encrypted browser cookie. Typically this endpoint is invoked when a user selects Logout link on the identity application's web page.

35.4.2 Understanding How OSP Works with Identity Manager

When using OAuth 2.0, the Identity Manager communication with OSP primarily consists of the following actions:

  1. Obtain an access token in the client browser.

  2. Validate the access token when the client browser submits it to the identity applications server.

The following figure illustrates the components and process flow involved in basic authentication:

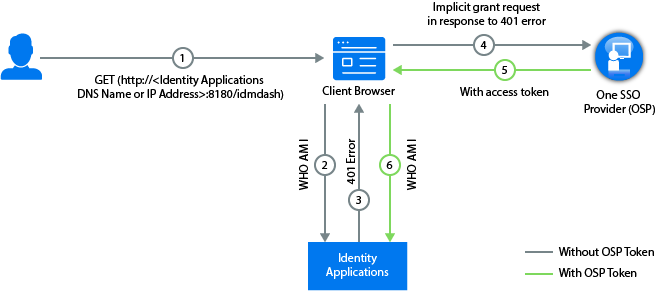
  1. A user navigates to the identity application's home page.

  2. The browser loads the identity application home page.

  3. The application web page makes an HTTP request to the identity applications server endpoint.

    Note that the application has not yet obtained an authentication token. Therefore, it does not have any authentication information in the request and the identity applications server returns an HTTP 401 status (unauthorized).

  4. The identity applications web page recognizes that 401 status means that the web page must obtain a valid authentication token. The web page directs the client browser to OSP grant endpoint for an implicit grant request. In the implicit flow, OSP issues the client browser an access token instead of an authorization code. For more information about implicit grant type, see Section 4.2 of RFC 6749.

    At this point, no authentication information exists because the OSP session cookie is either not present or, if present, indicates that the browser session is unauthenticated. Therefore, OSP presents a login web page.

  5. The user enters authentication credentials (typically user name and password) on the OSP page and selects Next.

    OSP looks up the user in the Identity Vault and validates the user-entered password. You can also configure OSP for one or more additional authentication factors.

  6. After the user is authenticated using the provided credentials, OSP creates an access token and redirects the browser to a redirect URI that the web application has provided. The access token and other data defined by OAuth 2.0 is appended to the redirect URI as a URI fragment. In addition, OSP returns its secure, encrypted session cookie to the browser.

  7. The browser loads Identity Applications web page indicated by the redirect URI. Identity Applications then extracts the access token from the URI fragment and validates the state information contained in the fragment.

    NOTE:The redirection endpoint URI must be an absolute URI as defined by Section 4.3 of RFC3986. The endpoint URI may include an application/x-www-form-urlencoded formatted query component according to Section 3.4 of RFC3986, which must be retained when adding additional query parameters. The endpoint URI must not include a fragment component. For more information, see sections 4.2.1 and 4.2.2 of RFC 6759.

  8. The identity applications inject the access token in the HTTP Authorization header (typically using the Bearer authentication type) and request the identity applications server for validating the token.

  9. The identity applications server contacts OSP via a back-channel HTTP request to validate the supplied token and to obtain identity information associated with the token. The identity applications server then responds to the HTTP request appropriately.

  10. If the token is validated, the identity applications web pages allow the user to perform the tasks the user is allowed to do. When additional HTTP requests are made to the identity applications server, the access token is supplied as part of the request in an HTTP authorization header.

  11. The access token in use is set to expire within the default expiration time interval of two minutes. If the identity applications server attempts to validate an access token after the token has expired, OSP informs the identity applications server that the token is no longer valid. The identity applications server then responds with an HTTP 401 status. The web application page again directs the client browser to OSP to request an access token.

  12. OSP determines (via OSP's secure session cookie) that the user is still authorized (the session has not timed-out due to inactivity and has not been explicitly logged out) and redirects the user back to the web application page with an access token without asking the user for re-entering the credentials.

To understand the authentication process through REST endpoints, see OSP Login Request Example by Using REST Endpoints

35.4.3 Guidelines for Enabling OSP Logging

The OSP log level is controlled by com.netiq.idm.osp.tenant.logging.level property typically set in the setenv.sh file in Tomcat’s bin directory. For example, /opt/netiq/idm/apps/tomcat/bin/setenv.sh on Linux. The setenv.sh file has the below entry at the end of the file.

JAVA_OPTS="-Xms1024m -Xmx1024m -XX:MaxPermSize=512m "
export JAVA_OPTS
export CATALINA_OPTS="-Dcom.netiq.ism.config=/opt/netiq/idm/apps/tomcat/conf/ism-configuration.properties -Dcom.netiq.osp.ext-context-file=/opt/netiq/idm/apps/osp_sspr/osp/osp-conf.jar -Dcom.netiq.idm.osp.logging.level=INFO -Dcom.netiq.idm.osp.client.host=myserver.acme.com -Dcom.netiq.idm.osp.tenant.logging.naudit.enabled=false -Dcom.netiq.idm.osp.logging.file.dir=${CATALINA_BASE}/logs -Djava.awt.headless=true -Dfile.encoding=UTF-8 -Dsun.jnu.encoding=UTF-8 -Djavax.xml.transform.TransformerFactory=org.apache.xalan.processor.TransformerFactoryImpl -Didmuserapp.logging.config.dir=/opt/netiq/idm/apps/tomcat/conf/ -Dextend.local.config.dir=/opt/netiq/idm/apps/tomcat/conf/"

The property, -Dcom.netiq.idm.osp.logging.level=ALL, controls the amount of information that OSP logs. The Apache Foundation defines the following trace levels for log4j:

  • OFF

  • FATAL

  • ERROR

  • WARN

  • INFO

  • DEBUG

  • TRACE

  • ALL

By default, OSP logging is set to INFO. You can set other levels depending on what you are troubleshooting. After setting the log level, restart Identity Applications. For example, restart Tomcat by performing the following command:

systemctl restart netiq-tomcat.service

Before enabling logging, NetIQ recommends to review the following guidelines:

  • Use ALL to troubleshoot if OSP is able to find the certificate that you included. This level names every single certificate in the known keystores it uses. This information can be useful because JVM has 90 or more certificates. In general, set the log level to ALL to debug or troubleshoot common issues. To generate additional messages, set com.netiq.idm.osp.debug property to true either as a Java system property in setenv.sh or ism-configuration.properties file.

  • File logging is enabled by default. OSP creates files name as osp-idm-<date of log generation>.log file in the Tomcat directory. For example, /opt/netiq/idm/apps/tomcat/logs/. File logging records the actions that have occurred. For example, you can configure logging to list every request made to OSP. This can help you get a good idea of how often visitors are coming and how they navigate the application pages. The content logged to file logging can be controlled by specifying logger levels.

  • When you enable console logging, OSP generates log messages in the catalina.out file located in the logs directory under Tomcat’s root directory. For example, /opt/netiq/idm/apps/tomcat/logs/catalina.out. NetIQ recommends you to use file logging on Windows.

  • OSP can handle thousands of requests per second. If transaction volume is high and each log entry consumes a few hundred bytes, OSP can fill up the available disk space in a matter of minutes. Logging also increases system overhead, which causes some degradation in system performance. Therefore, refrain from using console logging in a production environment because there is no default way to limit the size of the catalina.out file. For production use, the logging level should be set to WARNING or less. More verbose logging levels result in much more log data which requires both CPU resources to generate the log messages and disk resources to store the log messages.