15.3 Deploying a Driver Set to an Identity Vault
Suppose that you finish a new driver set that you want to deploy into a test tree, or suppose that you have imported a driver set, made modifications, and now you want to deploy the driver set back into its working tree. Use the following procedure to deploy an Identity Manager Driver Set object (and all contained Identity Manager drivers) into an existing Identity Manager system in an eDirectory tree:
-
Right-click the Driver Set icon in the Modeler view, then click .
You can also deploy the Driver Set from the Outline view by right-clicking the Driver Set object, then selecting .
The Identity Vault Credentials window displays if Designer can’t authenticate to the eDirectory tree specified in the Identity Vault, or if you do not have the Deployment DN designated in the tab of the Identity Vault where you are deploying.
-
Use the Compare feature to see differences between the objects you are deploying and those that already reside in an eDirectory tree.
-
In the Deployment Summary window, click .
-
Click to close the Information window.
-
(Conditional.) If you see other informational messages, decide what action to take.
You might also see a message in the Deployment Results window stating that the deployment was unsuccessful. Click the error messages in the Operation Results portion of the window to see the error descriptions and possible reasons in the Details portion.
-
(Conditional) If this is a new deployment, the Deploy - New Driver Settings window displays. Define security equivalences on the driver set and identify all objects that represent Administrative roles and exclude them from being replicated.
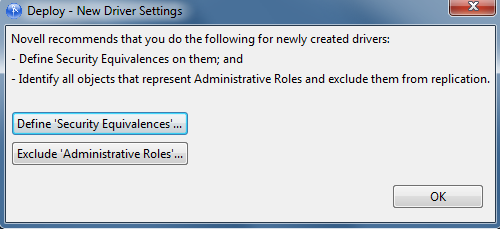
In both instances, NetIQ recommends that you select the Admin object, and any other objects that qualify in your network environment.
-
Click .