2.2 Configuring Google Authentication
All the Google services used by the G Suite Driver are authorized using OAuth2 via a Service Account Flow. In order to use a Service Account credential, you must have an administrative user account available.
NOTE:Google frequently updates the user interfaces of their web consoles. Your screens may differ from the ones shown in this guide.
The following sections provide information about configuring Google authentication:
2.2.1 Creating a G Suite Administrative Account
In order to be able to configure OAuth2 and properly authorize a Service Account credential, a G Suite domain account with Super Admin access will be required. It is a recommended best practice to create and dedicate an account specifically for use by the driver. This allows for tighter controls and better auditing of domain events.
To create a new admin in the G Suite Domain:
-
Create a new admin user in the Google Admin Dashboard at https://admin.google.com
-
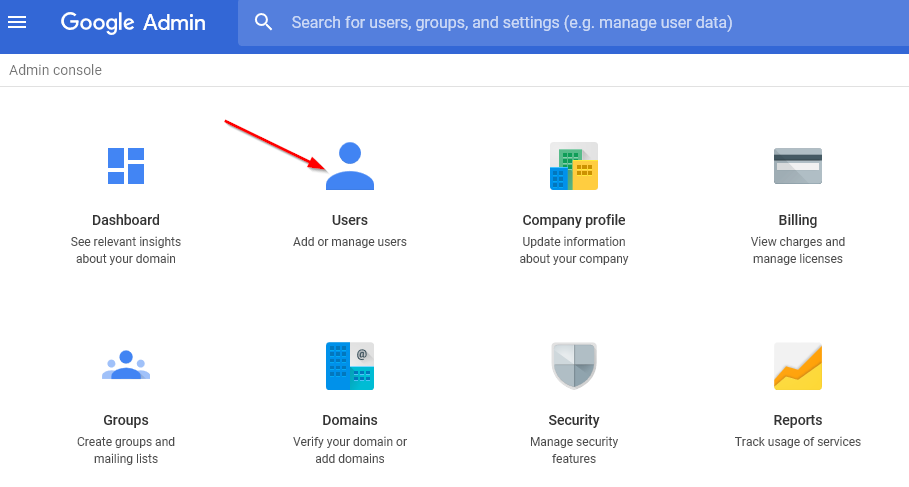
Click on the Users icon.
Figure 2-1 Starting the Administrative Account Creation Process
-
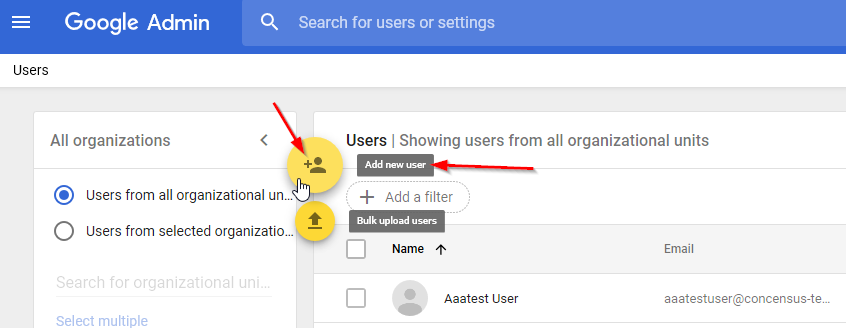
Add a new user.
Figure 2-2 Adding a New User
-
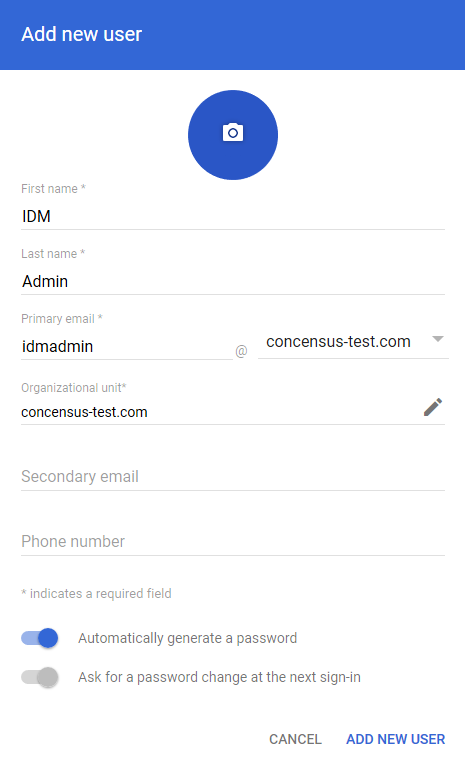
Specify an account that you can memorize and indicative of its role and purpose. Set or generate a password.
Figure 2-3 Naming the User and Creating a Password
-
Make the new user a super admin.
Figure 2-4 Adding Administrative Roles to the User Account
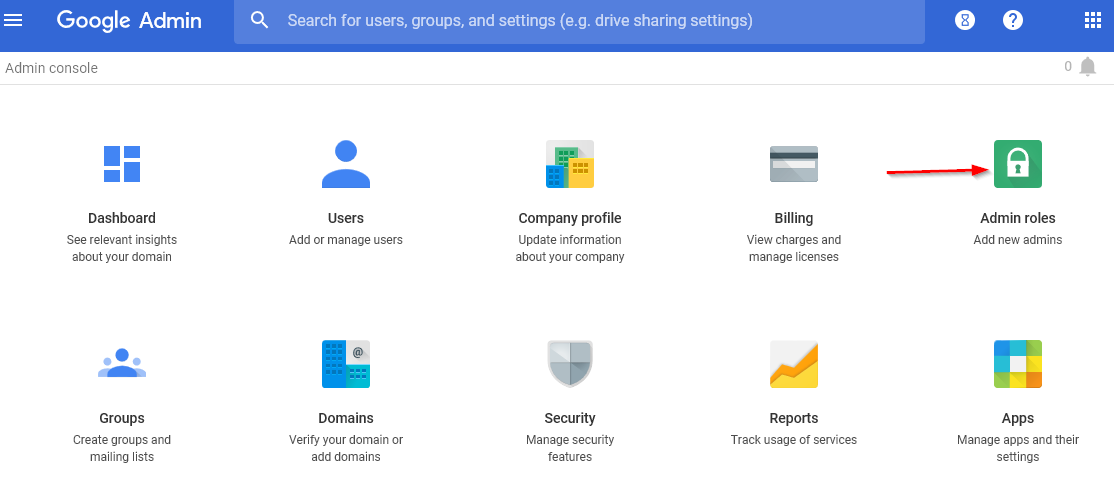
Figure 2-5 Selecting Super Admin Role
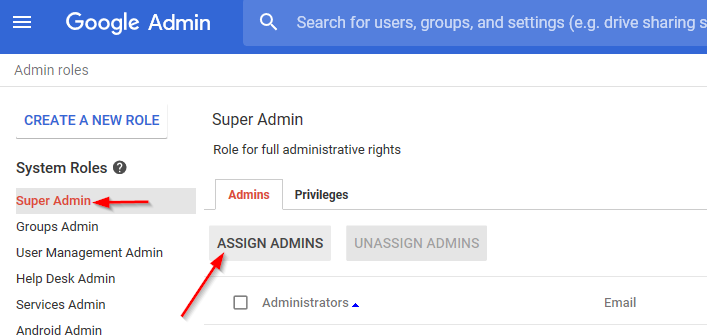
Figure 2-6 Confirming the Super Admin Role Assignment

-
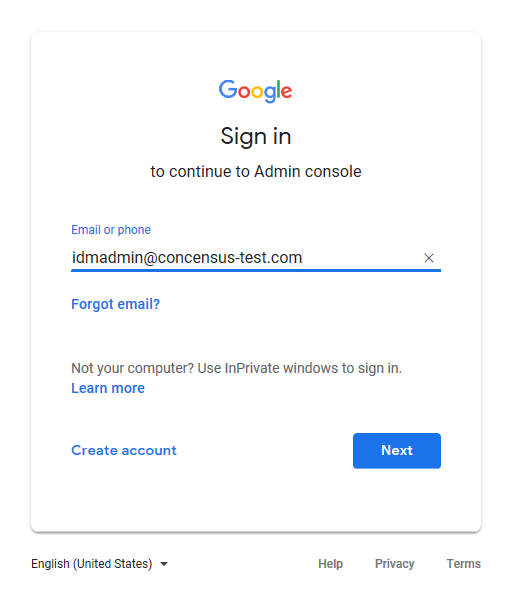
Log into the G Suite Admin Console with the new admin user to confirm proper set up.
Figure 2-7 Logging in to Verify Account Setup
-
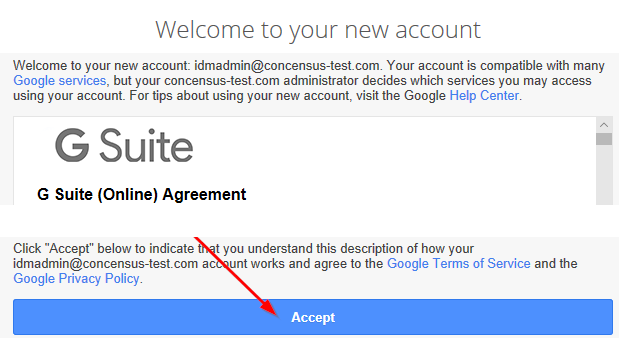
Accept the terms and conditions. The account will not work until this step is completed.
Figure 2-8 Accepting Terms and Conditions
-
It is recommended to set up a recovery phone number and/or email address for this new admin account.
NOTE:It is necessary to log in to the admin console with the new admin user via a web browser at least once to fully activate the account. Until that step is done, the driver will not function.
2.2.2 Enabling the G Suite API Access
The driver will provision users, groups, organizations, and shared contacts into G Suite. It is necessary to enable API Access in your G Suite domain before the driver can perform its work.
To enable API Access in G Suite:
-
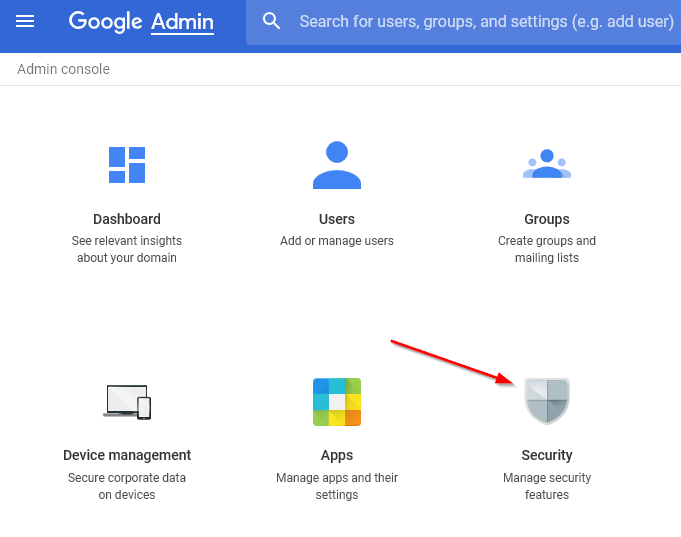
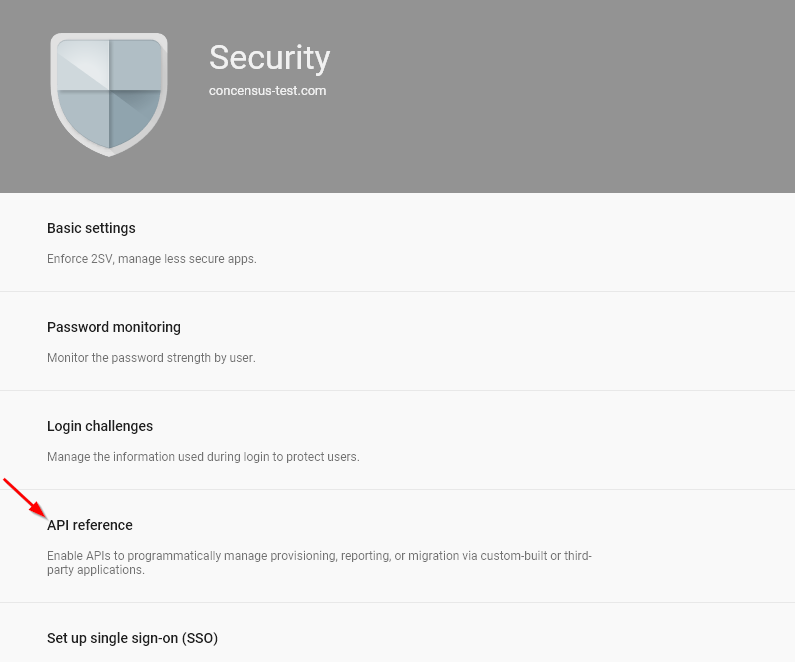
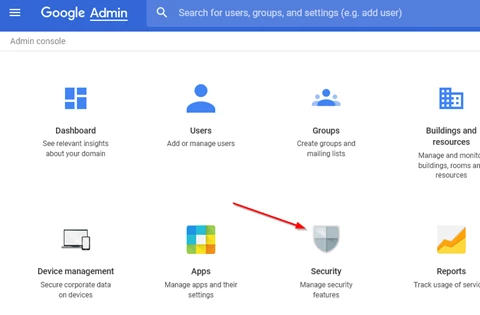
Using a web browser, log into the G Suite Admin Console. From the Dashboard select “Security.”
Figure 2-9 Starting Configuration of G Suite API Access
-
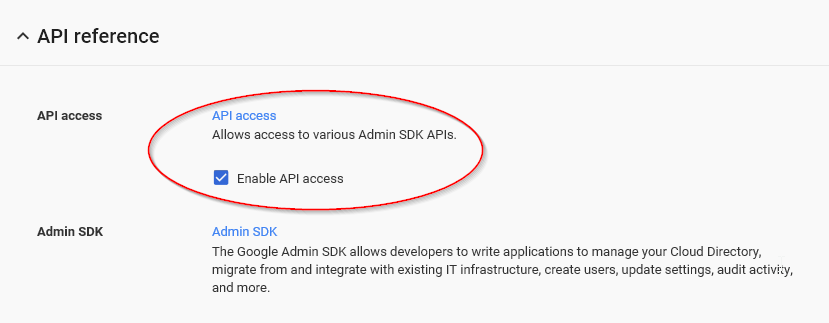
From the Security management page, select “API Reference.”
Figure 2-10 Working with the API Reference Setting
-
Check the box labeled “Enable API Access.”
Figure 2-11 Enabling the API Access
2.2.3 Configuring API and Service Account
NOTE:Google frequently updates the user interfaces of their web consoles. Your screens may differ from the ones shown in this guide.
The next step is to set up a developer project in the developer console. After creating the developer project, it is a recommended best practice to add additional administrators/owners of the project beyond the G Suite Driver account created earlier. This can prevent losing access to the project should changes be needed in the future.
Create Developer Project
-
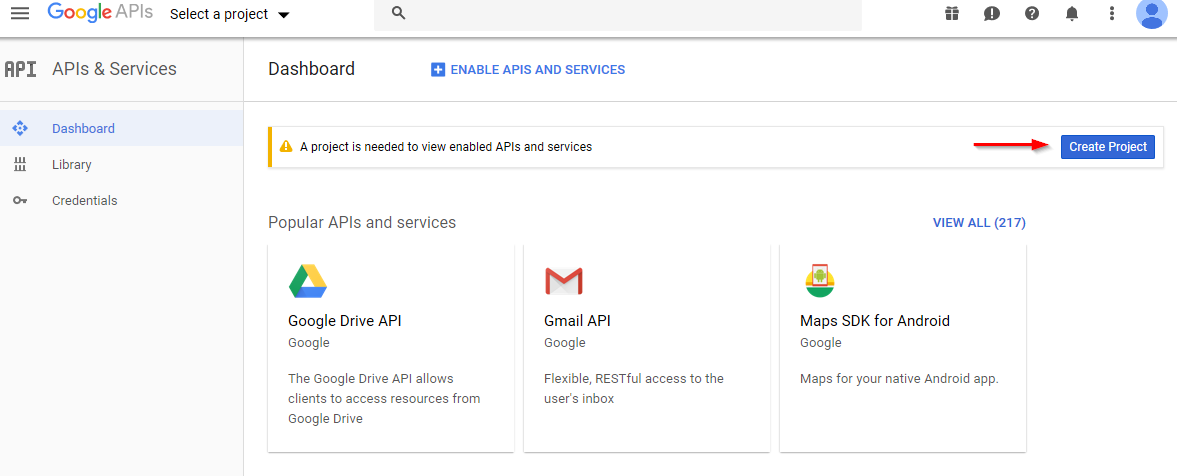
Go to the Google developers console at https://console.developers.google.com. If possible, using a new tab on your browser is recommended. You should be logged in with the same admin account created earlier. Agree to the terms of service, if needed.
Figure 2-12 Creating a New Developer Project
-
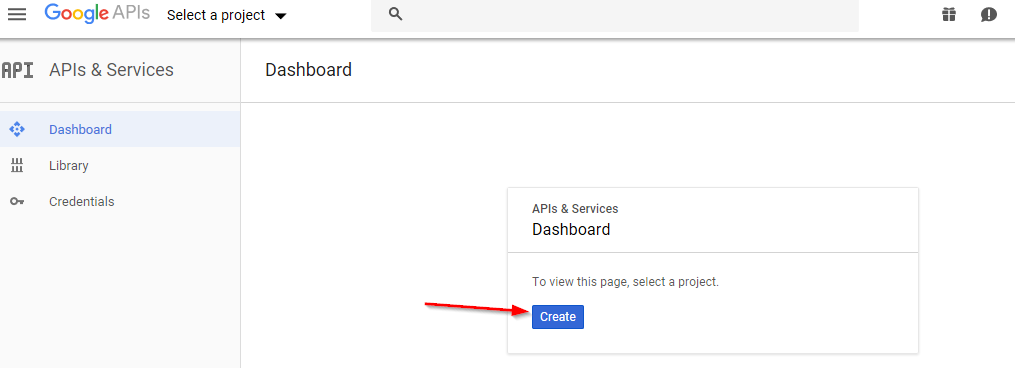
Create a new project within the developer’s console.
Figure 2-13 Working with the Project Creation Process
-
Fill in the Project Name field. The Project ID field is generated by Google.
Figure 2-14 Naming the Project
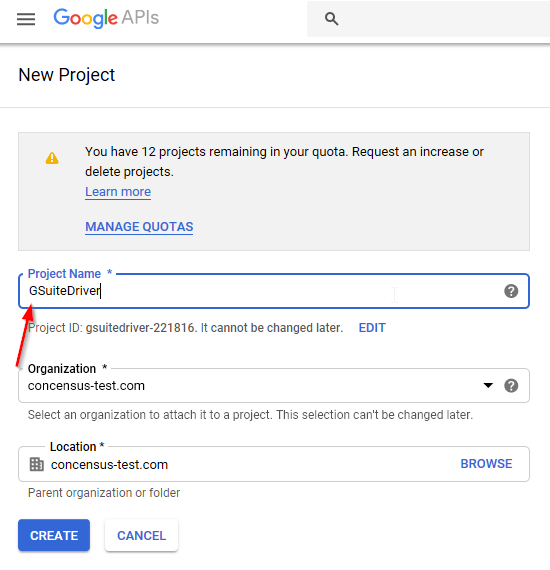
-
Click “Create.” The new project may take 1 to 2 minutes to create.
Once the new project is created, there are several steps which must be performed:
-
Enable the relevant APIs
-
Create an OAuth ClientID
-
Create a service account
Enable Admin SDK API
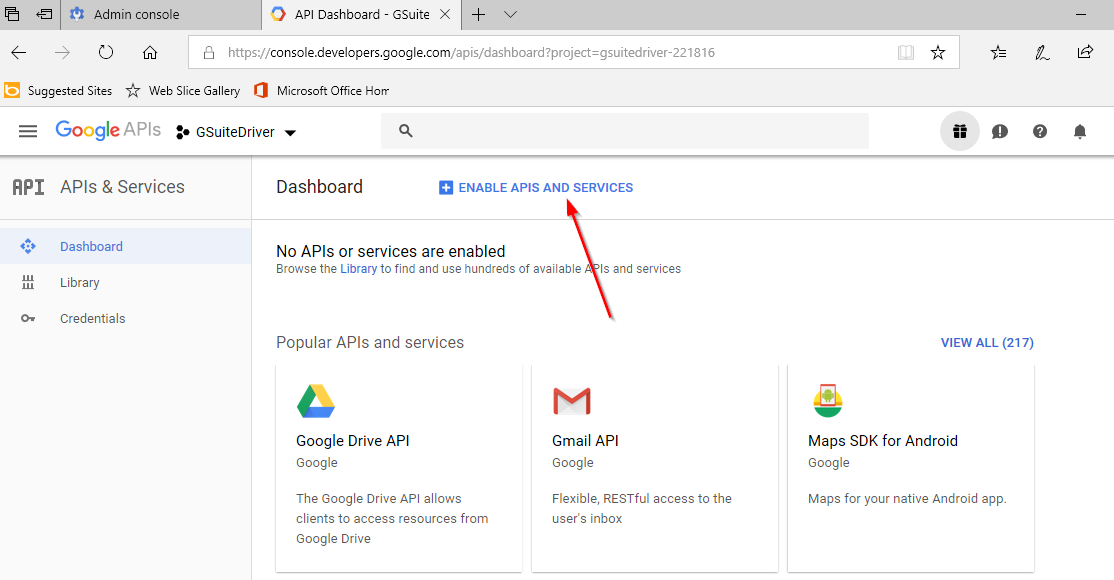
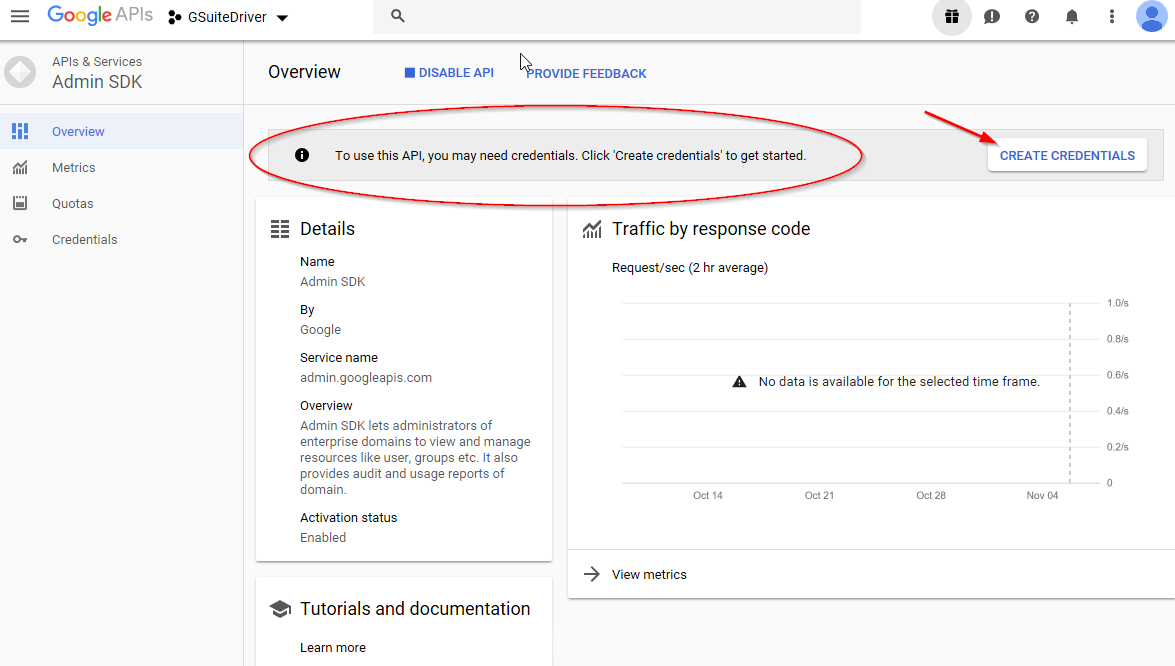
Once the project is created, from the developer's console, proceed to enable the Admin SDK API. The Admin SDK exposes the majority of the necessary API endpoints that the driver needs. When this API is enabled, we will be given an opportunity to create the needed credentials for the connector.
From the project created in the previous step:
-
Select "Enable APIs and Services."
Figure 2-15 Enabling APIs and Services for the Project
-
Scroll to the G Suite APIs; select View All, if needed.
Figure 2-16 Displaying the G Suite APIs

-
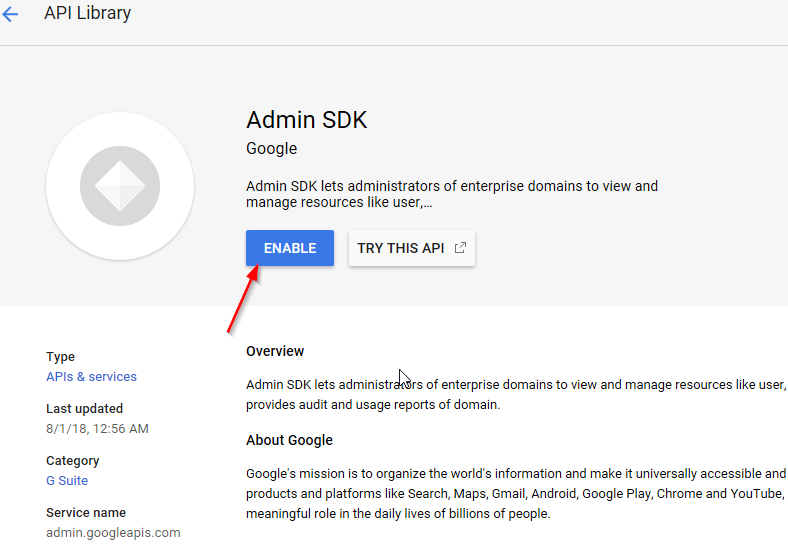
Select and Enable the Admin SDK. The interface will prompt you to create credentials, which will be needed for the driver to connect to Google's servers.
Figure 2-17 Select the Admin SDK
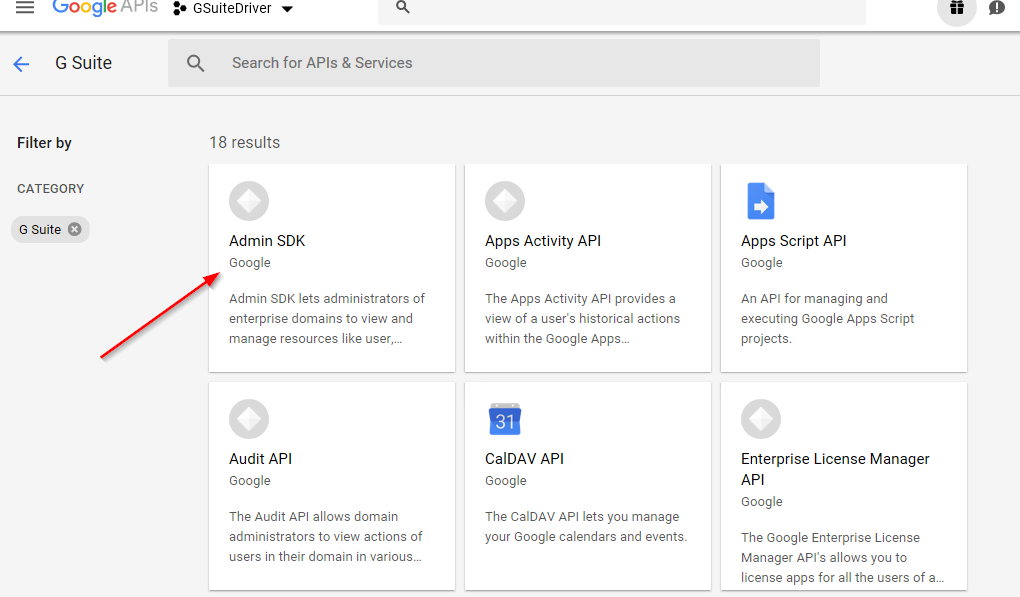
Figure 2-18 Enable the Admin SDK
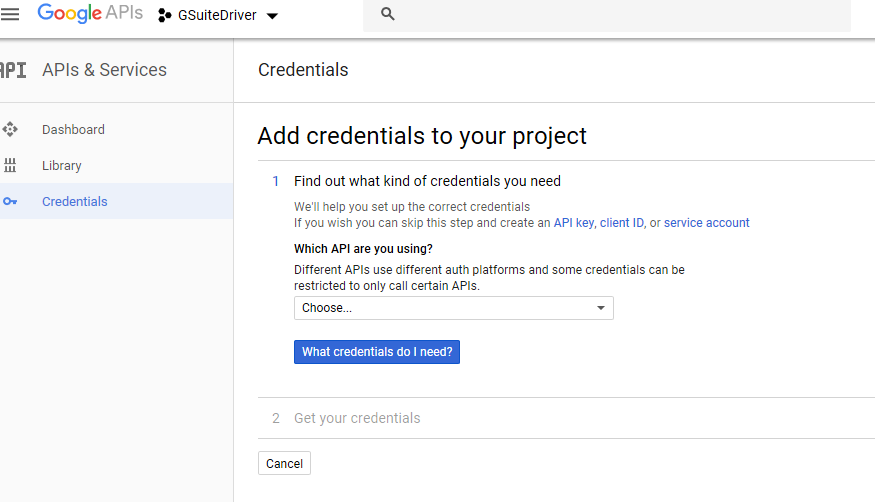
Create Service Account Credentials
From the "create credentials" prompt in the Admin SDK panel, continue to create the necessary credentials for the driver to authenticate and obtain authorization to the G Suite domain.
-
Select “Create Credentials.”
Figure 2-19 Starting the Credential Creation Process
-
The G Suite driver uses the “service account” credential type. Select “service account,” skipping the wizard.
Figure 2-20 Selecting an API for Credentials
-
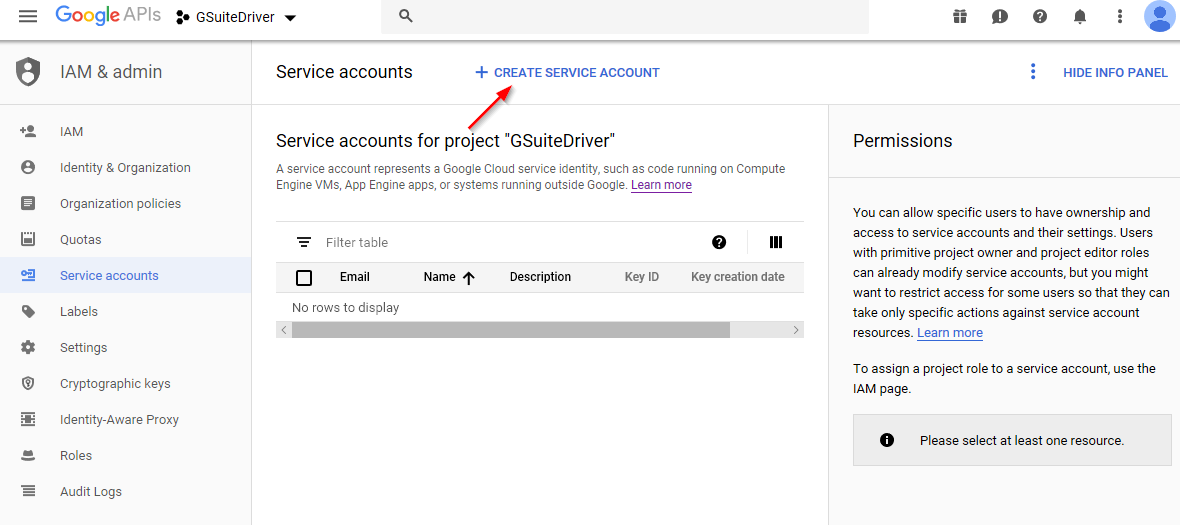
Click “Create Service Account.”
Figure 2-21 Select Create Service Account to Continue
-
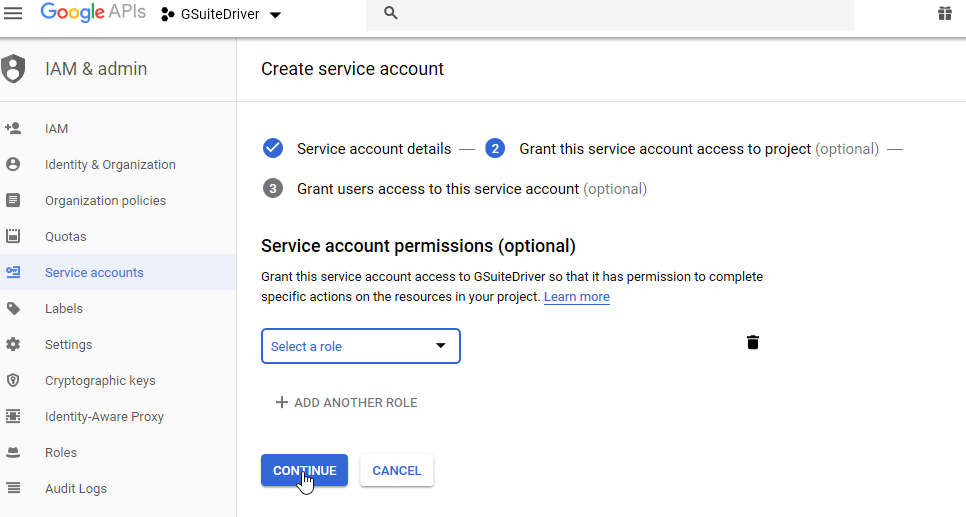
Give the account a relevant name and description.
Figure 2-22 Provide an Account Name

-
Do NOT assign a role or permissions to the service account. Simply continue from the screen above.
Figure 2-23 Continue Without Assigning Role or Permissions
-
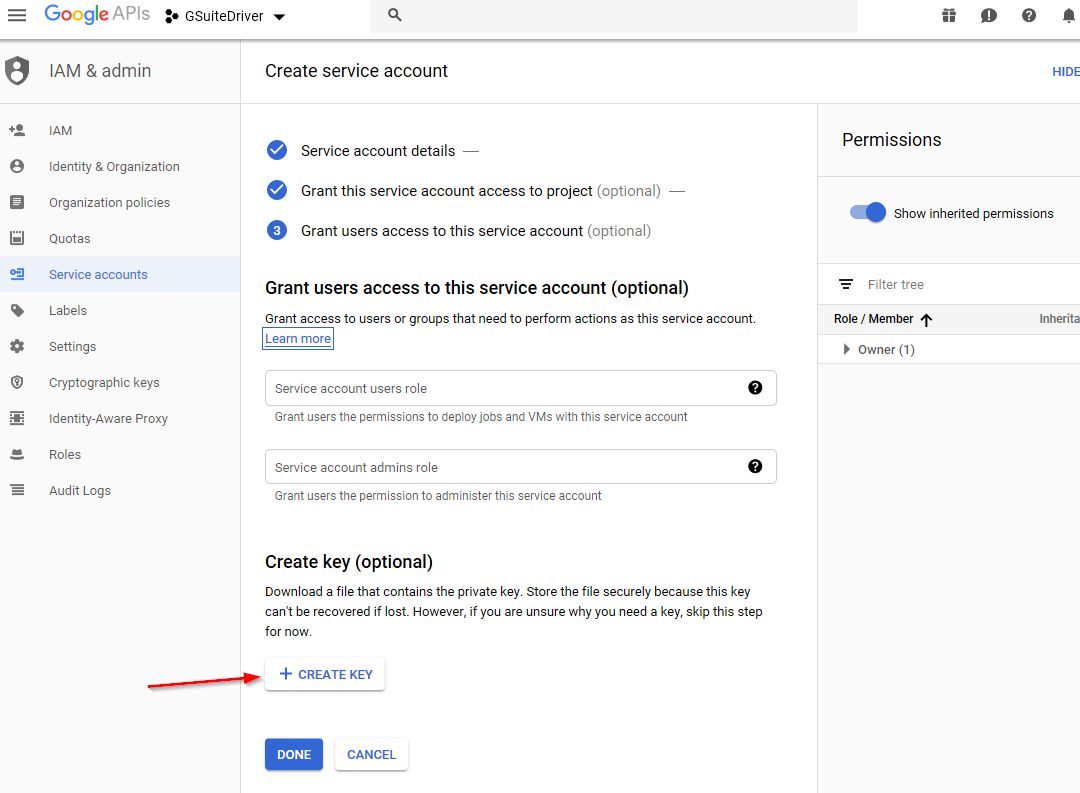
There is no need to grant access to the service account. The driver uses a private key as the login credential, so it is necessary to create a key from this screen. Select "Create Key." This key is required for the driver to function.
Figure 2-24 Starting the Creation of the Private Key
-
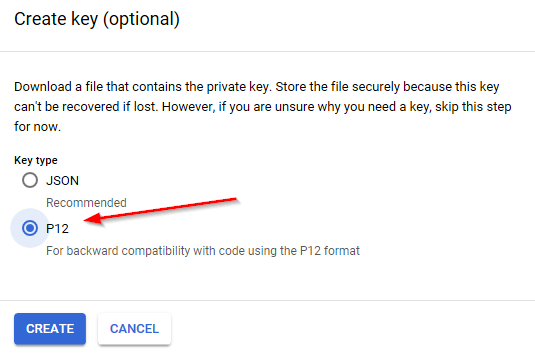
Save the key in the P12 format. The key will download and be saved on your workstation. This is your ONLY copy of this key. The key cannot be redownloaded from the developer's console. If lost, a new key will need to be created for this service account. A new key can be recreated from the credential in the developer's console project, if needed. The P12 key file is the equivalent of the service account’s password and should be treated accordingly.
Figure 2-25 Select P12 Format for the Private Key
-
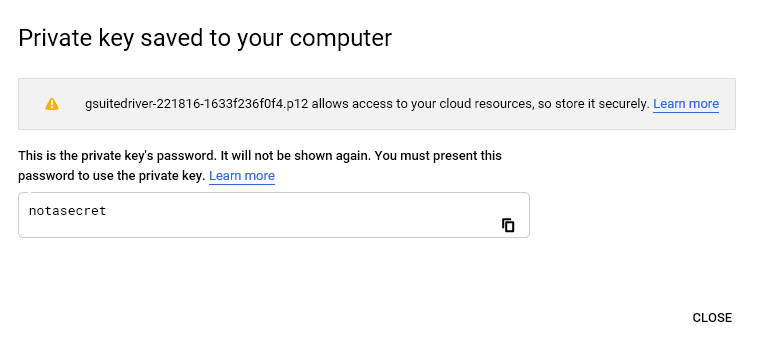
The key will need to be copied to the hosting machine which is running the driver.
Figure 2-26 Private Key Saved Locally
-
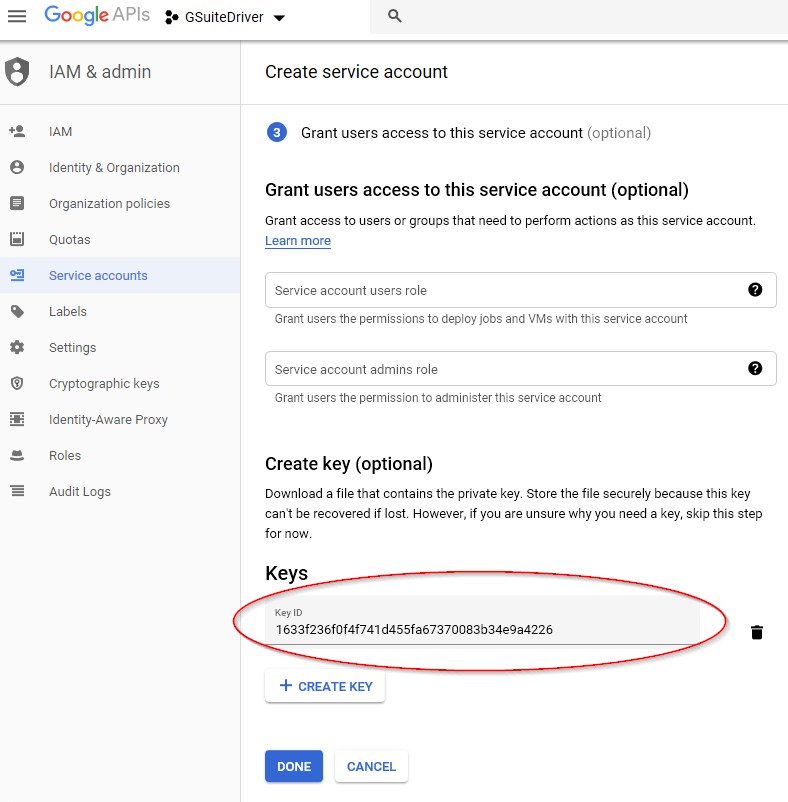
Click done.
Locate the P12 file and upload it to your Identity Manager server in a location accessible from the driver. /opt/novell/eDirectory/lib/dirxml/classes is a recommended location for Linux hosts. Generally, a good location is the same location as the gmailshim.jar file. If the driver is on a remote loader, then it needs to go with the gmailshim.jar file in the remote loader location.
NOTE:The location and filename of the key file is a necessary configuration parameter for the driver.
Figure 2-27 Completing the Private Key Creation
-
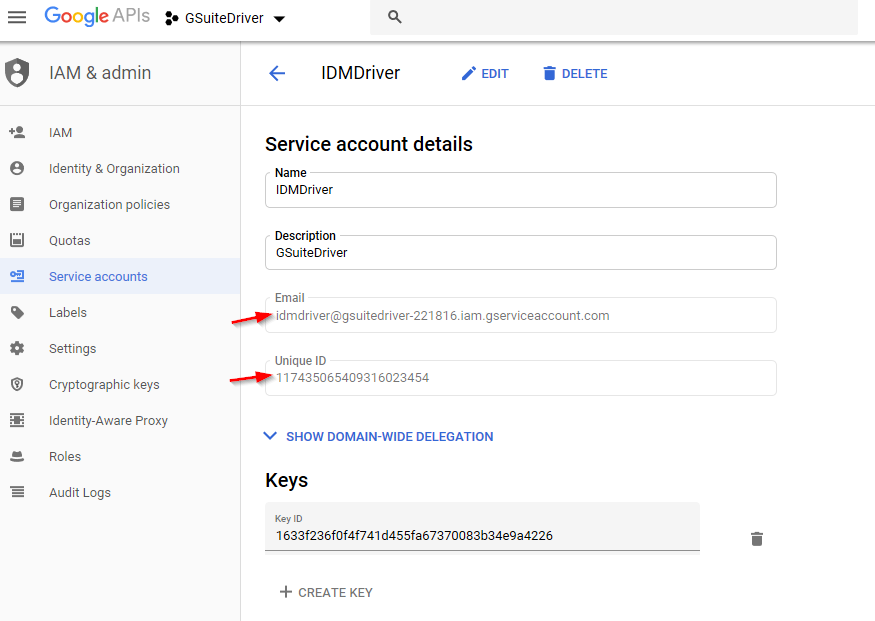
IMPORTANT: On the service account details screen below, copy and paste the Email and Unique ID values into a text file for later use. The required data is highlighted below. These two values will be used to authorize the service account to access your domain via the various APIs used by the driver.
NOTE:Copy the Unique ID and service account email address to a text file. They will be necessary for authorizing the service account and configuring the connector.
Figure 2-28 Record Email and Unique ID Values in a Text File for Later Reference
Managing Credentials and Keys
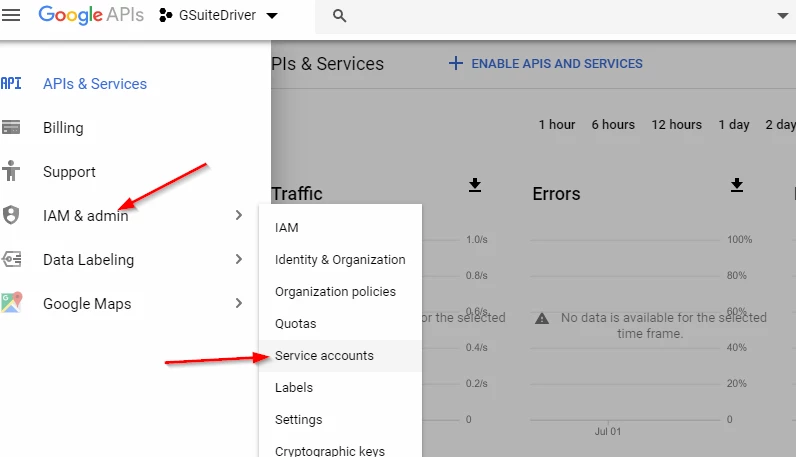
If you need to create or manage credentials after the fact, they can be accessed from the developer's console, in the project you created earlier. In the console, with your project selected, pull down the menu to IAM & admin and select service accounts as shown below.
Figure 2-29 Managing Credentials and Keys After the Fact
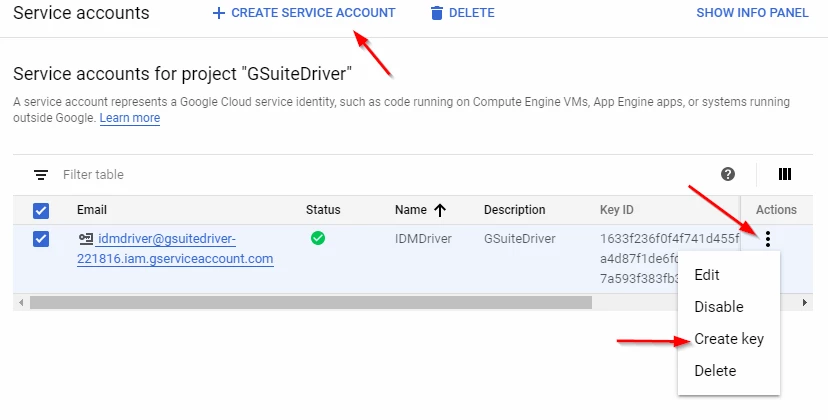
From there, you can either create a new service account, manage your existing service account, or create new keys, as shown below.
Figure 2-30 Options for Managing Accounts and Keys
For more information, see the Google's developer console help system accessible from the question mark icon at the top right of the page for more information.
Enable Remaining APIs
The Admin SDK API is not sufficient alone for the connector to function. It is necessary to enable these additional APIs:
-
Group Settings
-
Contacts
-
Gmail
Follow these steps:
-
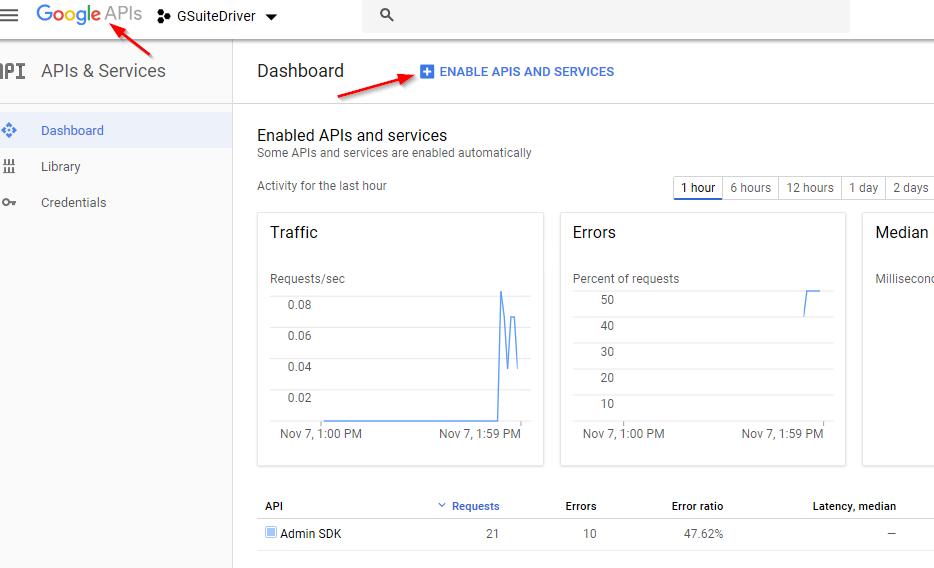
From the developer console dashboard, click the GoogleAPIs banner to easily reach this point.
Figure 2-31 Start of Process to Enable Remaining APIs
-
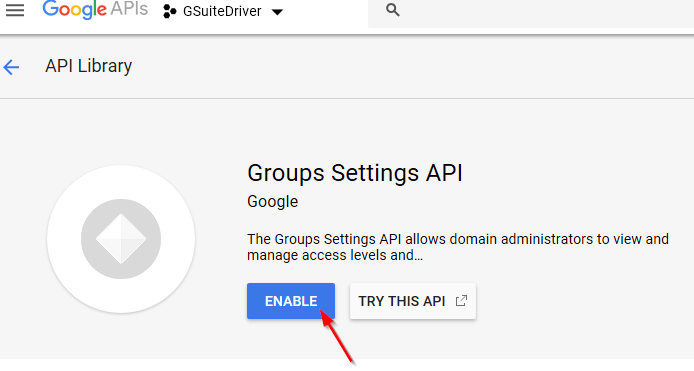
Select Enable APIs. From the API Library, search for and enable the Group Settings, Contacts, and Gmail APIs.
Figure 2-32 Selecting the Group Settings API
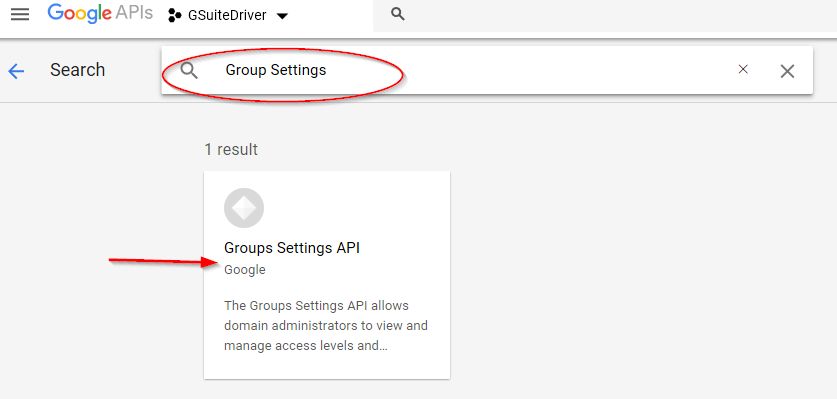
Figure 2-33 Enabling the Group Settings API
-
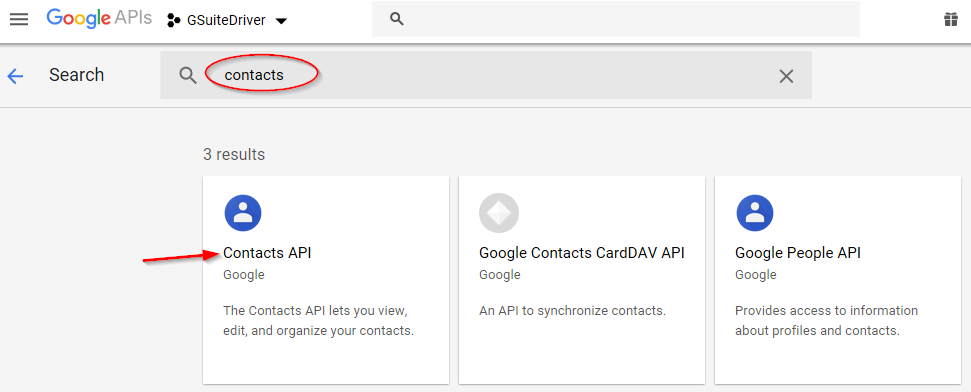
Return to the Enable APIs screen and search for “Contacts.” Enable the Contacts API.
Figure 2-34 Finding the Contacts API
-
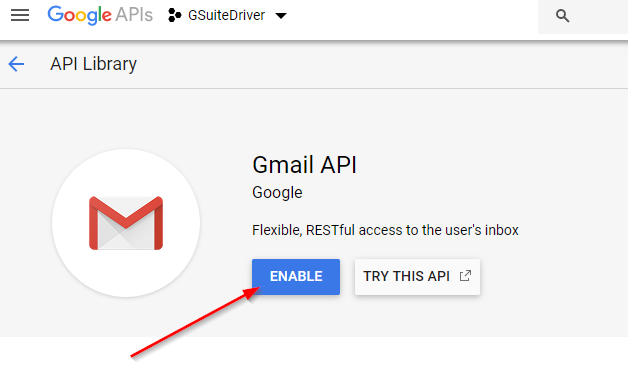
Finally search for and enable the Gmail API.
Figure 2-35 Enabling the Gmail API
Authorizing Service Account
The service account provides the driver with the ability to authenticate to the G Suite domain. It is necessary to grant that account permission to access your G Suite domain via the API service scope endpoints. For more information, see the Directory API: Authorize Requests document available from Google.
NOTE:You will need the Unique ID of the service account which was created earlier. You will also need the API scope list provided with the driver. The scope list can be found in a text file called DirectoryScopes.txt. The scope list is a list of authorized scopes, which take the form of URLs, in a comma separated list, all in one line. The authorized scope list can also be found in Appendix E – Directory Scopes. Use the most recent scope list as it may be updated in the future.
-
From the G Suite Admin Console, select the Security icon.
Figure 2-36 Beginning Service Account Authorization
-
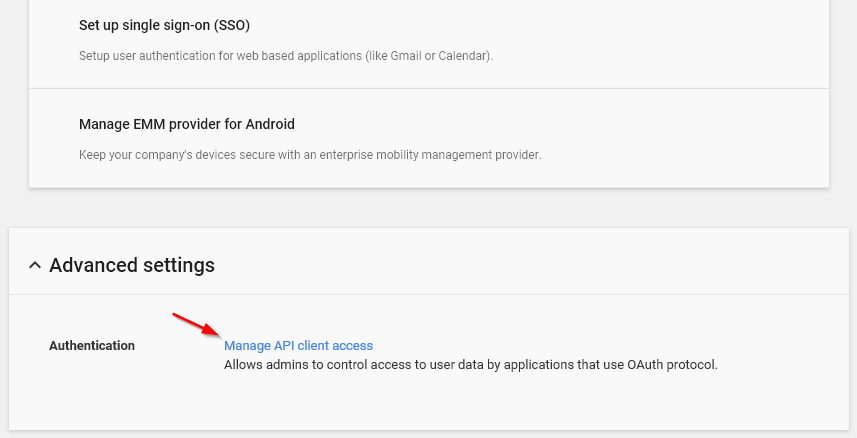
Scroll down and select “Advanced Settings.”
Figure 2-37 Scroll to and Select Advanced Settings
-
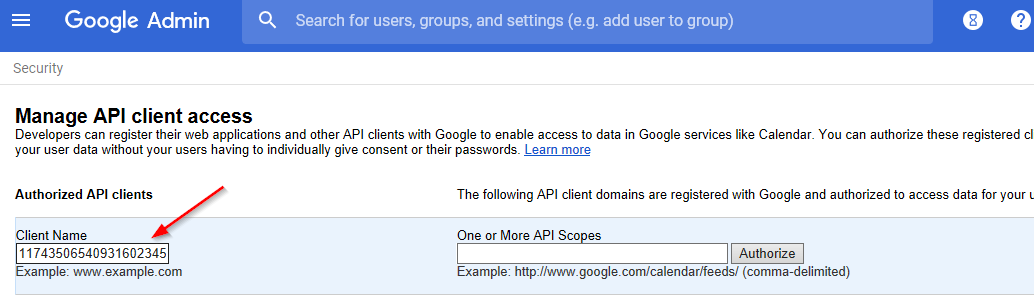
Select “Manage API client access.” Copy and paste the Unique ID of the service account into the "Client Name" field.
Figure 2-38 Entering the Client Name for the Authorized API Clients
-
Copy and paste the contents of the DirectoryScopes.txt file (included with the driver download or in Appendix E – Directory Scopes) into the "One or More API Scopes" field. Note that the content should be plain text, so copy from a text file not from a web page to avoid any metadata.
Click Authorize.
Figure 2-39 Entering the API Scope and Authorizing the API Client Access
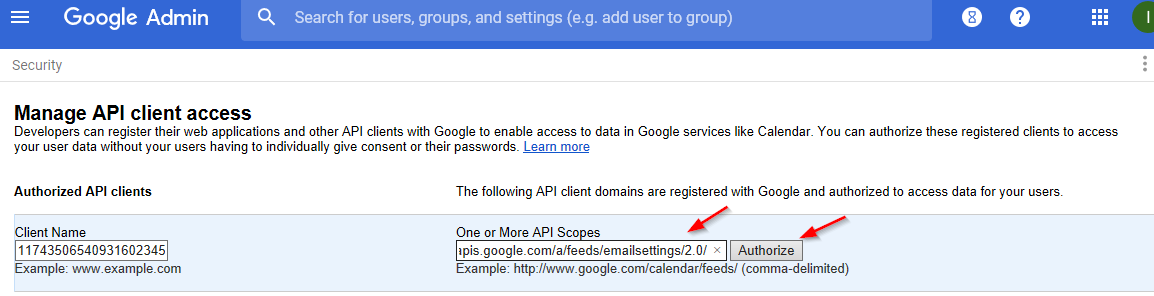
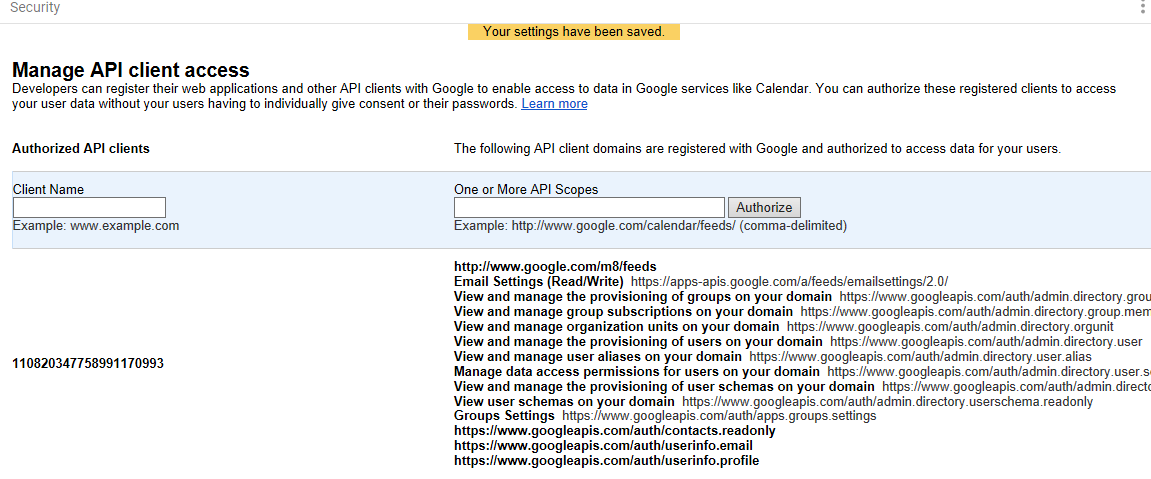
If this step was successful, the entry will appear in the authorized list similar to the image below:
Figure 2-40 Example of Successful API Client Access Authorization
If, for any reason, this does not work or you need to change the authorized scopes, delete the authorization entry and create it again with the correct information.
Configuring Driver Authentication
This section shows what information needs to be set in the Identity Manager driver properties to use the service account. If you have not yet imported the driver configuration into Designer or iManager, then complete those steps first before attempting to set the service account information.
You will need the following information to configure the authentication settings:
-
Admin account email address and password for the G Suite domain
-
This is the one created first in this guide
-
Do not use your only admin account. Create one for the driver to use.
-
-
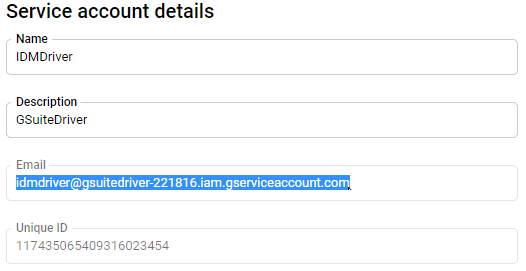
Service account Email Address
-
This should have been copied when the service account was created.
-
It can be found in the developer's console under service account details, as shown below:
Figure 2-41 Locating the Service Account Email Address
-
-
Full path and file name of the P12 key file on the Identity Manager server
-
This file was created as part of the credential process earlier in this guide
-
The file MUST be uploaded to the Identity Manager server where the Google driver is running.
-
It is recommended that the file be placed in the same location as the gmailshim.jar file.
-
On a Linux host, this location might be:
/opt/novell/eDirectory/lib/dirxml/classes/KEYFILENAME.p12
-
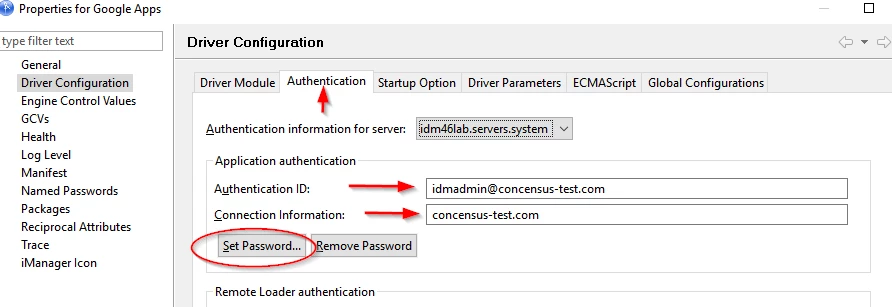
In Identity Manager Designer or iManager, edit the G Suite driver properties.
On the "Authentication" tab, set the following:
-
Authentication ID
-
The email address of the admin account
-
-
Connection Information
-
The domain name of this Google domain
-
-
Set Password
-
Set the password to the password of the admin account
-
The admin account is the actual identity used by the driver to effect changes in the domain. Once authenticated via the service account, the driver assumes the identity of the admin account and does the work through that proxy.
Figure 2-42 Completing the Driver Configuration Authentication Tab
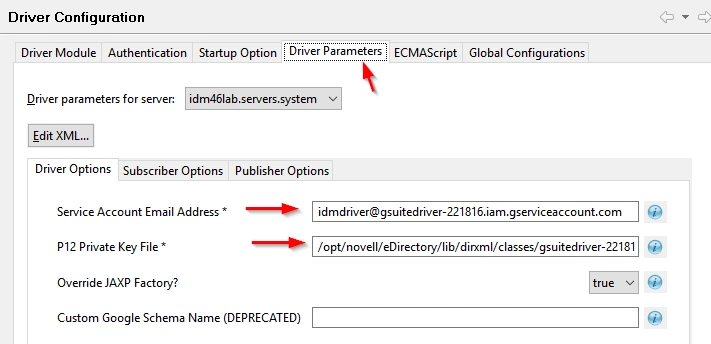
On the "Driver Parameters" tab, set the following:
-
Service Account Email Address
-
Set this to the service account email address from the service account created earlier.
-
-
P12 Private Key File
-
Set this to the precise path AND file name of the P12 file which was uploaded to the Identity Manager server.
-
Use the hosting operating systems file and path correct syntax e.g.:
-
/path/filename for Linux
-
C:\path\filename for Windows
Figure 2-43 Completing the Driver Configuration Driver Parameters Tab
-
-
Finally, select “Ok” and update the driver in the Vault.