3.3 Configuring iChain for NetIdentity Authentication
iChain lets you use the NetIdentity protocol for proxy authentication. This also allows for single sign-on to back-end applications like NetStorage and Zen for Desktops.
NetIdentity authentication requires the NetIdentity client 1.2.1 or later or Zen for Desktops Agent plugins that are included in the Zen for Desktop 401 patch to be installed on the workstation.
3.3.1 How NetIdentity Works with iChain Authentication
IMPORTANT:The NetIdentity client is compatible only with Internet Explorer*.
For NetIdentity to work with iChain authentication, assume you have an accelerator that is using an authentication profile with the option Allow authentication through NetIdentity enabled. A workstation with the NetIdentity client needs to access a Web server through the accelerator. The browser sends a GET request to iChain, which does not include a valid iChain cookie because the workstation is not yet authenticated to iChain. Because the workstation has NetIdentity installed, the GET request includes a header with the value NovINet: v1.2. When iChain receives the GET, it returns a 302 Found packet and redirects the browser to the ICSLogin URL. The browser then sends a GET request to that URL, again with the NovINet header.
iChain replies with a 401 Unauthorized packet. This packet includes NetIdentity specific information such as NetIdentity Realm name and other information used by the NetIdentity protocol. When the NetIdentity client receives this information, if Strict Trust is enabled (default), NetIdentity verifies that the server and Certificate Authority (CA) are trusted (according to the list of trusted authorities in Internet Explorer). If the server and CA are trusted, NetIdentity checks its existing credential store (i.e. “wallet”) to see if authentication credentials already exist for that Realm name. If they do exist, they are sent back to iChain in attempt to authenticate. If the wallet credentials do not exist for that realm name, and the NetIdentity registry setting called Try Local Credentials is enabled, the user's desktop login credentials are sent. If no entry exists in the wallet for this realm and Try Local Credentials is disabled or fails, the NetIdentity client provides a pop-up dialog prompting the user for login credentials. The NetIdentity pop-up dialog color scheme differs from that of the browser's pop-up dialog.
After NetIdentity successfully completes the login, the credentials for that Realm are stored in the wallet.
3.3.2 Configuring an iChain Accelerator to Use NetIdentity
This section explains how to set up an Authentication Profile with NetIdentity.
-
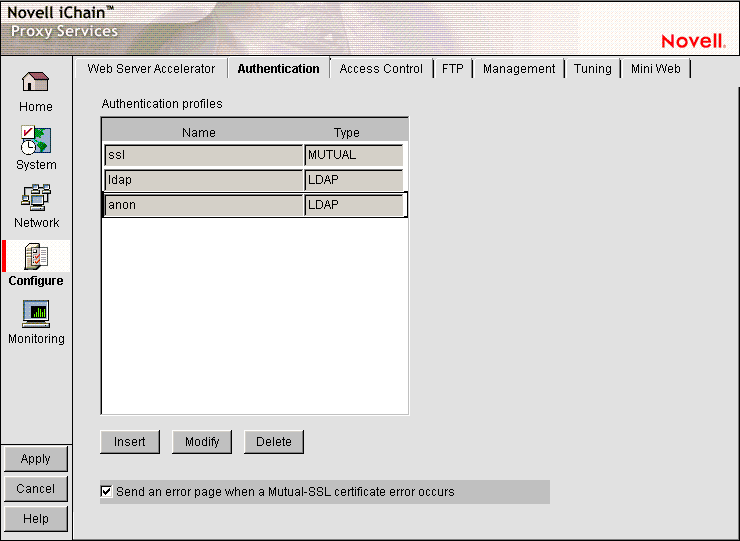
In the proxy server administration tool, click Configure, then click Authentication.

-
Do one of the following:
-
Select the desired LDAP authentication profile, then click Modify.
-
Click Insert to create a new authentication profile.
If you create a new authentication profile, type the name in the Authentication Profile name field, then go to Step 3.
-
-
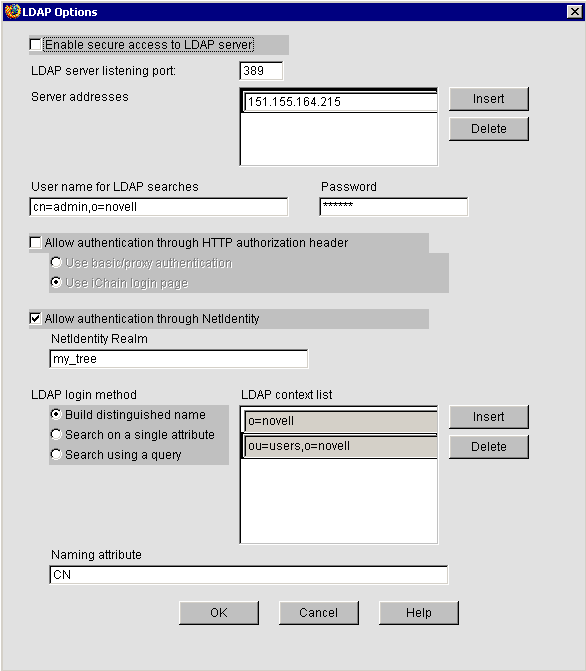
Click the LDAP Authentication radio button, then click LDAP Options.

-
Check the Allow authentication through NetIdentity check box.
-
Type a name you want in the NetIdentity Realm Name field (case-sensitive).
IMPORTANT:The Realm Name is especially important with accelerating NetIdentity aware applications, such as NetStorage. The Realm name needs to exactly match the name of the realm used by the application. Typically, the Realm name of a NetIdentity aware application is the same as the eDirectory tree name.
-
Click OK twice, then click Apply.
After you set up an authentication profile with NetIdentity, you need to configure the accelerator to use that profile, see Section 3.3.3, Configuring An Accelerator to Use an Authentication Profile.
3.3.3 Configuring An Accelerator to Use an Authentication Profile
-
In the proxy server administration tool, click Configure, then click Web Server Accelerator.
-
Select the desired accelerator, then click Modify.

-
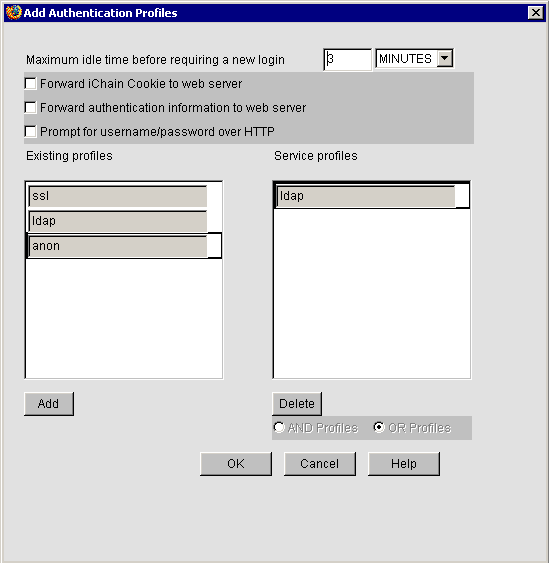
Click Authentication Options.

The authentication profile displays in the Service Profiles column. If the profile you want is not in that column, select the profile in the existing profiles column, then click Add.
-
Click Ok twice, then click Apply.