1.0 Interface Layout of the Orchestration Server Console
Both the grid administrator and the job developer need to have access to and use the Cloud Manager Orchestration Console. The administrator needs to use the console to perform any management functions, such as creating user accounts and managing Orchestration Server activities. The developer uses the console to access the JDL editor for creating or modifying jobs and policies.
The following figure shows the general areas on the console interface that are referred to in this guide.
Figure 1-1 The Cloud Manager Orchestration Console
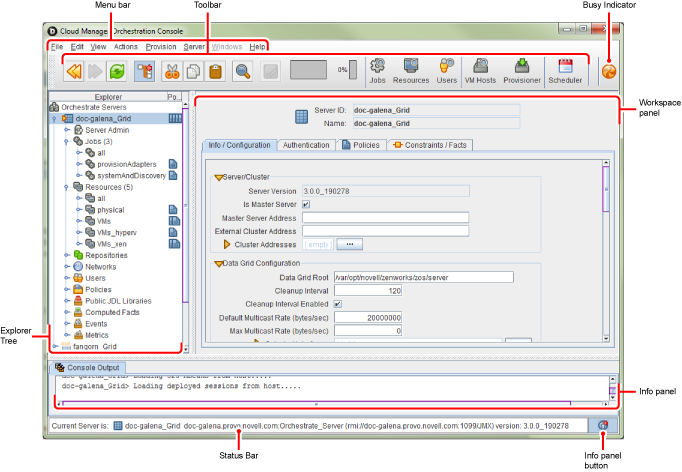
The following list describes the functional areas of the main Orchestration Console display.
-
Operations Menu bar: The Operations Menu bar provides operations categorized under menus such as , , , , , , and .
-
The menu lets you save any changes you have made or exit the console.
-
The menu lets you cut, copy, and paste items and choose general and server preferences for the console.
-
The menu lets you manipulate the display of the different components of the console and refresh the Explorer and Workspace panels.
-
The menu lets you launch specific tools that create and delete users or user groups, computing resources, jobs, policies, and computed facts.
-
The menu lets you discover VM hosts and Repositories, VM Images, disks, and Repository capacities. you can also start and stop VMs and VM hosts, resync a VM’s state or a VM hosts’ state, reset the state of all VMs in the grid or cancel that resync, or can perform a rediscovery of all VMs in the grid.
-
The menu lets you start a local server, log in to the server, create and display logs for logged-in servers, log out of the server, and shut down the server.
-
The menu lets you select console windows to display when you have more than one console window open. You can open the Explorer panel and the two tabs of the Info panel ( and ) in their own windows by right-clicking the tab and choosing in the pop-up menu.
-
The menu provides access to the About box for the console. It also provides a link to Cloud Manager documentation on the Web.
-
-
Console toolbar: The Console toolbar has buttons for executing common tasks. The basic tasks are , , , , , , , , and .
The toolbar also includes buttons that open monitoring views for , , and .
To the far right of the toolbar, a pinwheel icon indicates when the console is busy.
-
Explorer tree: Sometimes referred to as the “Tree view,” this panel displays a hierarchical tree that lets you navigate to different objects; you can click items in the tree to see their details. For example, you can display computing resources for a selected grid. When you click in the tree, its details appear in the Workspace panel with a list of active computing resources. You can edit the attributes in the workspace panel.
-
Workspace panel: This panel displays a detailed view for an item you select in the Explorer tree. For example, if you select a computing resource under physical in the Explorer tree, the Workspace panel view changes to and “Admin view” to show the details for that resource. You can edit the properties of Grid object in the views displayed in the Workspace panel.
The views in the panel change as you select different monitoring tools (, , , , ) or the tool in the Main toolbar.
-
Info panel: The Info panel displays a variety of information, such as validation and error messages, log files, and query results. You can display or hide the Info panel by clicking the icon in the Status bar.
-
Status bar: The status bar displays general identity information about the Orchestration Server where you are logged in.
For information about launching the console and using it for the first time, see Launching the Orchestration Console and Logging in to the Orchestration Server
in the NetIQ Cloud Manager 2.3 Installation Guide.