NetIQ Cloud Manager 2.1.5
A Zone Administrator has rights to manage the resources for one or more Cloud Manager zones. This Quick Start explains how to perform Zone Administrator tasks in the Cloud Manager console. The information is also available in the Cloud Manager console under > > .
1.0 Resource Group Concepts
A resource group defines a set of VM hosts that an organization can use for its business services. In addition to the VM hosts, the resource group includes one or more service levels that define the cost of the host resources (vCPUs, memory, storage, and networks) and the service objectives (availability, support response time, and so forth).
1.1 VM Host Recommendations
All VM hosts that you include in a resource group should be identical in terms of hypervisor technology, operating system version, network configuration, storage repository configuration, and hardware capabilities. This ensures a consistent environment for business services regardless of the host. It also ensures that the resource group’s service levels apply to all hosts.
1.2 Shared and Dedicated Resource Groups
A resource group can be shared among multiple organizations, which means that each organization’s business services utilize the same resources, or a resource group can be assigned to only one organization, in which case only that organization’s business services consume the resources.
1.3 Examples
As an example, you might create a Business Critical resource group that consists of high-performance hosts intended for mission-critical applications and services. You assign the resource group a Platinum service level with costs that reflect the more expensive hardware and service contract. Any business service that is provisioned to the resource group inherits the resource and service costs.
Or, you might create a Lab resource group that consists of standard-performance hosts intended for software testing. You assign the resource group a Bronze service level with costs that reflect the less expensive hardware and service contract.
2.0 Creating Resource Groups
-
On the main navigation bar, click

-
Click the tab, then click .
-
If you are the Zone Administrator for multiple zones, the Select Zone dialog box is displayed. Select the zone that contains the resources you are grouping, then click to display the Create Resource Group dialog box.
-
In the fields, provide the following information for the resource group:
Name: Specify a unique name for the group. You can use letters, numbers, and the following special characters: space, hyphen, underscore, apostrophe, percent, ampersand, and period. The maximum length is 110 characters.
Zone: Displays the zone whose hosts you can add to the group. You cannot change this setting.
Hypervisor: Select the hypervisor technology for the group’s hosts. You can add only those hosts that meet the hypervisor criteria.
Workload Repository: The setting causes a provisioned workload to be stored in the same repository as the VM template used to create it. If you want workloads provisioned to this resource group to be stored in a different shared repository, you must add hosts to the group (see Step 5), then come back and select the shared repository for the workloads. The list is populated only after you add hosts to the resource group.
Group Type: This applies only if VMware vSphere is the selected hypervisor. Select if you want the resource group to use hosts and host clusters. Select if you want the resource group to use a resource pool.
Resource Pool: If you specified as the group type, select the resource pool to include in the group.
Description: Provide any additional information for the resource group.
-
If the group type is , add hosts to the group:
-
Under , click the tab.
-
Click to display the Add Hosts dialog box.
The list displays all available hosts and host clusters in the zone that meet the selected hypervisor criteria. Hosts that are already assigned to another resource group are not displayed.
-
Select the hosts.
You can Shift-click and Ctrl-click to select multiple hosts.
-
Click to add the selected hosts to the list.
-
-
Add service levels to the group:
-
Under , click the tab.
-
Click to display the Add Service Levels dialog box.
-
Select the service levels.
You can Shift-click and Ctrl-click to select multiple service levels.
-
Click to add the selected service levels to the list.
-
-
Ignore the tab.
The tab shows the networks associated with the hosts you added to the group. The list is view-only so you can’t make any changes. However, the list is not generated until you save the resource group. If you want to see the networks at this time, click , double-click the resource group to open it again, then click the tab.
-
Specify the organizations that can use the resource group:
-
Under , click the tab.
-
Click to display the Add Organizations dialog box.
-
Select the organizations to which you want to assign the resource group.
You can Shift-click and Ctrl-click to select multiple hosts.
-
Click to add the selected organizations to the list.
IMPORTANT:The resource group is added to the organization, but its networks are not made available to the organization. To make the networks available, edit the organization and add the resource group’s networks to the list.
-
-
Click .
3.0 Monitoring Resource Capacity
The Capacity view provides information about used, reserved, and allocated resource capacity for zones. You can view the capacity information for all zones for which you are a Zone Administrator.
Monitoring the capacity status for your assigned zones can help you anticipate resource shortages that might arise as organizations deploy business services into your zones’ resource groups.
To open the Capacity view:
-
On the main navigation bar, click
 .
.
3.1 Understanding the Capacity View
The Capacity view includes three main sections: the Capacity Summary bar, the Zones list, and the Zones details.
Capacity Summary Bar
The Capacity Summary bar provides a summary for the total resources within your management scope.

For example, if you are a Zone Administrator for multiple zones, you see a summary of all of the resources in all of your zones.
Each resource (Memory, CPU, and Storage) has its own capacity indicator. The indicator displays the used and reserved capacity as a percentage of the total available capacity. The displayed percentage represents the reserved capacity.
The color of the indicator is determined by the Warning and Problem thresholds set for the Cloud environment. Green indicates that no thresholds have been reached, yellow indicates that the Warning threshold has been reached, and red indicates that the Problem threshold has been reached.
The Issues section of the Capacity Summary bar shows the following:
-
 No resource issues.
-
 The number of resources that have reached the Warning threshold.
-
 The number of resources that have reached the Problem threshold.
Zones List
The Zones list displays the zones for which you can view resource capacity.
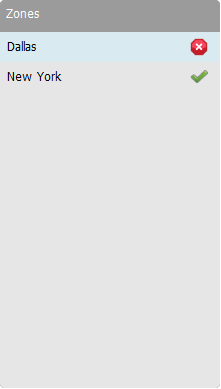
The icon next to each zone indicates the current status of the resources for that zone. The statuses correspond to the statuses that can be listed in the Capacity Summary bar:
-
No resource issues.
-
One or more resources for the zone have reached the Warning threshold.
-
One or more resources for the zone have reached the Problem threshold.
Zone Details
The Zone Details panel displays the resource capacity information for the zone that is selected in the list.
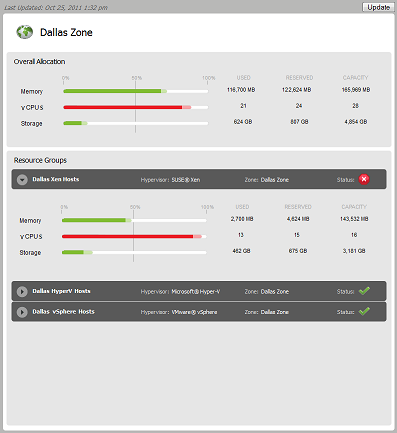
The section provides a summary of the used, reserved, and available capacity for the entire zone.
-
Used: The amount of the resource that is actually being consumed by deployed workloads. For example, a workload might be allocated 4 GB of memory but only be using 2 GB.
-
Reserved: The amount of the resource that is reserved for deployed workloads. For example, if a workload is allocated 4 GB of memory, all 4 GB are reserved.
-
Capacity: The total amount of the resource that is available for deployed workloads.
The sections provide capacity details for each resource group located within the zone. The status of each resource group is also displayed.
The field displays the last time the capacity data was updated. The button lets you update the data.
3.2 Updating the Capacity Data
The Capacity engine collects capacity data on a regular interval specified in System Configuration. The collected data is cached on the Cloud Manager Application Server.
The Capacity data is static, meaning that the Capacity view displays the same data until you update from the cached data on the Cloud Manager Application Server.
To update the data:
-
Click .
If the cached data is newer than the current data, the Capacity view is updated with the cached data.
-
Click to confirm that you to continue with the manual update.
The Capacity engine collects the new data from the system. As soon as the data is collected, the Capacity view automatically updates to the new data.
4.0 Generating Reports
You can generate reports showing the resource capacity and usage for a zone.
-
On the main navigation bar, click
 .
.
-
Click to display the Reports dialog box.
-
In the list, select the report you want to generate and the format you want, then click .
-
In the Report Parameters dialog box, select the zone for which to generate the report, then click .
A report window appears. Depending on the amount of data to be collected, the report might be completed quickly or it might take a while. As soon as the report is completed, it is displayed in the report window, saved to your computer, opened in an associated application, or you are prompted about which action you want to take (depending on your browser configuration).
If the report is taking a while, you can close the report window and the report continues to generate. If you close the report, its status is shown in the list. As soon as it is complete, you can view it.
5.0 Legal Notices:
© 2013 NetIQ Corporation and its affiliates. All Rights Reserved. THIS DOCUMENT AND THE SOFTWARE DESCRIBED IN THIS DOCUMENT ARE FURNISHED UNDER AND ARE SUBJECT TO THE TERMS OF A LICENSE AGREEMENT OR A NON-DISCLOSURE AGREEMENT. EXCEPT AS EXPRESSLY SET FORTH IN SUCH LICENSE AGREEMENT OR NON-DISCLOSURE AGREEMENT, NETIQ CORPORATION PROVIDES THIS DOCUMENT AND THE SOFTWARE DESCRIBED IN THIS DOCUMENT "AS IS" WITHOUT WARRANTY OF ANY KIND, EITHER EXPRESS OR IMPLIED, INCLUDING, BUT NOT LIMITED TO, THE IMPLIED WARRANTIES OF MERCHANTABILITY OR FITNESS FOR A PARTICULAR PURPOSE. SOME STATES DO NOT ALLOW DISCLAIMERS OF EXPRESS OR IMPLIED WARRANTIES IN CERTAIN TRANSACTIONS; THEREFORE, THIS STATEMENT MAY NOT APPLY TO YOU. This document and the software described in this document may not be lent, sold, or given away without the prior written permission of NetIQ Corporation, except as otherwise permitted by law. Except as expressly set forth in such license agreement or non-disclosure agreement, no part of this document or the software described in this document may be reproduced, stored in a retrieval system, or transmitted in any form or by any means, electronic, mechanical, or otherwise, without the prior written consent of NetIQ Corporation. Some companies, names, and data in this document are used for illustration purposes and may not represent real companies, individuals, or data. This document could include technical inaccuracies or typographical errors. Changes are periodically made to the information herein. These changes may be incorporated in new editions of this document. NetIQ Corporation may make improvements in or changes to the software described in this document at any time.