12.1 How the Connector for Office 365 Works
Before you install the connector for Office 365, review the following illustrations to help you understand how the connector works with CloudAccess.
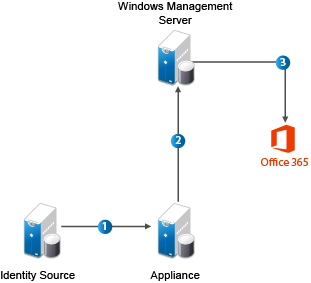
12.1.1 Setup and Configuration
The following figure illustrates the basic setup and configuration steps.

-
Run the connector for Office 365 installer using the .msi file. For more information, see Section 12.3, Installing the Connector for Office 365.
-
Create a trust relationship between the CloudAccess appliance and Office 365.
-
Configure user provisioning to Office 365.
12.1.2 User Provisioning
The following figure illustrates the workflow in provisioning users.
-
The administrator defines a policy to authorize access to Office 365 applications.
-
CloudAccess detects new and updated user information from the identity source.
-
CloudAccess sends user creation, license assignment, update, or deletion requests to the Windows Management Server.
-
The Windows Management Server forwards requests to Office 365 using the Windows Azure Active Directory Module for Windows PowerShell cmdlets.
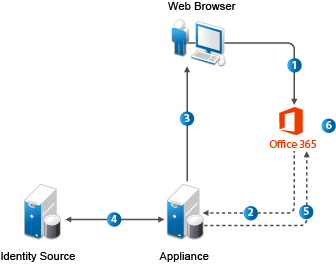
12.1.3 User Login to Office 365
The following figure illustrates the workflow for users logging in to Office 365 applications.
-
The user attempts to log in to Office 365.
-
The login is redirected to CloudAccess.
-
CloudAccess prompts the user for the user name and password. Or, if Kerberos is configured, CloudAccess performs seamless authentication.
-
CloudAccess verifies the user name and password using the identity sources. Or, if Kerberos is configured, CloudAccess validates the Kerberos token.
-
CloudAccess provides an assertion to Office 365.
-
Office 365 validates the assertion and allows the user access to assigned Office 365 applications.