Using the Authentication Filter Tool in NetIQ® CloudAccess
This document provides information about using the Authentication Filter tool for NetIQ CloudAccess to make session-based changes to the identity information for an authenticated user.
The CloudAccess single sign-on login is designed to authenticate a user against an identity source and to share this authentication with other protected applications. The authentication process does not provide extended functions to add, remove, or manage a user’s identity information for the session. To address this need, CloudAccess provides the Authentication Filter tool.
The Authentication Filter integrates with the CloudAccess single sign-on process. After the user logs in, the filter intercepts the authentication process and sends the user’s identity information from the identity source to your custom authentication scripts. You can add, remove, or set values for supported identity attributes. You can also set a cookie. You can interact with the user to gather input for those changes. After all of the encoded rules and associations are complete, CloudAccess stores the modified identity information in the session cache for the web services and applications.
The Authentication Filter tool is compatible with the ExtAPI library and the ExtUI library. It works with multiple scripting languages including PHP, Java, and Perl.
6.0 Examples
You can use the examples in this section to understand how the Authentication Filter interacts with your custom scripts to modify the authenticated user’s identity information for a session.
6.1 Example: Setting Values and Removing Identity Attributes
Your custom authentication scripts can add, remove, or set values for the supported identity attributes. Because the changes do not require user interaction, the user is unaware of the external authentication tasks being performed. After the external authentication actions and associations complete successfully, the user can access the SaaS web service or application. CloudAccess establishes the session by sending the modified identity information. For an example of how to add identity attributes, to set values for new or existing identity attributes, and to remove an identity attribute, see the Example: ExtAPI Script.
Figure 1 Using the Authentication Filter to Add or Remove Identity Attributes
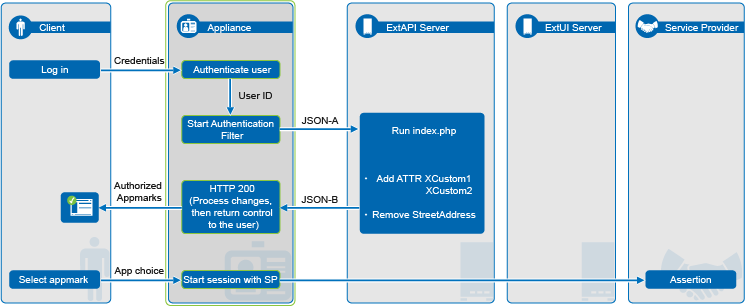
To prepare the Authentication Filter, do the following as an administrator user:
-
Create an authentication script, such as index.php, and store it on the ExtAPI server. For example:
http://extapi_server_dns/extapi/index.php -
Enable the Authentication Filter tool in CloudAccess, and configure it to point to the target authentication script.
The extended authentication process is as follows:
-
The user logs in to the CloudAccess login page with the single sign-on login credentials.
-
CloudAccess authenticates the user credentials against the identity source.
-
The Authentication Filter intercepts the authentication process and sends a JSON POST that contains the user’s identity information to the URL of a custom authentication script on the ExtAPI server.
-
The script sets values for the attributes XCustom1 and XCustom2, and removes the attribute StreetAddress.
-
After all external authentication is complete, the authentication script returns a JSON response to CloudAccess that contains an HTTP return status and the user’s modified identity attributes for the session.
-
CloudAccess stores the modified identity information in memory; it does not store it in the user’s identity source.
-
CloudAccess completes the authentication process and returns control to the user’s web browser.
-
For the life of this session, the modified identity attributes are available to service providers when the user accesses a SaaS web service or application.
6.2 Example: Adding and Removing Identity Attributes with User Interaction
Your custom authentication scripts can require interaction with the user to gather input. The user is aware only of the actions that gather the user’s input. After the external authentication actions and associations complete successfully, the user can access the SaaS web service or application. CloudAccess establishes the session by sending the modified identity information.
The following figure shows how you can extend the authentication process to manipulate identity attributes for an authenticated user, and redirect control to another authentication script to perform business-specific logic that requires user interaction. For an example of how to add identity attributes, to set values for new or existing identity attributes, and to remove an identity attribute, see Example: ExtAPI Script. For an example redirect script, see Example: Redirect Script.
Figure 2 Using the Authentication Filter to Add or Remove Identity Attributes with User Interaction
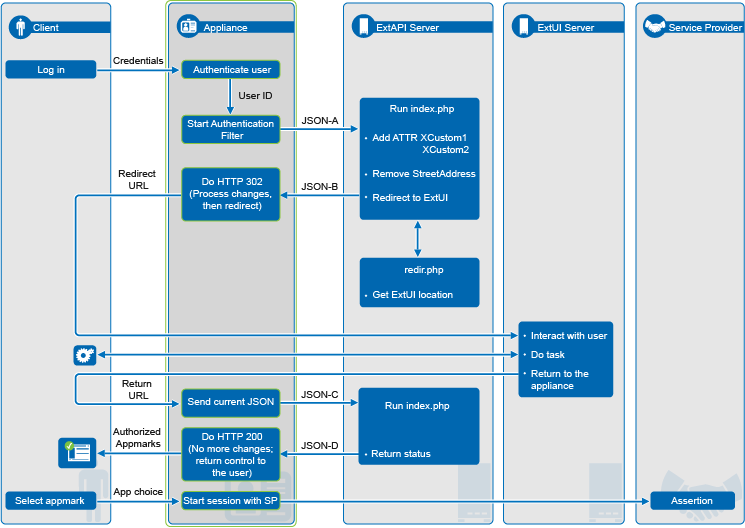
To prepare the Authentication Filter, do the following as an administrator user:
-
Create an authentication script, such as index.php, and store it on the ExtAPI server. For example:
http://extapi_server_dns/extapi/index.php -
Create a redirect script, such as redir.php, and store it on the ExtAPI server. For example:
http://extapi_server_dns/extapi/redir.php -
Create a user interaction script, such as user-input.php and store it on the ExtUI server. For example:
http://extui_server_dns/extui/user-input.php -
Enable the Authentication Filter tool in CloudAccess, and configure it to point to the target authentication script.
The extended authentication process is as follows:
-
The user logs in to the CloudAccess login page with the single sign-on login credentials.
-
CloudAccess authenticates the user credentials against the identity source.
-
The Authentication Filter intercepts the authentication process and sends a JSON POST that contains the user’s identity information to the URL of a custom authentication script on the ExtAPI server.
-
The script sets values for the attributes XCustom1 and XCustom2, and removes the attribute StreetAddress.
-
The authentication logic determines that an action requires user interaction, and redirects the user’s browser to a specified URL on the ExtUI server.
-
The target ExtUI script uses ExtUI library commands to perform the required business-specific logic to get information from the user, then returns to CloudAccess.
-
CloudAccess sends the current identity information with a JSON POST to the ExtAPI server to ensure that all encoded associations are complete.
-
After all external authentication is complete, the authentication script returns a JSON response to CloudAccess that contains an HTTP return status and the user’s modified identity attributes for the session.
-
CloudAccess stores the modified identity information in memory; it does not store it in the user’s identity source.
-
CloudAccess completes the authentication process and returns control to the user’s web browser.
-
For the life of this session, the modified identity attributes are available to service providers when the user accesses a SaaS web service or application.
6.3 Example: JSON Request
In the following sample JSON request (JSON-A), the identity attributes specify the information for the authenticated user. Only the specified attributes can be manipulated by the ExtAPI. All other values are static information based on the session:
-
The target file URL
-
The DNS name of the appliance
-
The user’s web browser
-
The user’s ID GUID
-
The return URL for the user’s session
Request destination URL: http://extapi_server_dns/extapi/index.php

POSTed Data:{
        "API":{      "version":"0"     },
        "Request":{
                    "Host":"appliance_dns",
                     "User-Agent":"Mozilla/5.0 (Windows NT 6.1; WOW64) AppleWebKit/537.36 (KHTML, like Gecko) Chrome/33.0.1750.146 Safari/537.36"
                  },
        "Session":{
                     "ID":"448484815b1a417abf07b0a64d75961e-D5A1E4F8B4A0A1BD",
                     "ReturnURL":"https://appliance_dns/osp/a/t1/auth/app/login?acAuthCardId=user&sid=0"
                  },
        "Identity":{
                "Principal-ID":"bis_EDIR_s1Vq9us-6a5828947d876047a4b86a5828947d87",
                "Attributes":{
                        "UserName":"admin",
                        "IdentityType":"EDIR",
                        "LastName":"admin",
                        "BirthDate":"Unavailable",
                        "Email":"admin@acme-widgets.com",
                        "FullName":"Admin admin",
                        "Gender":"Unavailable",
                        "ID":"6A5828947D876047A4B86A5828947D87",
                        "FirstName":"Admin",
                  }
        }
}
6.4 Example: JSON Response
The JSON response can modify only the identity attributes. The following code sample shows the portion of the JSON-B response that sets the values for XCustom1 and XCustom2. It sets XCustom1 to value. It sets XCustom2 to two values: value2a and value2b.
{"Identity":
  {"Attributes":
     {"set":{
      "XCustom1":"value",
      "XCustom2":["value2a","value2b"]}
}}}
In addition to setting or removing existing attributes, the response should contain a valid HTTP Response code. If the response returns an HTTP 200 OK response value, the appliance processes the specified changes, and then returns with a successful authentication to grant the user access to the authorized appmarks.
6.5 Example: ExtAPI Script
The following index.php script shows one way to use the ExtAPI library commands to perform the authentication logic that is described in Example: Setting Values and Removing Identity Attributes and Example: Adding and Removing Identity Attributes with User Interaction.
<?php
    $retVal = "";
    $redirectLocation = "http://extapi_server_dns/extapi/redir.php";
       header('Content-type: application/json', true, 200);
    $rawJSON = file_get_contents("php://input");
        	error_log("raw input: " . $rawJSON);
    $inVal = json_decode($rawJSON, TRUE);
    if ( !isset( $inVal['Identity']['Attributes']['XCustom1'])) {
        error_log("setting XCustom1 and XCustom2, redir to: ".$inVal['Session']['ReturnURL']);
        $retVal = json_encode(array("Identity" => array("Attributes" => array("set" => array("XCustom1" => "value", "XCustom2" => array("value2a", "value2b"), "XCustom3" => "1")))));
        header('Location: '.$redirectLocation.'?sendTo='. urlencode($inVal['Session']['ReturnURL']), true, 302);
    } else if ( !isset( $inVal['Identity']['Attributes']['XCustom4'])) {
        error_log("setting XCustom4 and XCustom5, removing xCustom2");
        $retVal = json_encode(array("Identity" => array("Attributes" => array("set" => array("XCustom4" => "value4", "XCustom5" => "true"), "remove" => "XCustom2"))));
    }

     echo $retVal;
     error_log("returning: " . $retVal);
    die();
?>
6.6 Example: Redirect Script
The following redir.php script shows one way to specify the redirect control to the ExtUI script in Example: Adding and Removing Identity Attributes with User Interaction.
<?php
    error_log("redirecting to: ".$_GET['sendTo']);
  header('Location: '.$_GET['sendTo'], TRUE, 302);
?>