Cloud Manager 2.5.1 Patch 4 Release Notes

June 2018

Cloud Manager 2.5 Support Pack 1 Patch Update 4 (2.5.1 Patch 4) resolves several issues for Cloud Manager 2.5.1. This patch is cumulative. It includes hotfixes and patches that have been provided since the Cloud Manager 2.5.1 release.

The documentation for this product is available in HTML and PDF formats at the Cloud Manager 2.5 Documentation website.

1.0 Version

This patch includes all of the files you need to update the Application Server 2.5.1 component of Cloud Manager to Application Server 2.5.1 Patch 4, and to update the Orchestration Server 3.5.1 component of Cloud Manager to Orchestration Server 3.5.1 Patch 4.

2.0 Resolved Issues for Patch 4

Cloud Manager 2.5.1 Patch 4 provides fixes for the following issue:

  • SR 101025364054: Visibility of Business Service information.

    Patch 4 contains a change to the caching methodology for user information, intended to fix this SR. It also contains user logging features intended to capture user-associated organization information when displaying Business Services.

3.0 Resolved Issues for Patch 3

Cloud Manager 2.5.1 Patch 4 provides fixes for the following issues that were previously provided as Cloud Manager 2.5.1 Patch 3:

  • SR 101113387411 and SR 10111338741: Workloads get into a state of disk inconsistency. CDROM disks get mapped to hard disks, and hard disks to CDROM disks. This in turn mixes up the costing per disk so customers are being charged incorrectly for disk usage.

    Patch 3 addresses the disk inconsistency by preventing the most likely causes in the CMAS server. In addition, the patch includes SQL scripts to help you locate VMs that have inconsistent disks and to correct the disk information stored in the database for each VM by swapping the disk information reported for its CDROM and its no-size disk. See Using SQL Scripts to Fix Workloads in a State of Disk Inconsistency in the Supplemental Documentation section in this document.

4.0 Resolved Issues for Patch 2

Cloud Manager 2.5.1 Patch 4 provides fixes for the following issues that were previously provided as Cloud Manager 2.5.1 Patch 2:

5.0 Resolved Issues for Patch 1

Cloud Manager 2.5.1 Patch 4 provides fixes for the following issues that were previously provided as Cloud Manager 2.5.1 Patch 1.

5.1 Deployed Server Has Different Values of CPU and RAM

Issue: A timing issue results in CPU and RAM values being overwritten before the Save Configuration job runs during provisioning. (SR 101030383971)

Fix: In this release, Cloud Manager does not attempt to set CPU and RAM values if there is an ongoing action in CMOS. This approach should honor the intended settings in the Save Configuration job and avoid the previous timing issues.

5.2 Timed Out Waiting for Customizer VM to Shut Down

Issue: A provisioning job fails if the job times out while waiting for the customizer VM to shut down gracefully. (SR 101054777911)

Fix: If a provisioning job times out, Cloud Manager first attempts to force a shutdown of the customizer VM. The provisioning job fails only if the forced shutdown task fails.

5.3 CMOS Is Busy After vSphere Boot and Every 24 Hours Later

Issue: Disks were not properly discovered from VMware because the classes for VirtualDeviceRemoteDeviceBackingInfo were not included in the discovery. When vSphereUpdater compared disks against the information in CMOS, it incorrectly identified the disks as having changes and triggered resynchronization operations for them. The number of concurrent resynchronizations can overwhelm the server, such that CMOS was busy after a vSphere boot and every 24 hours later. (SR 101099332941)

Fix: This release correctly identifies the disks that have changed and triggers resynchronization only for the ones that have actually changed.

5.4 Reports Are Not Working If Clusters Use Windows Server 2016

Issue: Reports did not include information for Windows Server 2016 Clusters. (SR 101076042841)

Fix: This release adds support for Windows Server 2016 Clusters in reports.

6.0 Requirements

Apply the Cloud Manager 2.5.1 Patch 4 files to your existing Cloud Manager 2.5.1 Application Server and Cloud Manager 3.5.1 Orchestration Server.

7.0 Files Included in This Patch

Cloud Manager 2.5.1 Patch 4 is available on the Micro Focus Patch Finder website. Specify Cloud Manager as the product, then search for patches for Cloud Manager 2.5.

Cloud Manager 2.5.1 Patch 4 provides the NCM_2.5.1_PatchUpdate4.zip file that contains the updates. The patch update consists of a ZIP file with the Cloud Manager Orchestration Server update files, and an RPM file for the Cloud Manager Application Server updates.

  • cmos.zip (for the Orchestration Server), which includes these files:

    • customizeconstants.py
    • customizer.jdl
    • customizer.job
    • libcustomize.pylib
    • vi-client.jar
    • vsphere_interface.py
  • CMOS_Customizer_LiveCD.i686-2.1.0.iso

  • netiq-cloudmanager-2.5.1-xx.noarch.rpm (for the Application Server), where xx is the build number.

  • sql_scripts.zip, which includes the following SQL scripts:

    • query_01_find_bad_cdroms_with_size.sql
    • query_02_find_list_of_disks_for_the_wl_that_a_disk_is_in.sql
    • query_03_find_list_of_disks_for_the_wl_template_that_a_disk_is_in.sql
    • sr411_fix_swapped_disk_cdrom_with_size_with_disk_with_no_size.sql
    • sr411_fix_swapped_disks_cdrom_with_size_with_disk_with_no_size.sql

8.0 Applying the Orchestration Server Patch

To apply the Orchestration Server patch to your Orchestration Server, you must install the files in the cmos.zip file.

8.1 CMOS Patch Installation Prerequisites

Ensure that the following prerequisites are met before you install the patch files:

  • Cloud Manager Orchestration Server 3.5.1 is installed, and is up and running.

  • Extract the files from cmos.zip and copy them to an accessible directory on the Cloud Manager Orchestration Server.

  • Copy the CMOS_Customizer_LiveCD.i686-2.1.0.iso file to an accessible directory on the Cloud Manager Orchestration Server.

8.2 Installing the Orchestration Server Patch Files

Use the following instructions to install the patch files on your Orchestration Server 3.5.1 Server and update it to version 3.5.1 Patch 4.

NOTE:A restart is required after you apply the files to your existing Orchestration Server.

NOTE:If you see an incorrect FQDN on a workload after applying the files in this patch, you might need to rediscover the VMs.

Applying the CMOS_Customizer_LiveCD.i686-2.1.0.iso Patch File

To apply the CMOS_Customizer_LiveCD.i686-2.1.0.iso patch file to the Orchestration Server:

  1. Copy the CMOS_Customizer_LiveCD.i686-2.1.0.iso file to the following location:

    /opt/novell/zenworks/zos/server/doc/install/

    In a console, enter

    cp CMOS_Customizer_LiveCD.i686-2.1.0.iso /opt/novell/zenworks/zos/server/doc/install/

Applying the customizeconstants.py Patch File

To apply the customizeconstants.py patch file to the Orchestration Server:

  1. Replace the old customizeconstants.py file in the following location with the new customizeconstants.py file from the patch:

    /var/opt/novell/zenworks/zos/server/store/deployed/libcustomize.pylib-64/libcustomize.pylib/libcustomize/

    In a console, enter

    cp customizeconstants.py /var/opt/novell/zenworks/zos/server/store/deployed/libcustomize.pylib-64/libcustomize.pylib/libcustomize/

Applying the vsphere_interface.py Patch File

To apply the vsphere_interface.py patch file to the Orchestration Server:

  1. Replace the old vsphere_interface.py file in the following location with the new vsphere_interface.py file from the patch:

    /var/opt/novell/zenworks/zos/server/store/deployed/libcustomize.pylib-<jobid>/libcustomize.pylib/libcustomize/

Applying the libcustomize.pylib Patch File

To apply the libcustomize.pylib patch file to the Orchestration Server:

  1. Replace the old libcustomize.pylib file in the following location with the new libcustomize.pylib file from the patch:

    /var/opt/novell/zenworks/zos/server/snapshot/deployment/core/

Applying the customizer.job Patch File

To apply the customizer.job patch file to the Orchestration Server:

  1. Replace the old customizer.job file in the following location with the new customizer.job file from the patch:

    /var/opt/novell/zenworks/zos/server/snapshot/deployment/core/

Applying the customizer.jdl Patch File

To apply the customizer.jdl patch file to the Orchestration Server:

  1. Replace the old customizer.jdl file in following location with the new customizer.jdl file from the patch:

    /var/opt/novell/zenworks/zos/server/store/deployed/customizer.job-<jobid>/customizer.job/

Applying the vi-client.jar Patch File

To apply the vi-client.jar patch file to the Orchestration Server:

  1. Copy vi-client.jar to the following location:

    /var/opt/novell/zenworks/zos/server/store/deployed/vsphere.sar-<jobid>/vSphereUpdate.job/

  2. Restart the vSphereUpdate scheduled job.

    1. In the Scheduler view of the Orchestration Server console, locate and select the vSphereUpdate scheduled job.

    2. On the Job Arguments page of the Job details section of the view, locate the mode field, deselect its Lock check box, and type stop in the field.

    3. In the console toolbar, click Save, then in the Scheduler view, click Run Now. Monitor the job progress.

    4. When the Job status shows success, delete the stop argument you previously entered in the mode field at Step 2.b, then repeat Step 2.c.

      This step ensures that the new vi-client.jar library you applied to the Orchestration Server is transferred to the Orchestration Agent running the vSphereUpdate job. The new library fixes the vSphere updater on the agent.

Restart the CMOS Server

To restart the Orchestration Server from the command line, enter the following command:

/etc/init.d/novell-zosserver restart

9.0 Applying the Application Server Patch

To apply the Application Server patch to your Application Server, you must install the files in the netiq-cloudmanager-2.5.1-xx.noarch.rpm file.

9.1 CMAS Patch Installation Prerequisites

Ensure that the following prerequisites are met before you install this patch:

  • Cloud Manager Application Server 2.5.1 is installed, and is up and running.

  • Extract the netiq-cloudmanager-2.5.1-xx.noarch.rpm file from the patch and copy it to an accessible directory on the Cloud Manager Application Server, such as the /tmp directory.

9.2 Installing the Application Server Patch

After you have copied the patch file to the server, use the following steps to install the file:

  1. From the location where you copied netiq-cloudmanager-2.5.1-xx.noarch.rpm file, run the following command:

    rpm -Uvh --nodeps netiq-cloudmanager-2.5.1-xx.noarch.rpm

  2. Run the Cloud Manager configuration program from the following location:

    /opt/netiq/cloudmanager/configurator/config

  3. Choose to run an upgrade for the Cloud Manager Server.

  4. Verify that the netiq-cloudmanager-2.5.1-xx.noarch.rpm file is installed.

    1. Log in to the Cloud Manager Web Console.

    2. In the Web Console, click Help > About.

    3. In the About box, verify the following:

      • Server version is 2.5.1 and build number is 81.1.16

      • Web UI version is 2.5.1 dated 6/13/18

10.0 Known Issues

NetIQ Corporation strives to ensure our products provide quality solutions for your enterprise software needs. There are no known issues for this patch release.

If you need assistance with specific product issues, please contact Customer Care.

11.0 Supplemental Documentation

This section provides documentation and procedures for new features and tools provided in patches for Cloud Manager 2.5.1.

11.1 Using SQL Scripts to Fix Workloads in a State of Disk Inconsistency

Cloud Manager Application Server 2.5.1 Patch 3 and Patch 4 provide SQL scripts to help you locate VMs that have inconsistent disks and to correct the disk information stored in the database for each VM by swapping the disk information reported for its non-zero-size CDROM and its no-size hard disk.

SQL Script

Description

query_01_find_bad_cdroms_with_size.sql

Run the script to get a list of disk IDs for CDROMs that currently have a non-zero disk size. Results are output to the text file you specify in the query, such as D:\results.txt.

query_02_find_list_of_disks_for_the_wl_that_a_disk_is_in.sql

You set the disk ID of a CDROM with a non-zero disk size as the value for the disk_data_id parameter in the script. Run the script to get a list of information about other disks on the CDROM’s parent VM.

query_03_find_list_of_disks_for_the_wl_template_that_a_disk_is_in.sql

You set the disk ID of a CDROM with a non-zero disk size as the value for the disk_data_id parameter in the script. Run the script to get a list of information about other disks on the workload template that was used to create the CDROM’s parent VM.

sr411_fix_swapped_disk_cdrom_with_size_with_disk_with_no_size.sql

Fixes values for one current problem VM at a time. You set the disk ID of a CDROM with a non-zero disk size as the value for the temp_disk_data_id parameter in the script. Run the script to swap the disk information of the CDROM and a hard disk with no size on the CDROM’s parent VM.

sr411_fix_swapped_disks_cdrom_with_size_with_disk_with_no_size.sql

Fixes values for all current problem VMs in a single run. After you output a list of disk IDs for CDROMs with non-zero sizes in a results.txt file, run the script to swap the disk information for the CDROM and the hard disk with no size on each CDROM’s parent VM, where each disk entry in the file is processed in turn.

To fix all VMs that currently have swapped information for their CDROMs and hard disks:

  1. Run the following SQL query to identify the CDROMs in the database that have a non-zero disk size and return their disk IDs to a file named results.txt.

    query_01_find_bad_cdroms_with_size.sql

    For example, if you extracted the scripts in the D:\sr411\sqlscripts\ directory, enter

    psql -U postgres -o D:\results.txt tietodb < D:\sr411\sqlscripts\query_01_find_bad_cdroms_with_size.sql
  2. Run the following SQL script to fix the CDROM and hard disk that have been swapped on the parent VM of each disk ID entry in the results.txt file.

    sr411_fix_swapped_disks_cdrom_with_size_with_disk_with_no_size.sql

    For example, enter

    psql -U postgres tietodb < D:\sr411\sqlscripts\sr411_fix_swapped_disks_cdrom_with_size_with_disk_with_no_size.sql

To fix a single VM that currently has swapped information for its CDROM and hard disk:

  1. Run the following SQL query to identify the CDROMs in the database that have a non-zero disk size and return their disk IDs to a file named results.txt.

    query_01_find_bad_cdroms_with_size.sql

    For example, if you extracted the scripts in the D:\sr411\sqlscripts\ directory, enter

    psql -U postgres -o D:\results.txt tietodb < D:\sr411\sqlscripts\query_01_find_bad_cdroms_with_size.sql
  2. For each disk ID entry in the results.txt file:

    1. Open the following SQL script in a text editor, then set the disk ID as the value for the temp_disk_data_id parameter.

      sr411_fix_swapped_disk_cdrom_with_size_with_disk_with_no_size.sql

    2. Run the script to fix the CDROM and hard disk that have been swapped on the parent VM of the specified disk ID.

      For example, enter

      psql -U postgres tietodb < D:\sr411\sqlscripts\sr411_fix_swapped_disk_cdrom_with_size_with_disk_with_no_size.sql
    3. Repeat Step 2.a and Step 2.b for each disk ID entry in turn.

      If you are using the single-VM-at-a-time process only to verify the outcome, remove the disk IDs for the corrected CDROMs from the results.txt file, then run the script for fixing all entries in a single run. See Step 2 in the fix-all procedure.

11.2 Configuring Maximum Number of VMs for a Business Service

Cloud Manager 2.5.1 Patch 2 provides a new option that enables you to configure a global setting for the number of workloads you can assign to a Business Service.

You can limit the number of VMs allowed to be configured for a Business Service by setting a global system setting in the System Configuration dialog. The default value is 1000. This value is intentionally set to a high value to allow any practical number of VMs to be added to a Business Service.

Setting a limit is optional. You can specify a smaller value to enforce consistent maximum values and to improve performance in your environment. Specify a value based on your operational needs and performance characteristics of your deployment.

To specify a maximum number of VMs for a Business Service:

  1. In the System Configuration dialog, select User Interface.

  2. Under Business Service Dialog, specify the maximum number of workloads to allow users to configure for each Business Service.
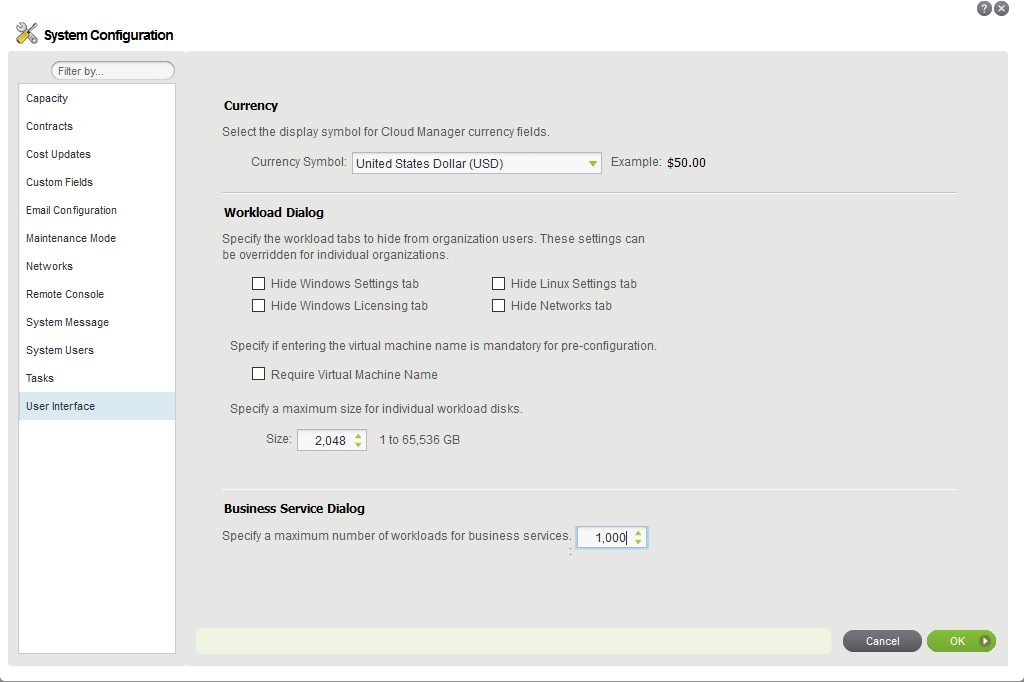
  3. Click OK to apply the setting.

12.0 Previous Releases

For documentation that accompanied earlier releases, visit the Cloud Manager Documentation website and scroll to Previous Releases.

13.0 Contacting Micro Focus

We want to hear your comments and suggestions about this document and the other documentation included with this product. You can use the comment on this topic link at the bottom of any page of the online documentation, or send an email to Documentation-Feedback@microfocus.com.

For specific product issues, contact Micro Focus Support at https://www.microfocus.com/support-and-services/.

Additional technical information or advice is available from several sources:

14.0 Legal Notice

For information about legal notices, trademarks, disclaimers, warranties, export and other use restrictions, U.S. Government rights, patent policy, and FIPS compliance, see https://www.microfocus.com/about/legal/.

Copyright © 2018 NetIQ Corporation. All Rights Reserved.