6.3 Adding a Cloud Bridge External Repository
IMPORTANT:The Cloud Bridge external repository is applicable only for Advanced Authentication as a Service (SaaS).
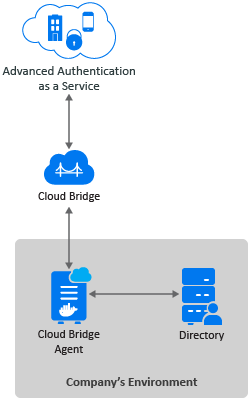
In Advanced Authentication as a Service environments, Cloud Bridge act as an identity transfer bridge between Advanced Authentication in the cloud and data sources in on-premises environments. The Cloud Bridge retrieves the identify information from the on-premises repositories and makes this data available periodically or on-demand requests to Advanced Authentication.
The Cloud Bridge Agent is the entity that responds to the Advanced Authentication collection and fulfillment commands and directs them to the proper data source for execution. To collect data from multiple on-premises repositories, you need to install a Cloud Bridge Agent in each on-premises repositories.
To learn the benefits of Cloud Bridge, see Understanding the Benefits of Cloud Bridge.
Repositories
To add a Cloud Bridge external repository, perform the following steps:
Before adding a new Cloud Bridge repository, ensure that you have the privilege to use the Cloud Bridge. Once you have the privilege to use Cloud Bridge, the Cloud Bridge Client(s) list will be displayed in the as in Step 6b. If you do not have the privilege to use Cloud Bridge, wait for the NetIQ operations team (Center of Excellence or CoE) to entitle you or contact CoE.
-
Click .
-
Select an applicable repository type from the list. The supported options are:
-
for Active Directory Domain Services.
-
for NetIQ eDirectory.
-
-
Specify the name of the repository in .
NOTE:For AD repositories, the name of the repository must correspond to the domain NetBIOS name.
-
Specify a container for the users in . When you select the option, Advanced Authentication performs a search for the users in all the child nodes. You can change the search scope by selecting the option.
-
You can specify a container for the groups in . When you select the option, Advanced Authentication performs a search for the groups in all the child nodes. You can change the search scope by selecting the option.
-
Add external server configurations:
-
Click .
-
Select the required client URL from .
-
Select the required data center from .
This list allows to add multiple domains.
-
Specify a local IP address of the LDAP server in .
-
Specify the port number of the server in . For example, 389.
-
(Optional) Enable to ensure that the LDAP connection to the appliance is secured with a valid self-signed SSL certificate. This helps to prevent any attacks on the LDAP connection and ensures safe authentication.
NOTE:If is enabled, you need to upload the LDAP CA certificate.
-
Click the save
 icon next to the server credentials.
-
-
If is enabled for the external server, click in , and select the certificate file from the local drive.
-
Open if you need to view the following details:
-
: It lists the available datacenter.json files. You can select the required Agent ID to view the corresponding datacenter.json information.
-
Select the required Client URL to view the available Client URL.
-
-
Click .
To understand the prerequisites and install procedure of installing Cloud Bridge Agent, see Installing the Cloud Bridge Agent.
You can perform the following to manage the Cloud Bridge external repository: