1. Introduction
This guide describes the RESTful APIs supported by the NetIQ Access Manager components. It includes step by step instructions for using these APIs.
Note: NTS will support the general Access Manager setup and any issues where the Access Manager endpoints do not return valid data. Any other code changes needed to integrate with Access Manager are outside the scope of traditional NTS support and need to go through the namsdk@novell.com channel.
2. API Overview
The APIs supported by the Access Manager can be broadly categorized as:
- Administration APIs
The administration APIs help to automate the common administrative tasks. The Administration Console exposes these APIs. They are available in the Access Manager 4.2 release.
- OAuth and OpenID Connect APIs
These APIs expose all the OAuth functionality as endpoints for registering clients, obtaining access tokens, and so forth. The Identity Server exposes these APIs. They are available from the Access Manager 4.1 release.
- Component Statistics APIs
These monitoring APIs provide the statistics of the Identity Servers and Access Gateways. These are exposed by the individual devices. These APIs are a precursor to the Administration APIs for obtaining the device statistics. These continue to be available, but it is recommended to use the administration statistics API instead, as a single API provides details for all the devices.
The following sections provide in depth details about these APIs.
3 Administration APIs
3.1 Accessing the Administration APIs
These APIs are supported by the Administration Console. You can invoke these by using a browser or by using curl command in scripts to help automate the administrative tasks.
Base URL: https://<Administration Console DNS or IP>:<AC Port>/amsvc/v1/…
The AC port will be 8443 by default. However if the Administration Console is installed along with an Identity Server on the same system, then the port will be 2443.
Authentication: The APIs are protected by using Basic Authentication. You can use the Administration Console credentials for accessing the APIs as well. However, the API access differs in the following ways from the Administration Console:
- The username for accessing the APIs should be specified in the fully qualified format.
For example, “cn=admin,o=novell”
- The user should have full admin rights to the Administration Console. These APIs do not support delegated admin access in this release.
Response Format: It returns the data as XML by default. Set the Accept header to “application/json” to obtain the response in the JSON format.
3.2 Detailed API Documentation
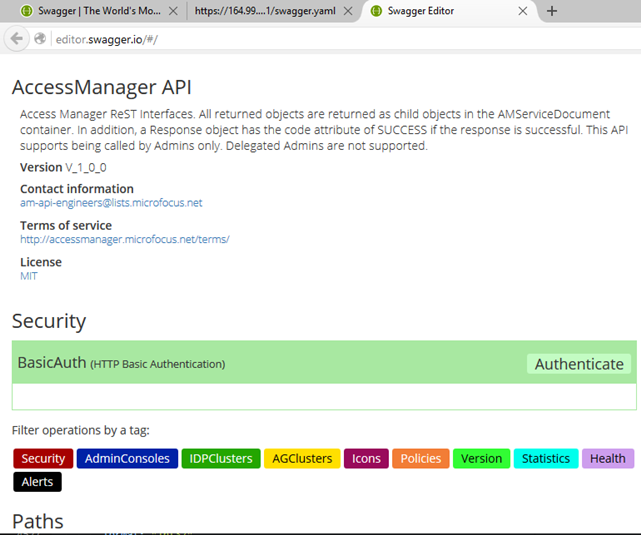
Detailed documentation for all the Administration APIs is available as a YAML file on the Access Manager SDK website. It is also hosted by an installed Administration Console. You can view the YAML file in a user-friendly format using the Swagger UI tool.
Steps to view Swagger documentation:
1. Get the YAML file from the SDK site or from an installed Admininstration Console as shown below.
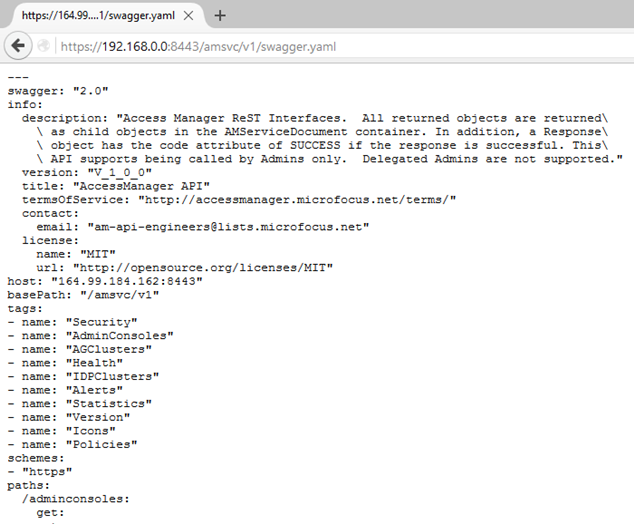
2. Copy the content displayed on to the Swagger UI at http://editor.swagger.io
3. The Swagger tool parses the YAML input and generates an interactive documentation UI, client SDK, and so forth.
3.3 Administration API Use Cases
3.3.1 Get Device Health
This API returns the health of all the devices (Identity Servers and Access Gateways) in Access Manager. The health is returned for various levels - for the entire Access Manager, for every cluster, every device, and every service/component (remote web servers, data stores, and so forth).
This API can be used for integration with external systems like NOC to view the status of Access Manager devices and the remote web servers.
Sample Request:
Invoke a URL like https://192.168.0.0:8443/amsvc/v1/health?expand=4
The ‘expand’ parameter specifies the level of detail to be returned. Accepted values are 1,2,3 and 4, where 4 returns the maximum detail for all the devices.
Sample Response:
<amService xmlns="urn:novell:schema:am:service">
<health status="noReport" uri="https://192.168.0.0:8443/amsvc/v1/health">
<idpClusterHealthList status="Green" total="1">
<clusterHealth status="Green" uri="https://192.168.0.0:8443/amsvc/v1/idpclusters/SCC7c9nsp/health">
<instanceID>SCC7c9nsp</instanceID>
<displayName>IDPCluster</displayName>
<deviceHealthList total="1">
<deviceHealth status="Green"
uri="https://192.168.0.0:8443/amsvc/v1/idpclusters/SCC7c9nsp/devices/idp-CC1B3FFB0BC40AD8/health">
<instanceID>idp-CC1B3FFB0BC40AD8</instanceID>
<displayName>192.168.0.6</displayName>
<serviceHealthList total="5">
<serviceHealth status="Passed">
<serviceName>Config Datastore</serviceName>
<message>Operating properly</message>
</serviceHealth>
...
Note:
This API returns the health information saved in the Administration Console. This data is refreshed every 5 minutes. Therefore it is sufficient to invoke this API every 5 minutes to get the latest health.
3.3.2 Get Device Statistics
This API returns the statistics for all the Identity Servers and Access Gateways in Access Manager.
Sample Request:
Send a GET request to a URL like https://192.168.0.0:8443/amsvc/v1/statistics.
Sample Response:
<amService xmlns="urn:novell:schema:am:service">
<response code="SUCCESS"/>
<statistics uri="https://192.168.0.0:8443/amsvc/v1/statistics">
<idpClusterStatisticsList total="1">
<clusterStatistics uri="https:// 192.168.0.0:8443/amsvc/v1/idpclusters/SCC7c9nsp/statistics">
<instanceID>SCC7c9nsp</instanceID>
<displayName>IDPCluster</displayName>
<deviceStatistics uri="https:// 192.168.0.0:8443/amsvc/v1/idpclusters/SCC7c9nsp/devices/idp-CC1B3FFB0BC40AD8/statistics">
<instanceID>idp-CC1B3FFB0BC40AD8</instanceID>
<displayName>192.168.0.6</displayName>
<statisticList total="90">
<statistic displayName="Cached Sessions">100</statistic>
<statistic displayName="Historical Maximum Logins Served">890</statistic> ...
Note:
This API returns the statistics information saved in the Administration Console. It is refreshed every 10 minutes. Therefore it is sufficient to invoke this API every 10 minutes to get the latest statistics.
3.3.3 Refresh Metadata of SAML 2.0 Trusted Providers
Trusted providers periodically refresh their metadata. Some metadata repositories like InCommon.org publish an updated metadata every day. Therefore an automated approach for refreshing the metadata of all the service providers and updating the associated trusted root certificates helps relieve the administrator of this frequent chore and also ensures that the system is up to date for security reasons.
Steps:
1. Invoke the API to get the Identity Server clusters. Parse the response to get the cluster URL.
Sample URL: https://192.168.0.0:8443/amsvc/v1/idpclusters
Response:
...<idpCluster uri="https://192.168.0.0:8443/amsvc/v1/idpclusters/SCC7c9nsp"> ...
2. For each cluster URL, invoke the API to get the list of service providers or identity providers, depending on the provider that needs to be refreshed.
https://192.168.0.0:8443/amsvc/v1/idpclusters/SCC7c9nsp/serviceproviders OR
https://192.168.0.0:8443/amsvc/v1/idpclusters/SCC7c9nsp/identityproviders
3. Parse the response to get the URL of the trusted provider to be updated.
Response Snippet:
<serviceProvider uri="https://192.168.0.0:8443/amsvc/v1/idpclusters/SCC7c9nsp/serviceproviders/STSPr9spkh">
<displayName>of365</displayName>
<protocol>saml2</protocol>
...
4. Invoke the metadata refresh API to apply the updated metadata as explained below.
5. Invoke the trusted roots API to add the root CA of the signing certificate specified in the metadata. This step is only needed if the certificate has changed. For more information, see the next section.
6. Invoke the Apply changes API to send these changes to the Identity Servers in that cluster.
Send PUT request to the cluster URL https://192.168.0.0:8443/amsvc/v1/idpclusters/SCC7c9nsp/
with input
{ “update” : “all” }
Sample Script
A sample script that implements all the steps listed above is available on the NetIQ Cool Solutions website.
Sample Request:
URL format: <trusted provider URL in step 3>/metadata
Send a PUT request to https://192.168.0.0:8443/amsvc/v1/idpclusters/SCC7c9nsp/serviceproviders/STSPr9spkh/metadata with metadata as input. Metadata can be specified as a text or a URL.
Sample text input: (Note: metadata text must be URL encoded)
{
"metadata" :
"%3C%3Fxml%20version%3D%221.0%22%20encoding%
3D%22UTF-8%22%20%3F%3E%3Cmd%3AEntityDescriptor%20xmlns%3
Amd%3D%22urn%3Aoasis%3Anames%3Atc%3ASAML%3A2.0%3Ametadata%
22%20ID%3D%22idXMuLnBrALGXkMAMUXd9WXvS0aEI%22%20entityID%
3D%22https%3A%2F%2Fpriyankasb.blr.novell.com%2Fnidp%2Fsaml
2%2Fmetadata%22%3E%3Cds%3ASignature%20xmlns%3Ads%3D%22http
%3A%2F%2Fwww.w3.org%2F2000%2F09%2Fxmldsig%23%22%3E%0A%3Cds
...............
%3C%2Fmd%3AEntityDescriptor%3E"
}
Sample metadata URL input:
{
"metadata" : "https://164.99.87.129:8443/nidp/saml2/metadata"
}
Response:
200 OK
3.3.4 Import Trusted Root Certificates
You can use this API to import a trusted root certificate. This is usually used in conjunction with the above metadata refresh API.
Sample Request:
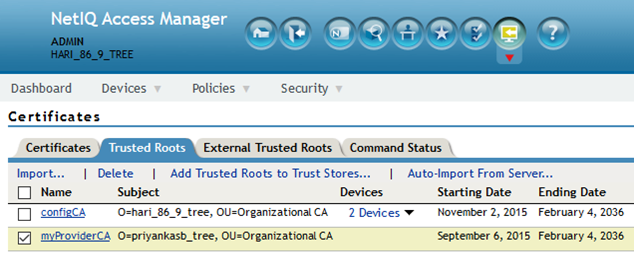
Send a PUT request to https://192.168.0.0:8443/amsvc/v1/security/trustedroots/myProviderCA
where “myProviderCA” is the trusted root name displayed on the Administration Console.
The URL encoded public CA certificate must be specified as input.
{
"certificate" : "-----BEGIN%20CERTIFICATE-----
%0AMIIFNDCCBBygAwIBAgIkAhwR%......
-----END%20CERTIFICATE-----"
}
Response:
200 OK
Note:
· The certificate must be URL encoded
· Apply changes to all the devices that might use this certificate.
3.3.5 Renew Certificates
You can use this API to renew the certificates that are available through the Administration Console. Specify the certificate name and the certificate content as input to the API.
Sample Request:
Send a PUT request to https://192.168.0.0:8443/amsvc/v1/security/certificates/test-signing
with the following input, where the intermediate certificates are optional:
{
"entityCertificate" :"-----BEGIN%20CERTIFICATE-----%0AMIIFDjCCA%2FagAwIBAg
IkAhwR%2F6b94LzCZy%2BK8kSqu-----END%20CERTIFICATE-----",
"rootCertificate" :"-----BEGIN%20CERTIFICATE-----%0AMIIFDjCCA%2FagAwIBAg
IkAhwR%2F6b94LzCZy%2BK8kSqu-----END%20CERTIFICATE-----",
"intermediateCertificate1" :"-----BEGIN%20CERTIFICATE-----
%0AMIIFDjCCA%2FagAwIBAgb94LzCZy%2BK8kSqu-----END%20CERTIFICATE-----",
"intermediateCertificate2" :"-----BEGIN%20CERTIFICATE-----
%0AMIIFDjCCA%2FagAwIBAgzCZy%2BK8kSqu-----END%20CERTIFICATE-----"
}
Note:
1. An update is required for all devices using that certificate. Updating the connector certificate requires tomcat restart.
2. Certificate specified must be the PEM formatted public certificate and must be URL encoded.
3. Entire chain must be specified. Entity Cert à Intermediate 1 à Intermediate 2 à Root CA where à indicates that the Entity certificate was signed by Intermediate 1 and so on.
3.3.6 Manage User Sessions
These APIs allow to fetch and terminate all the active sessions of a given user.
Steps:
1. Invoke the API to get all the Identity Server clusters.
Sample URL: https://192.168.0.0:8443/amsvc/v1/idpclusters
2. Parse the response to get the URL for each Identity Server cluster.
…<idpCluster uri="https://192.168.0.0:8443/amsvc/v1/idpclusters/SCC7c9nsp">…
3. Invoke the URL of a cluster to get the sessions for a user.
URL Format: <IDP cluster URL>/sessions?userid=<user name>
4. Repeat step 3 for other clusters as well, so that the sessions of the same user across all clusters is handled.
Sample Request:
https://192.168.0.0:8443/amsvc/v1/idpclusters/SCC7c9nsp/sessions?userid=admin
Use HTTP GET to retrieve all active sessions for the user ‘admin’.
Use HTTP DELETE method to terminate all sessions for the user ‘admin’.
Sample Response for GET request:
{
"userDN" : "cn=admin, o=novell",
"sessionDetails": { ["identityServer":"192.168.0.6", "sessionCount":"1"],
["identityServer":"192.168.0.7", "sessionCount":"2"]
}
}
3.3.7 Purge Access Gateway Cache
You can use this API to purge the access gateway server cache. Periodic purging of the cache frees up storage. You can select to purge the content of the purge list that has already been configured on the Administration Console or purge all content cached on the server.
Steps:
1. Get the list of Access Gateway clusters
Sample URL: https://164.99.86.7:8443/amsvc/v1/agclusters
2. Parse the response to get the URL of the cluster you want to purge
Sample Response:
<agCluster uri="https://164.99.86.7:8443/amsvc/v1/agclusters/ce035b033e6c7f29">
3. Invoke the URL to get the devices in that cluster
URL format: <cluster uri from above>/devices
Sample URL: https://164.99.86.7:8443/amsvc/v1/agclusters/ce035b033e6c7f29/devices
4. Parse the response to get the URL of the device you want to purge
Sample Response:
<agDevice uri="https://164.99.86.7:8443/amsvc/v1/agclusters/ce035b033e6c7f29/devices/ag-6459CF981F6FD178">
5. Send a PUT request to the device URL with parameters to purge cache. See sample below.
Sample Request:
PUT request to https://164.99.86.7:8443/amsvc/v1/agclusters/ce035b033e6c7f29/devices/ag-6459CF981F6FD178
With input { "purge" : "list" }
Specify “list” to purge the content configured in the Purge List on the UI.
Use “all” to purge the entire cache.
Response:
200 OK
Note:
Clearing the cache decreases the responsiveness of a device, as every page will need to be retrieved. Therefore it is recommended to execute this command for one device at a time.
4 OAuth and OpenID Connect API
This section describes OAuth 2.0 and OpenID Connect implementation for authentication and authorization with NetIQ Access Manager. An application developer or administrator can get an access token from Access Manager and use it in their applications. By default, OpenID Connect is supported in all APIs.
4.1 Step by Step Guide
The following are the steps involved in enabling OAuth2.0 and OpenID Connect for your application:
Register your application in Access Manager.
Get a unique Client Credentials (Client ID and Client Secret) for your application. Implement and invoke appropriate authentication or authorization requests with
necessary parameters by using one of OAuth2.0 Authorization Grant flows. Validate and trust tokens issued by Access Manager.
Invoke REST APIs by using the tokens issued.
Trust the tokens issued by Access Manager in REST APIs by resource servers protecting resources.
4.2 Registering Client Applications
Registering a client application includes the following activities:
1. Get Client ID and Secret
2. Register redirect URI
3.Register Authorization Grants
4. Register OpenID Connect configuration
Getting Client ID and Secret
To get an "Access Token" or "ID Token", the application needs to send Client Credentials. Client Credentials are unique credentials assigned per client application. The developer have to register their application with necessary details into the Access Manager to use any of the following API. The details of how to register their applications are specified in the NetIQ Access Manager Administration Guide. After registering the application, Access Manager will provide "client id" and "client secret". Note these values.
Registering Redirect URI
A valid redirection URI must be registered with Access Manager along with each client application. Access Manager will redirect only to these registered URIs for issuing tokens in the Authorization Code Grant flow and Implicit Grant flow. One of the registered URIs should be passed along with requests in these flows.
Registering Authorization Grants to be used
The client application has to specify which OAuth2.0 Authorization Grant flows the application will use. Access Manager will issue tokens only in the specified flows. Any requests with flows those are not registered during client registration is not supported. You can also modify this information after client is registered.
An administrator of your organization can also disable some of the Oauth 2.0 authorization grant flows to minimize the security risk. For example, an administration can disable the use of "Resource Owner Credential" grant if none of the Oauth 2.0 applications in the organization uses this flow. It is not recommended unless it is absolutely required.
4.2.1 Registering OpenID Connect Configurations
Access Manager supports both Oauth 2.0 and OpenID Connect specifications by default. Typically, OAuth2.0 is used for authorization of applications and OpenID Connect is used for authentication. Oauth 2.0 flow issues a security token called "Access Token" and OpenID Connect issues "ID Token" and optionally "Access Token".
ID Tokens are JSON Web Tokens (JWT) signed by Identity Server and optionally encrypted by client application's public certificate. The relying party can verify the signature of the ID Token and trust that token is issued by trusted Identity Server.
You can register signing algorithm to be used for a JWT token. If your application needs confidentiality of ID Token, provide a publicly accessible URL of public certificate and algorithm in the JWKS format. You need to configure this during client application registration.
4.2.2 OAuth 2.0 Endpoints
To get an Access Token and Identity Token, the client invokes requests to corresponding endpoints exposed by the Identity Server. The Identity Server exposes the following four endpoints:
Authorization Endpoint
Token Endpoint TokenInfo Endpoint UserInfo Endpoint
Authorization Endpoint is always contacted via a browser. This endpoint requires that user has existing browser session with the Identity Server. If no session exists at the time of request, the Authorization Endpoint redirects the user to login. This endpoint is used when the client uses the Authorization Code flow or Implicit flow.
Token Endpoint is used directly by the client without involving the browser. Hence, it is possible to get an Access Token offline when the user is not connected via a browser. This endpoint can issue an Access Token when the client provides either a valid authorization code, resource owner credentials, or client credentials.
TokenInfo Endpoint is used for validating Access Tokens issued in OAuth 2.0 Authorization flows. Clients can send the Access Token via Authorization Header. This endpoint returns a JSON response stating whether the token is valid.
UserInfo Endpoint is used for getting Resource Owner's claims. A client can send a request to UserInfo endpoint with a valid Access Token and get the claims that are authorized by Resource Owner to share. This endpoint checks whether provided Access Token has valid scopes to issue the claims.
4.2.3 Other Endpoints
In addition to the above basic endpoints, the Identity Server exposes the following endpoints: Metadata Endpoint
Client Registration Endpoint
Scope and Resource Server registration Endpoint
Metadata Endpoint exposes the basic services and options available at the Identity Server for OAuth 2.0 and OpenID Connect. This also contains URLs for basic endpoints. This endpoint is typically in this format: https://www.idp.com:8443/nidp/oauth/nam/.well-known/OpenID- configuration. Invoking this URL responds with a JSON document containing the following information:
OAuth2.0 Endpoints
ID Token supported algorithms
JWKS Keys which can be used for verifying ID token
Supported Response Modes, Response Types, and scopes
Client Registration Endpoint is used by developers to register the OAuth2.0 clients through
REST API. This endpoint itself is protected by OAuth2.0 and hence the clients invoking this
endpoint to register clients should obtain Access Tokens from the Authorization Endpoint by providing the developer's username and password. For registering new clients, the developer must have a "NAM_OAUTH2_DEVELOPER" role defined in the Identity Server.
The Scope and Resource Server Registration Endpoint is used to register , modify, or delete a scope. The users who invokes this endpoint must have "NAM_OAUTH2_ADMIN" role defined in Identity Server to be able to register manipulate the scope values.
4.3 Authentication
The application can request an authentication service from Access Manager by using one of the supported OAuth2.0 Authorization Grant flows. Access Manager implements OpenID Connect
1.0 specification on top of these flows, and hence the application can get more information about authentication and it can verify the issued identity tokens.
The result of authentication exchange is an identity token called as "ID Token". This token is in JSON Web Token (JWT) format. This token is signed by public signing certificate of Identity Server. The client application needs to verify the signature of the token and token is issued by the trusted Identity Server.
The authentication service assures the application that user has an active session at Identity
Server with requested or default assurance level. The flows requiring active user session involves a browser redirect and hence the authorization grant flows in this section talks about "Authorization Code Grant" flow and "Implicit Grant" flow. The authentication service can use advanced authentication methods configured in the Identity Server. This does not require the application to know the password of the user. If your application does not depend on a browser interface or handles username/password directly, please refer to "Resource Owner Credential Grant" in section "Other OAuth2.0 Grants" below.
4.3.1 Getting Identity Tokens
You can use any one of the following flows to get an Identity Token:
• Authorization Code Grant Flow
• Implicit Flow
Authorization Code Grant Flow
The Authorization Code Grant is a two step process. In the first step, get a short lived "authorization code" from the Identity Server. In the second step, exchange this "authorization code" with "ID Token". The application can also request for "Access Token" for authorization if the application will make RESTful API calls to resource servers.
The application can also specify minimum assurance level for authentication method from Identity Server by using the below mentioned request parameter. Identity Server ensures that the user is authenticated with the requested level of authentication before sending the Identity Token.
Identity Token is a signed JSON Web Token (JWT). Signing is optional, but recommended. The token will be signed when the client is configured with "ID Token Signing Algorithm" during
the client registration.
The application verifies the returned Identity Token as mentioned in the "Validating ID Token" section.
Getting an Authorization Code
The client can get an authorization code in first step by redirecting the browser to the Authorization Endpoint with the required query string values. See the “Request Parameters” section.
The response is a short life-time code called "authorization code". This code can be used to exchange identity tokens from Identity Server from the Token Endpoint by passing necessary request parameter explained in the subsequent section "Exchanging Authorization Code for Token". The authorization code is sent back through a browser redirect to a registered redirect_uri. The client should handle this request to the redirect_uri. This involves exchanging the code with an Access Token.
Request Parameters
To get an authorization code, the client should invoke a request to Identity Server's Authorization
Endpoint with the following request query string parameters:
Parameter | Required | Value | Description |
client_id | Yes | Client application ID, which is obtained at the time of client application registration | |
response_type | Yes | code | it should be "code". |
redirect_uri | Optional | If provided, the value of this must exactly match one of the registered URIs during application registration. If not provided, the browser will be redirected to any of the registered redirect URIs registered during application registration. | |
scope | Yes | OpenID | List of scopes the application requires. It should contain OpenID". You can get all “scopes_supported” at the authorization server’s OpenID Metadata Endpoint. Scope values should be space separated %20 or +. |
state | Recommended | An opaque value used by the client to maintain state between the request and callback. The authorization server includes this value when redirecting the user-agent back to the client. The parameter should be used to prevent cross- site forgery requests. | |
prompt | Optional | none/login/consent | The values can be either "none", "login", or "consent". none: No user interface will be shown to user if user is not already authenticated. If not authenticated, an error message in one of "login_required", "interaction_required" or other will be sent back to client application. This is useful if client want to detect whether the user has an existing session with Identity Server or not and has necessary consents. : Identity Server will prompt for re-authentication consent: Identity Server will prompt for consent even if consent is already given |
max_age | Optional | 300 | Maximum authentication age at Identity Server in seconds. If the user has not logged in within this elapsed time, the user will be re-prompted for authentication |
acr_values | Optional | /name/password/uri | If client request contains acr_values parameter, Identity Server maps the value to configured contracts in Identity Server and prompts the user with the contract if the user is not already authenticated with the contract. The contract is not sent in ID token in this release. |
Response Values
The Identity Server responds a HTTP 302 redirect message to the requested redirect_uri in the Authorization request . If the request does not contain the redirect_uri param, the Identity Server will redirect to one of the registered redirect_uri.
The redirect response will have the following parameters:
Parameter | Description |
code | An opaque binary token. variable length field. Application should not assume the size of the code and allocate sufficient space for reading the code. |
state | Contains the state parameter sent in the authentication request above |
Sample Request and Response
A sample request with whitespace for readability:
HTTP/1.1 GET /nidp/oauth/nam/authz?
&response_type=token
&client_id=bb775b12-bbd4-423b-83d9-647aeb98608d
&client_secret=bBbE-4mNO_kWWAnEeOL1CLTyuPhNLhHkTThA- rEckyrdLmRLn3GhnxjsKI2mEijCSlPjftxHod_05dp-uGs6wA
&redirect_uri=https://www.oauthapp.com/oauth.php
&scope=email
&nonce=ab8932b6
&state=AB32623HS
User-Agent: Mozilla/5.0 (Windows NT 6.1) AppleWebKit/537.36 (KHTML, like
Gecko) Chrome/41.0.2228.0 Safari/537.36
Accept: */*
Cookie: JSESSIONID=188BAEB80B063C852D2CC82FDBD15A43
Response
HTTP/1.1 302 Found
Cache-Control: no-cache, no-store, no-transform
Location: https://www.oauthapp.com/oauth.php?
code=/wEBAAY..........Ws1gQ~~
&scope=email
Content-Length: 0
Date: Tue, 03 Mar 2015 18:12:55 GMT
Exchanging the Authorization Code with Identity Tokens
The client, listening for the authorization code in the registered redirect_uri, can use the requests explained in next section to exchange the authorization code with an Access Token. The request should be sent to the Token Endpoint.
The response is sent back in the JSON format and contains both access_token and id_token. Access Tokens are used for authorization and typically sent to an API server. The client when invoking any other API service has to include this access token. The API server will validate this access token and authorize the incoming API requests based on the scopes embedded in the access token.
The ID token contains the authentication information such as the issuer of the token, its validity, and when the user got authenticated. The client has to verify the signature of the ID token if present and check the issuer.
Request Parameters
The token request should have the following parameters:
Parameter | Required | Description |
grant_type | Yes | authorization_ code |
client_id | Yes | Client ID of the registered client |
client_secret | Client Secret of the registered client | |
code | Yes | Code received in the Authorization code flow |
redirect_uri | Yes | This should be same as the one sent during the authorization code request |